A walkthrough of how to review and edit customer contact information in a communication center, including how to send emails and texts and manage communication preferences.
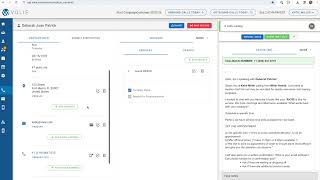
In this section, we're going to review the contact information located within the call, email and text screens. On the far left where I'm circling now, you'll see the name of the customer you are contacting. So in this instance, Deborah Patrick. Below you'll see where it says Miller Honda. This is the rooftop or dealership you are calling on behalf of. Below where it says inactive customers. This is the reason you're calling the customer, also known as the campaign or the call queue. Below you'll see the attempt number. So is this the first or second or maybe third time I'm trying to reach this customer for this particular campaign? Continuing down, you'll see the customer's full name if they're associated with a company, as well as their birth date. If you need to edit any of the information on the contact info, you can click the pencil icon like I did. Next to Deborah's name. Here, you could potentially add a middle name or update with a birthday. When you're finished, click Save. Next, if you'll scroll down, you'll see any home addresses that we have tied to their profile, as well as email and phone numbers. You can also add or edit any of this information. Next to the email, you'll see an envelope icon or a mail icon. This will pop up an ad hoc email inbox where you can type in or send a custom email to this customer. You'll click compose new email, choose who it is sent to. You can also carbon copy or blind carbon copy someone and use the paperclip icon to attach any coupons or flyers. You can then type your message and hit send using the green arrow on the top left. The last section will be any phone numbers associated with the customer. Here it will list any cell phone number or work phone numbers we have tied to this customer. If you want to text the customer while you're on the phone with them, you can click the smartphone icon next to the phone number you'd like to text and it will pop up a texting bubble for you to type out your message. You can then send the text either with the Enter key or using the blue arrow. You'll also have the option to use shortcuts so message templates that are available to text these customers. By selecting one of these templates, it will auto fill the message into the message body, allowing you the opportunity to change it if needed prior to sending to the customer. The last section of the contact info will be the communication preferences on the bottom. Right now this customer has it checked, meaning they are eligible to receive all future communications. If this customer would like to be opted out so that they do not receive any phone calls, emails or text messages in the future, you can simply uncheck that box and will remove them from any future follow up. Sam.