Drawing Flowers in Python
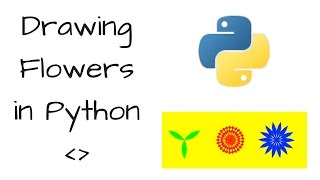
A 20-minute walkthrough of a Python Turtle program that draws three stylized flowers using three core functions: petal() draws circles in a loop, flower() repeats petals at different angles, and move() positions them. Change the parameters and you change the petal count, size, and tightness.
Chapters
Okay, so my task was to draw one of these shapes using Python, and now I didn't exactly draw one of these shapes. I just decided to draw some pretty flowers on my own, which may be a bit easier than drawing something like that or that, but nonetheless, I'll show you what I drew anyway. So we'll just move this off the screen. Here's my code. I'll show you what it does, and then I'll walk, walk you through each of it step by step. So we'll To start off, we'll turn the speed down a little bit. Let's make it 8. Save it. And go up here and go run. Oh, there's an error. This is all live. There we go. Maybe that'll work now. Run. So, we've got a little turtle there. Using the Python draw function. See, that one drew a flower to start with. Didn't intentionally make it look like that. Then we got flower 2, and then it finishes up with a blue flower. There we go. You get the point. So how did we get from this to this? And now I think the graphics is going to be not responsive. That's all right, we can run it again. So what do we start with? Import turtle. Now why do we import turtle? Because turtle is a library of, let's just call it drawing, a whole bunch of drawing codes that is already inbuilt to Python. So a lot of people have done the work beforehand, and if you download the program, say IDLE, start a new project, new file, import turtle, you'll then have access to all the functions related to turtle. And what do they include? Well, you can go to something like this: Summary of Turtle Methods, interactivepython.org, and it shows you a whole bunch of turtle commands that you can use. So how did we get ours to draw flowers? So step 1: define a function to draw the petal. Now that's what def stands for— define I'm pretty sure it defines a function. So we're defining a function called pedal that takes in 3 parameters: t, r, and angle, and we'll get to those in a second. So within our pedal function, we start a for loop. So for i in range, and now range, essentially what that means is it starts at 0 and it counts to 2, right? So 0, 1, 2. 2. It's got 3, 3 numbers in there. And then for that range, so each time, for each of those 0, 1, and 2, we want to use the turtle. So t in this case stands for turtle. This t up here is, is turtle radius angle. So circle, we want it to draw it at a radius of r, and we'll get to where r comes into play in a moment. At an angle of angle, and then after, after it's done that drawing a circle, we want it to turn— turtle to turn left, so t.left. So just think of all the t's here. And now I've typed this short as turtle, so t equals turtle. You could even comment that at the top. T turtle. Not— my code's not the cleanest stuff, but I'm slowly learning and getting better, getting better every, every day, I hope. So t.left at an angle of 180 degrees minus angle. So that's our angle here, because if we turned left at 180 degrees, it would draw some weird shapes, whereas we want it to turn left at a particular angle. So we get the shape of a flower. So we define the petal function. Next, we define the actual flower function. So this takes in a parameter t, turtle, n, which is a specific amount of times— we define that later on— uh, r for the radius, and the angle again. And now it's going to be the same as these two values: r, angle, and t. The only thing different in here is the n it takes in. And now the n, we'll get to in a bit, is the number of petals that we want our flower to have. So for i in range, why are we using n? Because as I said, that's the number of petals we want to use. So that's how many times we want the petal to be drawn. So in range, run the petal function. So we're calling in petal here in within the flower function. And we want it to— after it's, after it's drawn an individual petal, we want it to turn left 360 degrees divided by n. And now remember, n was the number of petals that we wanted to draw. So why is it 360 degrees divided by n? Well, because we want our flower to eventually look like a circle. So we divide the degrees in a circle by the number of petals we want, aka n, and then eventually it will turn into a flower with the shape of a circle with the number of petals n making up that, that circle. And now we define movement here, and so it takes in a t, so the turtle, and length, which is how much we want it to move, so a number of pixels on the screen. And now I put this in here, we'll get to that in a second, to give the background color, to give the screen a background color. So window turtle.screen. Again, this could be just t if we wanted it to, but we'll leave it as turtle for the time being. turtle.screen, window.backgroundColor, bgcolor takes in a color here, argument— no, parameter, sorry. Now this could be blue, but we won't do blue because our flower, one of our flowers is blue. And so when we run the move function, we want the turtle pen pu. So what does pu stand for? So we come back to here. Pu is short for pen up, so it picks the turtle's pen up, so it won't when the pen's up, it won't draw. Similar to pen down, puts the turtle's pen down because turtle essentially, remember, is just a drawing function and it's, it's a pen. So pd, pen down, drawing. pu, pen up, not drawing. So we want to pick the pen up, to move the turtle forward a specified length, and then to put the pen down and start drawing. So here's where we define our turtle. Now I've called mine Sam. This could be whatever you want. It could be Bob, could be Charlotte. The name doesn't really matter. We're just giving the variable a name. And now Sam equals turtle.Turtle. And what does this mean? Well, we're calling, we're calling in the turtle function up here from the turtle library to say that the variable Sam will be a turtle, aka a drawing function. And now we can adjust some of— this is where we get the turtle or the pen to start drawing. And now we can find the speed of the drawing. The speed, I think, I'm not sure, I tried it at different speeds. I tried 100 and it goes very fast, so we'll try that in a second. But essentially 1 is the fastest— or slowest, 0 won't move at all. But for this sake, to make it fast, we'll go 100. And now to draw our first flower, we've got sam.color green. Now you can probably guess that this means that the— this flower is going to be green because we're calling the turtle, we're giving it a value of green, and now this sam.shape turtle, this could— if we delete this, let me just show you what that comes out as. So see how there was an arrow just drawing? That went really fast because I had it on 100 speed. If we go back to having turtle there, it'll use a turtle to draw the flowers an arrow. Now, I'm not sure why this, this keeps crashing, but let's get out of there. Alright, so move Sam -150. Now that means that from the start I'm calling the move function here and I'm putting in Sam, which is the turtle, and then the amount I want it to be off-center. So it's going to move along the x-axis -150 pixels from the center. So what does that look like? Well, when we draw our green flower, see how the green one's not in the center, the red one's in the center? Because we're shifting it across from the start. So we're moving it from the start because the turtle, when it, when it starts by default, will start in the center. And then why are these two We have a red one that's drawn with outline, a blue one that's drawn with outline, and then a green one that's drawn with fill. Well, because on the green one we have these two commands here, begin_fill, end_fill, but we'll get to those in a second. Let's talk about this flower command here. Flower function, more, more would be more correct term. So if we go up here, def flower define flower function takes in a parameter turtle, n, r, and angle. So here's what we're doing here, we're entering these values. We've got flower takes in the t value Sam with an n value of 7, with an r value of 60, and an angle value of 60. So see there, t Sam, n 7, r 60. 60.0, angle 60.0. And so let's have a look how these relate to our drawings. So if we go over here, 7 will be the n. So essentially it's going to draw— it's going to run this petal function here n amount of times. So what do you think if we were to run the petal drawing function 7 times, we should result with— we should end up with 7 petals, right? So 1, 2, 3, 4, 5, 6, 7. Perfect. That's what we want. Now, what happens here? What's the r? So that's the radius. So that's 60 pixels. So the radius here of a flower petal 60 pixels, and then the angle it turns is also 60. And so that's, that's how we get this curvature up here rather than it being a circle, because remember, up here we're taking in r and angle. And why, why does it complete— why all the petals in even, even spacing around each other? Well, because remember, we've when we finish drawing each individual petal, we run t.left at an angle of 360 degrees divided by n. So what is that? So if we go here, 360 divided by 7, 51. So each one of these petals is at an angle of 51 degrees. And then we repeat the process here for the red flower and the blue flower, except the red flower has 10 petals and the blue flower has 14 petals. And they have— the red flower has a radius of 40 pixels and the blue flower has a radius of 70 pixels. So what happens if we change this number to like 100, and let's say this one to like 25 on the red flower? Let's have a look what happens. There we go. So now the flower has 25 petals, as you can see, and each of them has a radius of 100 pixels, and— but the angle is still at 80. So what if we change this to maybe 30, and let's see what happens. Ah, there we go, it turns a lot tighter. Let's change this to 30. Maybe I got the angle and radius mixed up. Ah, it's the width of the petal. There we go, that's cool. So across, so rather than from here to here, it's from here to here. Now, have we covered everything? Oh yes, the fill. So why is this filled in and this is not? Well, with, with the turtle function, there's a begin fill and an end fill command, as you'll find over here. On this summary of turtle methods. So begin_fill— remember the starting point for a filled polygon, aka where did you start drawing. end_fill— close the polygon and fill with the current fill color. So the end_fill— and why do we run it? Why do we run these functions above and below the flower function? Well, because begin_fill is going to remember where the turtle initially started. So let's turn this right down. To, let's say, 1. And then the end_fill is going to remember where— let's go a bit higher, let's go maybe 2. We don't want to be waiting too long. And then the end_fill is going to be— is going to remember the final point of where the turtle was, and then it's going to backfill the entire drawing with the color you had been using. So in our case, green. Let's, for demonstration's sake, just change this to blue. Just so you can see that the color can change. So nice and slow, the turtle started off in the middle point. It's going to draw 7 petals here because we've got 7 here. It's going to draw each of them with a radius of 60. Ah, there we go, the end fill. So right on the last point, it remembers where it finished and where it started and fills the rest of the shape with with the color you were drawing in. So let's, let's do the same for the other two. sam.beginFill.end See how it's going very slow? It's because we've changed our speed to 2. For this next demonstration, I'll make sure I put it up to like 100 or something like that again. Alright, now if this all works correctly, we should have all of our flowers filled up with their specific color. Let's change this one back to green. And let's run for one last time. Nice and fast. Oh, look at that pretty pattern. There we go. So that is a quick and easy way of drawing some shapes in Python using the turtle feature, defining a whole bunch of functions. So we've got 1, 2, 3 functions here. And then we're calling them. Flower, we're calling and adding in the parameters here, and within the flower function, we're calling the petal function, which we've defined up here. And then before the flower function starts to, to go, we're calling the move function. And so everything works from top to bottom, so it's going to start off by defining Sam because if you imagine there's a line here, we define all of our rules first, and then we start to write what we want, what we want to happen. So we define Sam as the turtle, aka the drawing parameter, and give it a speed, and then we give it a color, give it a shape. Now, this shape can be a number of different things. Turtle is, is a fun one. We call the move function, so rather than the green flower starting in the center, we move it across a little bit. And then we begin the fill in the position where the turtle ends up, so -150 pixels from the center. And then it starts to draw the flower with these parameters that we've defined up here. And then it ends the fill and colors the flower in green. Then we repeat the process for the red and the blue flower, and we're done. We get some, some pretty shapes. So that's my brief explanation, or well, not fairly brief. I'm finding this video is going to last 20 minutes now, but that's essentially how I did this project on Udacity. And how did I do it? Well, I did like a whole bunch of Googling. You can see I've got some websites here with Python code, example of how to use Turtle, and then I just chopped and changed the code to suit me. But the project asked me to draw one of these shapes and I ended up with wherever they've gone. It's lagging out. But yeah, hope you gained some value out of this. If you haven't, well, then I'll keep making more videos and hope you get more stuff out of that. But I'll I'm rambling now, so I'm gonna get back to the next project and I'll record that when I'm doing it, and then we'll see where we end up. So, I'll catch you later. Thanks for watching.
More from Daniel
Small Language Models (SLMs) Are the Future: Fine-Tuning AI That Runs on Your iPhone

Introducing Sunny - A MedGemma-Powered Skin Health Tracking App (Kaggle Competition Entry)

Benchmarking: NVIDIA DGX Spark & NVIDIA RTX 4090 | Part 4 - Comparing the results

Benchmarking: NVIDIA DGX Spark & NVIDIA RTX 4090 | Part 3 - Running LLMs on the RTX 4090

Benchmarking: NVIDIA DGX Spark & NVIDIA RTX 4090 | Part 2 - Formalizing the tests

Benchmarking: NVIDIA DGX Spark & NVIDIA RTX 4090 | Part 1 - Creating a series of tests


Local Multimodal RAG on the NVIDIA DGX Spark | Part 4 - Publishing our demo to Hugging Face


Local Multimodal RAG on the NVIDIA DGX Spark | Part 3 - Putting it all together