I got my machine learning model deployed! | Airbnb Amenity Detection Part 8
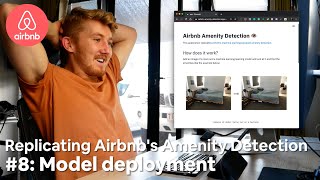
A machine learning engineer deploys a RetinaNet model trained to detect Airbnb amenities as a public web app using Streamlit and Google Cloud. The model runs on a hosted URL and identifies objects like beds, pillows, and countertops in photos, though the live demo shows some predictions fail intermittently.
Chapters
We have come so far. It is getting, we are getting right to the tail end of this 42-day project. It's like day 38 or something. I don't actually even know. All I know is I'm gonna keep going until this model is deployed in a little app that you can access and take a photo and use Airbnb's amenity detection on some room in your place. Let's check the whiteboard. We come over here. Last week was week 5. So it has deploy and make accessible. Can someone use it? We haven't done that yet. So that's gonna move over to week 6. 6. REST API minimum, I have a feeling that might not be just the minimum for this, for this. So we might adjust that, but start scaling up modeling and finish modeling. Those two can be ticked off. How exciting. Welcome to what could be potentially the last video in this 42-day project series replicating Airbnb's amenity detection. We are up to part 8 or maybe part 9. I'm not entirely sure either. I'm not really keeping track of the numbers here, Anyway, what can we call this one? Deployment. Roll that intro. Let me show you what I'm up to, or at least what I plan to get done in the, in the coming week. We're going to go basically until the model is deployed. So that is our minimum viable product. So we're going to go through a few things in this video, but let me show you. It's week 6. So the start date was yesterday. It is the 1st of April, 2020. I'm going to go to about probably like the 5th of April or something. We'll wrap this up. And I've got a fully trained model living in a Google Storage bucket. Yes, that is correct. There is room for improvement, but I suspect it's only marginal unless I had more data. So this week I'm going to be deploying my model and building a small application around it to replicate some basic features you'd expect it to do, adhering to to the criteria I set myself at the start of this project. So it needs to be accessible to someone on their mobile device. For example, can someone take and upload a photo of their room and my model, my deployed model finds the amenities in that room based on the machine learning model that I've used? Okay. Beat or at least equal Airbnb's MVP. We haven't quite done that, but that's okay. We've got a few other criteria, but let's go back to see what we're trying to do for this week. So make model accessible to the public. Yes. Build an application around the model using Streamlit. I am so excited to be using Streamlit. Let's have a look. We've got it up here. Streamlit is the fastest way to build custom ML tools. So look at this. We're going to be diving deep into this. I'm not going to show you too much. You can check out the link in the description on what Streamlit actually is, but it just allows us to build a machine learning application or, or an app or a tool of some sort around our data/model. So I haven't used it before. I'm really excited to start using it. Clean up the GitHub and Google Cloud Storage bucket. Again, I want this to be, once this project is wrapped up and done, I want it to be all available in GitHub. And so that way you can replicate it on your own and just get the exact same results that I did. But that's enough talking for now. I gotta get back and do, continue to research Streamlit, clean up my modeling code, and build some inference functions. I'll come back once we've got some inferencing happening. I'm so excited. We've got a little inference function. You ready to test it out? Oh, my tongue's a bit numb. I've been drinking a lot of water with ice. So what it does is it's just called make inference. It takes an image, a model config file, which is like a YAML file, which basically just defines the structure of a model. It takes the model weights, which is what the model, the patterns the model has learned, threshold, which it can be between 0.1 and 1. Now, the higher the threshold is, how confident the model is in a prediction. We'll see that in a second. It's going to draw, say for example, the, the image that we take a photo of has 5 objects in it. It's going to draw n 5 onto that image. Now, it may not always— there's a caveat here— an image image may not always have 5 objects in it. So I need to figure out a way I could potentially fix this up. And if the 5 objects don't reach over a certain threshold, they won't be drawn on the image. And then if you want to save the image to file with the, the boxes drawn on, you can put save equals true. So then it comes here, creates a detection2_config, merges the model config, sets up the model weight, sets up the threshold, And then it uses the Detectron2 Visualizer and DefaultPredictor classes to make a prediction on an image. And the Visualizer helps us draw on an image. We come down here, draw instance predictions. So you ready? Let's try it out. I've just set up a little random sample here to go through my validation images, uh, which is just a list of dictionaries. It's going to pick one randomly. It's going to get the file name from it. I've got them set up here. Val_test. They're all of the, the validation and testing images are in that folder. So fingers crossed, this should pick a random image from our validation and test set, make some predictions on it using our trained model. As you can see here, there's a config file. We've got retinanet_model_final_config and retinanet_model_final.pth, which is a PyTorch model file. Because that's what Detection 2 is written in. So you ready? Let's do it. Come on. Oh, look at that. We zoom in. So remember, it's predicting 5 different instances. So we got fireplace. That's pretty good. It's got oven, couch. Oh, that's a mistake. Coffee maker. I mean, you could, you could potentially say that it's a coffee maker. Let's try again. Sofa bed, nice. Television, beautiful. Oh, it's picking up a television in the back there. Maybe that's a couch. No, not really. Gas stove, wow. Countertop, okay, that's pretty good. One more for good luck. Mirror, okay, lots of predictions on mirror. All right, why not? One more. Porche. Well, we're gonna have to do some playing around with this, but the real test will be on a custom image, so Let's take some photos of my bedroom and somewhere out there and see how it goes. First of all, we get a shot of the bed. Very nice. Now we go out to the little kitchenette out here. This might be interesting. There's a few things here. Let's see if we got— should pick up that microwave. Couple photos for good luck. Let's test them out. Okay, we've got some custom images. Let's get them AirDropped over to the Mac. Go here. Wonderful. There we go. Oh, they might have to be converted to JPEG. I wonder if I can just change the extension here. So JPG, because HEIC is like some weird Apple extension that might not work, but I definitely know that my model works with JPEG, so I'm going to just change them both to JPEG. And we might change this one. Which one's this one? There's a photo of the kitchen, so we'll change this to kitchen, and then this will be bedroom. All right, you ready? Make inference. We'll start with the bedroom. Fingers crossed this works. Oh, what's happened here? Visualizer, none type. It's always with the live demos. I wonder if it works on PNG. Yes! Look at that! How cool is that? There's my fridge. There's my microwave oven. Countertop and sink. Wonderful. Okay, we might do the same for the bedroom image and change this to bedroom. Is this going to work? Oh, look at that stairs. It's treating my door as stairs, but that's not too bad. We've got a bed, we got pillows. Wow, it even got the pillow that was underneath the top pillow. That's pretty darn good. Okay, that's actually really exciting. You know when you, you see machine learning models working on some demonstration and it's like, yeah, that's really cool. But then as soon as you use your own data, everything's way cooler. So I'm going to figure out— now that I've got the inference code ready, I'm going to figure out how to put that into an app built with Streamlit, which is what we talked about before. But then once I've figured that out, I'll come back and show you what I've made. Well, we should have had it well and truly deployed by now, but we are still trying to do it. As you can see by here, I've got— I've been going through the, the Google documentation because I'm trying to deploy it to Google Cloud. So using Google's App Engine to deploy my small Streamlit app. Now, testing and deploying your application. What do we got here? Pushing and pulling images. Google App— G Cloud App Deploy, Docker. So I've been learning about all these new technologies and new ways to, to basically push apps to deployment, machine learning apps. I built a small Streamlit app, the predictions are working, which is very, very exciting. But how do I get that public? So I read some blog posts on how to deploy, how to deploy your Streamlit application to Google Cloud. And because I figured out Because my application requires a trained machine learning model, which is a fairly large file, it's like 400 megabytes or something like that, I needed to create a Docker image and then host that on Google Cloud's container registry. And then I'm just about to try and push it now, as in deploy a Google Cloud app using App Engine using a hosted Docker image, because if I built the Docker image during deployment it would take too long and I would get a deadline exceeded limit, which I think the deadline is something like 10 minutes. If it takes longer than 10 minutes to build, no bueno. So I've got a line of code here that I'm gonna run. I've got a whole bunch of notes, as you can see here, what I've, what I've created, my Docker image, rebuilding environment from scratch, getting app up and running locally in bare-bones environment before moving to GCP. So that's what I did. I got it up and running in a bare-bones environment environment. Now I'm trying to move it to GCP. Deploy to Docker using a hosted image. Let's try this out. Let's run it and we'll see what happens live. You ready? There we go. gcloud app deploy image-url gcr.io/airbnb_amenity_detection. There's my Docker image that I've created, which has basically sucked up all of my local environment things, information about my app that's running locally, and hopefully it deploys it to Google Cloud. If not, well, we'll figure it out. This might take a little while to build. This is the first time I've run this, so hopefully it works. Fingers crossed. Let's channel the, the code gods. Now I may have to speed this up a little because I, I don't know how long it's going to take. If this works, my app should be accessible at this little URL here. AirbnbAmenityDetection.appspot.com. All right, we're getting an error. We have— at least we've got an error, that's pretty good. Code VM disk full, no sufficient free disk space. Oh damn it! Please increase your VM instance disk size in the disk size. Well, in the resource setting in the app.yaml. Okay, I'll do that and then we'll come back. Let's try again. We've upped the disk size to 50 gigabytes. The default, I believe, was 10, so hopefully 50 gigabytes is enough. I've also upped it to have 2 CPUs. I actually don't know if that'll make a difference. The default is 1, and I've ups— upped the RAM to be 2.3 by going through this little, uh, this little equation. So hopefully that, that is enough. We might need to change these settings. Here we go. What's happening here? Oh my God, deployed service to— are you ready for this? Let's get Chrome up because Brave is a bit, uh, antsy pantsy when it comes to development tools. So here's one. Hopefully this is still running on localhost. So this is my localhost. There we go. This is what it should look like. Let's see, will it? It's saying that it's deployed to Google Cloud. Let's see what happens. Oh my goodness. Oh, that's localhost. Boom. Kitchen. Damn it! I think I know what's wrong here, but that's good news. Look at that, that's running locally. I mean, that's running— oh, no way! Tell me this is going to work. It's running on the CPU, so the detection is going to take a fairly long time. I can't believe this is uploaded and working. No, it's printed out the wrong thing. What about if I did, uh, this one? But this is so amazing. Look at— if I go here, rerun, there's something that's happening here that's not letting us do it. But this is running on Apps Script. Let's check if it works on I'm going to copy this, run it on my iPad. No way! Check this out. Fish on! We're running live there. Airbnb amenity detection on the iPad. Deployed! Now we just got to fix this up. So I'll be back when that happens. Well, after a 3-hour livestream on Twitch, we finally got the model deployed. Boom! Deployed! I think it worked. Yes! I was getting so excited to read this. We'll read that later, but let's copy. Or maybe if I refresh this, so take a note of what this looks like because this might be, this might be deployed. We might be able to take this as a clip and put it into the YouTube video summarizing this. You ready? 3, 2, 1. Oh, look at that! Look at that! Which I'm so, so excited about, but that doesn't mean it's not without any errors. So we've got it deployed locally here. This is a localhost:8501, which is what Streamlit's default is. So I've got some, some information here. How does it work? Then an example of what's supposed to happen, a place you can upload your own image. How was this made? And then just a link to all the other videos and code and whatnot. And you can see this app is only 169 lines of code and it's all of this. I mean, it could be far less. There are 30 lines dedicated towards this list of classes. I could make it better, but my goal here was to just make it accessible. Um, and so here it is deployed on AppSpot, which is Google's App Engine. So airbnb-amenitydetection.appspot.com. So you can try to go to this URL. It'll be linked below. If it's still live, I might have taken it down because it cost too much or whatever. So let's refresh this and see if it works. We'll see what happens with the local version. So we're localhost here. Browse images, bedroom.jpg. So this is just going to be this photo. It should show me. Yes, there's my uploaded image. I can now select the number of boxes I'd like to draw, a.k.a. the number of amendities I'd like to detect. At the moment the default is 5, let's just leave it at that. And we're going to make a prediction. So this is my machine learning model running on it. As you can see there, it's going to load in a checkpoint from retina_net_model_final.pth, which is a saved PyTorch model. And there we go, it's detected some amenities and it lists out the 5 amenities that's detected here: bed, pillow, pillow, countertop. Uh, kind of correct, kind of not. Couch. That's correct, with all my washing on that couch. Now if we go to the deployed version of it, does it work the exact same? So let's go here, browse. We'll upload the same image. So remember, this is running on a web server. Now this is what happens. Sometimes it works, sometimes it doesn't. I don't exactly know why because I'm still new to, to this sort of stuff. I'm still new to using Streamlit. So let's try again. Usually what it takes is a rerun, which is going up here and pressing R. Nope. Try a refresh, upload, maybe a Command+R, and wait a little bit. Always with the live demos, am I right? Oh, there we go. Uploaded image. See, this is still on the deployed version. Make a prediction. Now sometimes what it does is it does a prediction but it only displays an image with the number 0. So I actually don't know what's broken there. Boom! There we go. It's working on the deployed version. So detecting the exact same because we're using the same model on the deployed version as the local version. So it's always going to detect the same sort of, same sort of patterns. Now if we come over here, let's— because it is the end of week 6, we could improve this, but it is It is the end of week 6. It is the end of the 42 days. Let's go through and see what we've done. Make model accessible to the public. Yes. Build an application around the model using Streamlit. Yes. Someone should be able to visit Streamlit application on their own device. Yes, you can do that. My— actually, my friend did try this on his phone and it didn't seem to work. I've had it working a couple of times on my iPad, but for now I think it's Streamlit only works properly with desktops. Now, I may be corrected. There might be something wrong with my app, but I'm not entirely sure. That would be— an extension is to make it working on mobile devices. Calculate business use case numbers for the model. I think this will be part of a retroactive, so a way to reflect on the project. So let's bring this up into week 7. Can I scroll? There we go. So week 7, I've got it as a placeholder here, even though this is only a 6-week project. I've got some, just a way that I can, what can I do differently? What extensions could I have done next? And making the code and the data public so that you can replicate this. So like a tutorial as well as a blog post summarizing everything. What class is the model most uncertain about when someone uploads an image? What amenities get detected? Well, I answered that question. How could you make it so the most uncertain ones get asked about? Yeah, if we look at the whiteboard, Week 6 is like supposed to be a retraining pipeline, so we didn't quite make it there, but we did get it deployed, so we can tick that off. What we may have to do is, again, that's probably Week 7 as part of the extensions for this project because it is day 42 and it's time to wrap up. Clean up GitHub and GCS bucket. Yes, I've cleaned up GitHub and GCS mostly. Um, but this is probably going to be, uh, another extension. So what we'll do, I'll bring these down. So the main focus of this week was just getting it deployed, which we've done. So I'll bring these back up into week 7. Beautiful! It's been a long journey right from the start, like figuring out how Detectron 2 worked, figuring out how to collect data, figuring out how to deploy a machine learning model, doing a whole bunch of modeling experiments and tracking them with Weights and Biases. Is the project a complete success? Well, of course there could always be ways to improve, but I think I've had a bunch of fun. I've had a bunch of, of learns. I've had a bunch of ideas now in terms of how I would go about building another project. And that's what it's all about, right? It's about trying things that might not work. So, we tick off day 42, tick off week 6 from the 42-day project template that, that we started with. And now the next step is after you completed such a 42-day project, a 6-week project, is to spend a week or so just retroactively reflecting on what could have been done differently. So that's probably what I'm going to spend the next week doing, is just cleaning up all the code, making it accessible to others, and then thinking about, okay, how can I use what I've learned from this project in my next one? As always, if you've got any questions, leave them in a comment below. I'll get to all of them, as many as I can. But keep learning, keep creating. I'll see you next time.
More from Daniel
Small Language Models (SLMs) Are the Future: Fine-Tuning AI That Runs on Your iPhone

Introducing Sunny - A MedGemma-Powered Skin Health Tracking App (Kaggle Competition Entry)
Benchmarking: NVIDIA DGX Spark & NVIDIA RTX 4090 | Part 4 - Comparing the results
Benchmarking: NVIDIA DGX Spark & NVIDIA RTX 4090 | Part 3 - Running LLMs on the RTX 4090
Benchmarking: NVIDIA DGX Spark & NVIDIA RTX 4090 | Part 2 - Formalizing the tests
Benchmarking: NVIDIA DGX Spark & NVIDIA RTX 4090 | Part 1 - Creating a series of tests

Local Multimodal RAG on the NVIDIA DGX Spark | Part 4 - Publishing our demo to Hugging Face


Local Multimodal RAG on the NVIDIA DGX Spark | Part 3 - Putting it all together