Starting Term 2 of the Udacity Artificial Intelligence Nanodegree | Learning Intelligence 19
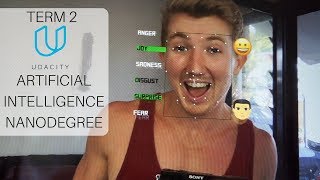
Daniel Bourke starts Term 2 of Udacity's AI Nanodegree, focusing on deep learning and a facial keypoint detection capstone. He walks through the computer vision pipeline, Keras model tweaks like dropout and max-pooling, and shares resources including Lex Fridman's MIT self-driving car lecture.
Chapters
What is going on, learners? Welcome to Learning Intelligence 19, and this week's episode is going to be really cool. I'm into the second term of the artificial intelligence Nanodegree on Udacity, and this term is all about deep learning. So we're building projects using deep learning, and right now I'm up to the first module, and I'll show you what it's about. We look in here, the first project is computer vision capstone, building a facial keypoint detection system, and I'll show you that in a second. I'll show you an example of what it is. I've been through all the initial classes here, so This is what you get when you start. So you've got to set up an Anaconda environment for your computer, set up some cloud computing on AWS. Really cool thing about the AI Nanodegree, much like the Deep Learning Nanodegree, you do get $100 worth of AWS credits, $100 US dollars, that is. That's really good to use Amazon Web Services such as EC2 GPUs, which are really good for deep learning. And so that's, that's one thing, sort of, if you imagine the cost of the course, you could essentially take $100 off of it because you get those AWS credits. But then we go into here. So we started off with Intro to Computer Vision. Mimic Me is a project, an optional project. I'll get onto that. I'll show you what it's about in a second. And then I did image representation and analysis, image segmentation features, and object recognition. And now I'm up to the project. I've 100% viewed it, but I haven't completed the project. And one really cool takeaway I took from the Intro to Computer Vision class is that the basis of any AI system is that number one, it can perceive its environment, and number two, it can make actions on its own will, uh, based on those perceptions. So if you think about it in a two-part phrase, it's Or imagine a self-driving car as an example. So self-driving car needs to use computer vision as well as other systems to perceive its environment. And then it has to be able to take actions based on those perceptions. So that's a really, I think, cool way to introduce AI to someone if they're not familiar with what it is. And perceptions about environment can be anything in environment. If you imagine a voice recognition system, it has to be able to perceive sounds in its environment and then make actions on that. Two really important points, I think, in terms of describing what AI actually is. And now I'll show you something really cool, is this. Facial key point system. Let me set this camera up for you. Now, this piece of software is called Affect Me, which is made by Affectiva. And I don't know if you can see, but in close here, it's got on the side next to my face, it's got all these labels. It's got anger, joy, sadness, disgust, surprise, and fear. And on the right side here— oh, the webcam's back to front for me— it shows an emoji of what I'm feeling. So, let's try this out. Wink face. He's got tongue out. Little smile. See if we can get him angry. Mmm. So that's really cool. And this is essentially what we're going to be building for the first capstone project in computer vision. So I'm really excited for that. If I can leave a link in the description so you can try out using this piece of software, I will. But if not, head over to the Affectiva webpage, which I'll leave a link in the description. They're a startup using computer vision to detect emotion in faces, which I think is really cool. All right guys, so I just finished part 1 of the computer vision capstone project, and I'm going to get on to part 2 and part 3 later this week. So I'll show you here what I've done. I've essentially created just a document here, like a, just a bare note, just a simple note, and gone through the project and just wrote down what's required for the setup, what's required for each different part, some links to the rubric, and then some optional, optional tasks that I can make my project stand out. And then a whole bunch of notes for each part. What I want to do with this, this project, or each of the projects in the term 2, is to, once I finish them, make a blog post or a video about it. So how— a guide of how you can implement it yourself. That's what I'm taking extensive notes on this one and working through it as hard as I can and sort of writing down everything that I found out how to help me. So you can work on these things as as well. Stay tuned, that'll come out in the next few weeks. But if we look here, this, this project is all on computer vision. And we started out right up the top, just detecting a face in an image. And then we detected the eyes of that face. And then if we go down here, we detected a whole group of faces in a blurry image and then unblurred or denoised the image and then re-detected it. So if you see up here in this one, it's missing that face of the girl in the purple dress. But then we took some of the noise out and made it a bit clearer, not perfectly clear, but clear enough so that you could detect that extra, extra face. And then I just finished off— oh, actually, sorry, then we did some edge detection. So you see here, we've got a face there and then detected the edges of it, cleaned up the edges so they were a bit cleaner. And then we did— I learned how Google— so if you know, if you've ever used Google Maps in in-person view, you know how everyone's face is blurred out? Well, we did the equivalent of that. If you come down here, we go into this. So there's the original image. And then I learned how to— oh, I detected detected the face in it and then I blurred out the face. So you see there, blurred out the face, but you can still see the rest of the image. I'm really excited, I'm really liking this project. I think the next stage or the next part of it, let me just check, I'll fill you in. So the next stage is part 2, so it'll be training a convolutional neural network to detect facial key points. And then part 3 is putting parts 1 and 2 together. So I'll hit you up once I've done some more progress. I need a break from it, I'm going to get something to eat. Oh, one more thing, don't be afraid to reach out for help. Look at this. On the Udacity and the Slack channel, see, I asked a question here. I'm not sure if you can see it, but that's 3:14 PM. I got a response back by 3:18 PM. And the same goes for the forums. If we come over here, where is it? I got a response back 29 minutes ago, and my question I only asked 1 hour ago. That's a note to self. If you're having a problem with something, don't be afraid to ask out. And that goes for you guys as well. If you need any help with anything, ask me. I'll do my best to help. Leave a comment below and I'll try my best. 3 quick things from today's coding adventures. So the main one is I'm still working through the computer vision project, aka to train a facial recognition system to detect facial key points. Ideally, what we want is some sort of outcome like this. See the blue dots there? And so what I'm doing, I'm building a convolutional neural network. You can see the epochs here and the training output, the losses there. And I'm doing it in Keras. Where is it? Where's my implementation? There it is there. So starting off, convolutional layer, max pooling layer, dropout layer, and However, it's got some tweaking to do, but I'm going to save that for tomorrow because I'm going to go work out and clear my brain and sort of let the subconscious do the work. I've got my model pretty accurate, but I think I need a few more iterations before I get it perfect and ready for submission. This is how I'm tracking what I'm doing. So I've got iteration 1, I put down the neural network architecture here, and then for each iteration, so iteration 2, I use the same network as above, but I changed to the Adam optimizer. I'm just writing down and taking screenshots of the results, writing down the changes that I implement and taking note of what results and how it affects the results so I can update it better in the future. The second thing for today is I went over this lecture on deep learning with, with my brother, and I'll leave a link in the description. It's a deep learning lecture from the MIT self-driving cars course, and it introduces deep learning from the eyes of self-driving cars. So it's— I found it really valuable. I'll put a link in the description, and it's by Lex, who's also a wizard, so check his channel out. I mentioned him in last episode, Lex Fridman. And the third and final thing is, if we go here, playground.tensorflow.org. So this is where you can tinker with a neural network right here in the browser. You can just change the architectures. See, I've got mine running here. It's running almost 4,000 epochs, learning rates there, activation, regularization. Look at all this. You can add more layers. Add hidden layers, etc., and it shows you what it outputs. I think that's a really cool visualization for how a neural network looks like in TensorFlow, what it's actually doing behind the scenes. That's it for today. It's really hot here. As you can see, I'm sweating just standing in my room. I'm gonna go to gym and sweat a bit more. Apparently, 33% of the test miles driven in the MIT self-driving car course test cars, which are all Teslas, are in autopilot. Check this out. And apparently that reflex the actual use case of Teslas on the road, and I'm not entirely sure how true that is. I tried tweeting Elon Musk to see if that was correct, but I didn't get a response. That's all right, I imagine Elon's a very busy guy. I've left a, left a note here of what I have to do next week just so I can, I can get on top of things. I've got a few questions to answer, I've got a few checkboxes to answer, and I'll show you how far through it I am in the Trello board. This is how I keep track of all my projects. So we go down here, I've got a checklist of all the tasks I have to do. I've done up to step 4, step 5, I've probably done about 50% of step 5, so create a convolutional neural network to recognize facial key points. Probably done about 50% of that. I have to finish off that and then get through the rest of that. Guys, it has been a big week. From deep learning with self-driving cars to artificial general intelligence to building a facial key point detection system. I'm loving this. And next week's going to be no different as I work towards finishing the first major project of Artificial Intelligence Nanodegree Term 2, uh, building a facial key point detection system using a convolutional neural network. Combining OpenCV and Keras to build a system that can recognize 7, I think it is, 7 or so key points on a face. And stay tuned, in the future, once I finish the project, I'll release a video detailing the steps I took to do it, as well as I'll put out a blog post of how I worked through the computer vision pipeline. But stay tuned for that. Subscribe to me on Medium or subscribe to my channel and you'll be the first to see those videos. And blog posts when they come out. But without any further ado, it's time to get out to some shoutouts of the week. So these guys either commented on my videos, reached out to me via email, or contacted me in one way or another. You can always do the same. My email is daniel@mrdbourke.com. My Twitter account is @mrdbourke. If you want to reach out to me, I respond to everything, and I'll do my best to answer any questions you have or any advice you want. Or if you want to give me advice, feel free to reach out as well. I'd love to hear it from you. In no particular order, we have Carlos So all the best with your AI Nanodegree program and thank you for that Kaggle learning resource. I'll definitely be checking that out in the near future. Dhruv, I hope I'm pronouncing this name right, but thank you so much for your kind words and all the best with your Machine Learning Nanodegree. Sreyas, again, I hope I'm pronouncing these names right, guys, and if I don't, I apologize, but thank you so much for your kind words and I'll definitely keep these videos going. I'm loving it so much. I love learning and I love sharing what I learn, so I'm I'm going to keep making them, don't you worry about that. Justo, I hope the note-taking advice I gave in my Deep Learning Nanodegree review video went well. It's worked for me, so hopefully it does the same for you. Koran, thank you for your consistent advice, your feedback, and your words of encouragement, plus that link to the deep reinforcement learning video. That's available on Lex Fridman's channel. The link's in the description. And that's a wrap for Learning Intelligence 19. Thank you so much for tuning in. I'll be back next week with Learning Intelligence 20. Can you believe it? We're up to the 20s already. It's been an awesome journey so far, and I can't wait to see what's next. But as always, keep learning!
More from Daniel
Small Language Models (SLMs) Are the Future: Fine-Tuning AI That Runs on Your iPhone

Introducing Sunny - A MedGemma-Powered Skin Health Tracking App (Kaggle Competition Entry)
Benchmarking: NVIDIA DGX Spark & NVIDIA RTX 4090 | Part 4 - Comparing the results
Benchmarking: NVIDIA DGX Spark & NVIDIA RTX 4090 | Part 3 - Running LLMs on the RTX 4090
Benchmarking: NVIDIA DGX Spark & NVIDIA RTX 4090 | Part 2 - Formalizing the tests
Benchmarking: NVIDIA DGX Spark & NVIDIA RTX 4090 | Part 1 - Creating a series of tests

Local Multimodal RAG on the NVIDIA DGX Spark | Part 4 - Publishing our demo to Hugging Face


Local Multimodal RAG on the NVIDIA DGX Spark | Part 3 - Putting it all together