Bro - Writing an Analyzer 2
In this tutorial Jon Schipp demonstrates how to build a custom RIP protocol analyzer for Bro (now Zeek). He walks through the directory layout for a protocol analyzer (load.bro, dpd.sig, main.bro), creates a dynamic protocol detection (DPD) signature that matches RIP packets by inspecting the payload bytes for command, version, and zero fields, and saves the signature to enable the analyzer on non‑standard ports. He then edits main.bro to set up the init event, create a logging stream, and handle ripresponse events. New fields (version as a count and command as a string) are added to the ripinfo record, and a constants file (constants.bro) is introduced to map numeric command values (1,2) to human‑readable strings (request, response). The script is configured to attach the analyzer to the default RIP port 520, and the constants file is loaded. Finally, he runs Bro on a sample pcap (ripv2.cap), verifies that the analyzer fires, and shows the generated rip.log containing timestamps, UIDs, source/destination IPs and ports, command strings, and version numbers, confirming a functional RIP logging analyzer.
Chapters
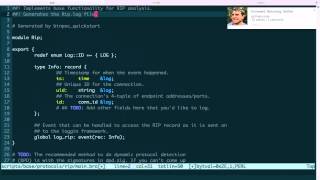
Okay, let's continue where we left off, and let's go ahead and move over to the Binpack Sample Analyzer page here. And we're now going to be focusing on the script layer stuff, so we'll be focusing on this directory in particular where sample is the name of the protocol. That we're working with, and it'll be RIP in our case. So you have the __load__ .bro file, which is the default file that loads everything else whenever a directory is read into Bro. Next, we'll have a dpd signature for the digital protocol detection scripts or an analyzer, and then what we'll have is the main.bro file, which contains all the base stuff for each— so for each analyzer. And this typically, for every analyzer that's usually built, uh, it typically goes that if you say have the SNMP analyzer or the SSH, well, in the main.bro section in the script land that corresponds to those analyzers, that's where we actually have all the events ready to go, and that's where we set up logging, etc., so that when Bro is being used for the first time, it's already doing things for those particular analyzers up in the script layer. So let's begin by starting with a simple one, dpd.sig. And if we look here— nope, I need to go to my Bro directory. We're going to be starting in scripts. Whoops, typed an error there. Okay. Scripts, and then you can just follow this base protocols. So base protocols and then the name of the protocol that we're working with, RIP. So Vlad's awesome set of Bimpac Quick Start scripts will have these generated for you already if you're following along. And we're going to open up dpd.sig. Okay, get rid of that white space there. And you can see that, hey, it tells us to, to make a regex to match this stuff. So basically what this does is the dynamic protocol detection signature in this case will, when you fill it out to match the particular protocol, it will generate, or it will call that analyzer to attach for that protocol when it's seen on the wire. So this is a way to detect protocols that are running on non-standard ports. So typically RIP runs on 520. I've never seen it on a different port, but it could be done that way. So what we're going to do is instead of relying on that, we're going to write an anal— a DPD, uh, signature that will detect it on other ports. So let's go ahead and get rid of this stuff here. Okay, so the first thing we need to do is we want to work with the payload, and you can actually get this information from the signature framework, uh, section of the manual. So Bro signature framework should pull it up here. Okay, and you can see that here's a— this first example pretty much has everything we need for detecting our RIP protocol over the wire. So we're going to work with payload, and following the example, we're going to need to do is anything between these two forward slashes will be, will be the regex match. Let's go back to the RFC for this, and we want to match the first part, which should be enough, I would think, to do some basic detection of RIP. False positives are possible, but in this case I think we might be all right. So remember, these first field is a byte, it's called command. Second field is called a byte called version that contains the version, and then there's this 2-byte field that is just zeros. And for command, we have two possible options: request and response, so 1 and 2. And for version, we also have version 1 and version 2. So this should be pretty easy to match. So we're going to do is going to match the beginning of the payload, that is when it starts. So after the headers of the protocols are already parsed, that is after IP, then UDP, we then have the rip data. And this is where we're going to start. We're saying start from the rip data, and we're going to do a regex for match for these, um, bytes that we're looking for, 0x2. And this particular one we just match matches the two possible values for the command, that is version 1— or excuse me, that is the request and the response. Then what we're going to do is we're going to match the version of RIP in the version field. So 02, there's that as well. And we put it— we do the OR here. You can see the, the pipe for the OR. That is, it can match response or request or response or version 1 and version 2, but they have to— one of these have to be matched for each. Then what we're going to do, we're going to do the last 2 bytes here and that is the zeros. That zero field right here must be zero. Well, actually not that one, this one must be zero. Matching that right there. And then we just go ahead and have that say enable RIP. So that will actually enable the RIP analyzer for this, for these packets that match this detection signature. Alright, so now I'm gonna go ahead and save that file. Now we're going to take a look at the main Bro script for our analyzer, and that is main.bro. Go ahead and get rid of this whitespace here. Alright, now if you quickly look through this, you have the Bro init event which is run on Bro initialization. So when Bro starts, and what it does is it already starts creating the logging stream, which we will then write out later whenever an event happens related to our protocol. And in this case, rip events created by default from Vlad's binpacks quick start scripts. But remember, we don't have event called rip_event, we have rip_request and rip_response that we changed. For our purposes. So to do this, we're going to modify this here and just call it a rip_response first. And then what we're going to do is— remember those values that we passed in to the analyzer in rip-analyzer.pack, the command and version specifically? Because we want to pass those to the script layer. So that's why we handled those. So let's go ahead and add those here, and we're going to use account for the command and version. And we are— because there it's a simple field that just has a count of numbers, that is, it takes an integer. And then what we're going to do is -5 here for the priority, that it's a low priority. And we're doing this for logging because all logging as a convention is set to low priority. So higher priority events can happen out that are not related to logs, such as detection, detecting attacks as they come across the wire. So now what we want to do is we want to start building out our setup for detecting, um, or doing something with these RIP events. So let's just move up a little before we continue with that. So here's a little information that Vlad wrote in a script to do, uh, on the— about the dynamic protocol detection signatures. So by default, you can set the, the ports that this Analyzer should attach to, and by default we have 520, which is the default RIP port. We're going to put that in there as constant ports. So it's just a stored variable called ports, which is a constant. It's not changed. It's unable to be changed after that. Then what we do is, we're going to uncomment this. We want to say, hey, what are the likely server ports for this analyzer? That is, what are the ports that identify the server portion of the connection?. And in RIP, typically you'll see the ports are the same between the two, especially whenever routing updates are sent that are unsolicited. For more information about this, you have to browse the RFC to figure out what is likely for the particular protocol. And in our case, we can go ahead and add 520. That is, this right here will be set in here as ports, 'cause we're referencing it. And that'll be set to the likely server ports array. Which allows— and it allows Bro to detect which side is the server. But in this case, it really doesn't matter because typically both sides will have a source and destination port of 520. Now what we want to do is take a look at the top here. You can see that we have a module called rip. So this is a way to set up a namespace, uh, that everything in this particular file that has this module is specific to rip. It cannot be referenced outside of this namespace unless it's set globally or something. Next, what we have up is the, the info record here. This record is what's used for logging. So by default, if we start logging with this, which it's already done because it created the log stream and it's starting to write the stream on this RIP response message, um, with these fields will be written out: the timestamp, the UID and the ID record, which contains, uh, source IP address, destination IP address, and in Bro we called them originators and responders, and then their corresponding, uh, ports, source and destination. We want to add a little bit more, so we'll do that in just a moment. But first off, before we do that, let's just go ahead and try to do something simple that allows our script to work. So we want to print— let's print, um, what can we print? Let's do something like response, found response. Okay, and then what we'll do is we'll print, uh, command. Command will be fine. And we'll end it with a semicolon so that every time that this rip response event happens, it will print a found response. Okay, now we'll call Bro and to read in our pcap file, ripv2.cap. Aha! You can see it did say that, hey, found response, and it printed the number for the response. And these other messages we did in the previous video, we actually added a print statement to the analyzer so that it would print whenever, basically for debugging purposes, so whenever it entered that particular statement for detecting whether the packet is a RIP response or RIP request. So now that we know that this works, let's go ahead and start logging some stuff. Well, so what do we need? Well, the first thing that we would like to have is the version information. So let's go ahead and create— to go to the top here, we want to create a version field. We'll call it version. And then what we're going to do is we are going to kind of figure out what the type is for this version, and we're going to use count. Because we're gonna display the version as a number, 1 or 2, based on what it is. We don't need to type in— we don't need to display in the log RIP_V1 or V2. It's not necessary. Let's just do count. So just 1 or 2 for that. And then what we're gonna do is we're gonna go ahead and do a command. We're gonna print out the command, and this time we're actually going to do something more advanced than the stream, because if you're looking at the log file and it just shows 1 or 2, it's really not going to help you. You have to actually look up in the protocol, this in the reference or the specification, to see whether or what 1 or 2 means. So we're gonna make this a string, and then we're gonna go back down and actually start working with this information. Okay, so what we're gonna do now is go ahead and add a new field Let's go ahead and do version first. Version. Okay. So you can see that version is passed in as account. And what we're doing here is we're saying version, we're assigning the value of version to the version that the info record points to. And that will be logged. That's pretty much all you need right there to actually start logging the version. Very simple. So we pass the version, gets passed in by the event from the analyzer, right? And then we actually set up at the top to just recap, we set up the record, a new field in this data structure for the info of RIP, rip_info. We set that up here to log the version count as a count. And then what we do is we actually start assigning the version that comes from the agent event to, whoops, to this info version that we put up in that record above. And then this could— this, this function right here actually, which is what starts writing that data to, to the log files. Next is what we're going to do is we're going to actually do something a little bit more advanced, and that is we have to do the, the command. Because remember, we don't want to print, we don't want to write to the log 1 or 2 based on what the command is. We need to find a way to print an ASCII-based string, and one way is to use number of defined constants. So I'm going to go ahead and build this out. Okay, so what's actually happening here is I am— we're also passing in command here as a count, and command will be replaced here every time a packet comes that matches a RIP response. This will have the value of 1 or 2 based, based on what this is set into the event with this past the event. And this will be referencing command types. So this will be an index into a data structure called the command types. And whatever that data structure yields, it will, it will return and assign to info command. So we have to go ahead and build that data structure. So let's do that next. And let's do that with the const, and we don't have that by default. So conststs.bro, what we're going to do is, hey, this is, uh, constants definitions for RIP, and we're going to go ahead and sign it, uh, put it in the same namespace. And then we're going to start— we're going to export these so we can reference them at different times. Okay, so whoops, and then we're going in here, so we're starting to build out the, uh, const command_types equals And then we set our types here. And we do one more. And except this was not going to be types, or this is not going to be— actually, we're not going to do that one just yet. That'll be for a later video. But let's go ahead and do just these two, these, these particular types, and that we're going to fill this out so that 1 refers to request and 2 refers to response. Comma there to make it syntax valid. And we can do this little default equals function and count_string return. This is a boilerplate thing we're just going to go ahead and do, because if nothing is in this, then, um, we'll print unknown message. Okay, okay, so now we have these constants set up for command types. Let's just— it's just a way to reference. So if in the other script, if that command is passed as 1 to command types, then this is returned, this string. If it is 2, then response is returned. Okay, main.bro. So again, so imagine a packet comes across the wire and it is a response packet, that is number 2 is sent. So the count will refer to the type of the, the data that will— that command will be containing. And remember, it's an integer, one, just a number. So we're going to do, um, 2 in this case. Packet comes across the wire, rip response is set to 2. So then, that is, command is set to, I should say, sorry, I made it a little bit more complicated. Um, let's, I'm going to rephrase that one more time. So if a packet comes across the wire, the analyzer will parse out the command portion. It will, event will get generated by a biff event in the analyzer.pak file. Then it will eventually get passed in userland to this event rip_response, and the command will contain a value for rip_response of 2. So here we say if the command_types is 2, and here where the 2 is set to this, we're passing— we're going— this is going to be referenced to 2, it'll be substituted, and then we'll assign whatever that is whenever it goes and takes a look at that type or that, uh, constant data structure that we made of command_types, and we'll the two will match the response string. It'll return that response string, which is response, and set it into info$command, which will then be written to the log file. Okay, next, the final thing we need to do for— to get this to work is we need to unset that or uncomment that so that whenever a port is seen a 520, as we saw here, the RIP analyzer will be attached to that port over UDP. So this is another way to do it outside of the DPD, the Dynamic Protocol Detection Signature that we wrote earlier. So since we know that almost all RIP traffic is going to be on 520, go ahead and attach 5— uh, packets that are 520 to the RIP analyzer. So that will be called. Now let's go ahead and run that bro pcap file. Let's see, one second here. We do have an error. Error in main.bro line 50, unknown identifier commands_types at or near commands_types. So let's open up— oh, that is because we do not load— we did not load the, um, constants file. So this is going to be a relative path to that directory that is, um, this here. So main.bro will get loaded, which will then load constants.bro, and that's what that is there to do. Okay, so now let's try to run cat file again, and let's see if we have a log file available. We do. We have a rip.log. Look at that. This is awesome. So now let's open up that, and we can see that we have the transaction ID, the UID— I'm sorry, not the transaction, the timestamp— the UID, which is the transaction ID essentially, the originator IP address, version, port, destination, or the responder IP address, the responder port, the type of RIP message it is. In this case, it's a response, which correlates to the command, and then the version. These are all version 2 packets. And there you have it. We actually have a working log of RIP. Very basic, but it gets the point across on how to develop these sort of things in Bro.
More from Jon


What No One Knows the Podcast / Vodcast featuring The Tampa Bay Wave and Jon Schipp

Meeting the Exposure Management Challenge: Key Use Cases for Success | @OfficialRapid7 #SolutionSpotlight
Spot Security Control Gaps and Non-Compliant Resources Across Your Attack Surface