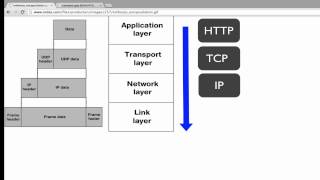
TCP/IP uses a four-layer model: application, transport, network, and data link. An HTTP request gets wrapped in headers at each layer (HTTP, TCP, IP, Ethernet), then unwrapped the same way at the receiver. Later modules will show you how to see these headers in Wireshark.
Chapters
Hello and welcome to the TCP/IP module. In this module, we will be discussing TCP/IP and each layer's corresponding protocols. This module is not intended to cover TCP/IP in its entirety, but to give a solid foundation for the rest of this course. Those of you with a networking background may use this as a quick refresher, but for those of you new to these concepts, you'll want to make sure you feel comfortable with TCP/IP before moving forward. So what exactly is TCP/IP? TCP/IP stands for Transmission Control Protocol/Internet Protocol and is a standardized suite of communication protocols. This really is the foundation that allows network devices to communicate. Because each device has its own TCP/IP stack, This allows you to purchase any brand of computer or mobile device with the confidence that that device will communicate on your network and over the internet. So let's take a moment, look at the diagram. On the right side, you will see 4 layers of the TCP/IP model: the application, transport, network, and the data link layer. It's a good thing to note that you won't always see these layers referred to with the same exact names. It's common to see diagrams with a link layer labeled network access or network interface. And the network layer labeled Internet. The labels shown here correspond well with another model known as the OSI model, so this is what we'll be using for the rest of the course. On the left side of the diagram, we'll see what happens to our data as it moves down through the layers and is prepared to leave our device and traverse the network. So imagine we are sending an HTTP GET request. Our data at top will have an HTTP header, and as it's sent down through the stack, each layer will add its own header corresponding to the protocol being used, with the link layer actually encapsulating the data. In our example, since HTTP uses TCP, a TCP header will be added at the transport layer, an IP header at the network layer, then finally our data will be encapsulated with an Ethernet header and footer at the link layer. When our data reaches the other end of this communication, The web server will actually strip off each of these headers as it moves back up through the layers so the application can receive the data. Later in this module, we'll use Wireshark to look at these headers, and you'll actually notice that these headers have fields specifying what higher-level protocol to hand the data over to. One thing to note is that you'll often hear protocols at the link layer referred to as Layer 2 protocols and network layer protocols referred to as Layer 3 protocols. This is in reference to a separation of the link layer into two different layers: a physical layer 1 and a data link layer 2. The OSI model that I referenced earlier is actually a 7-layer model. This splits the bottom layer into two separate layers and the top layer into three layers. This diagram is a good example since it displays a different labeling that you'll often see with the bottom two layers. This course will be using the TCP/IP model, but just remember that the Layer 2 protocols belong to the data link layer and Layer 3 protocols belong to the network layer. This concludes the introduction to TCP/IP. For the rest of this module, we will be using Wireshark to take a look at each of these layers in depth. If you need assistance installing Wireshark, please refer to the Wireshark module.