Tcpdump Advanced 1 (Link Layer)
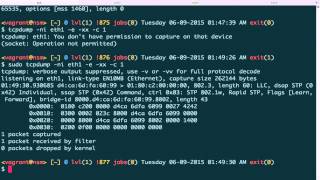
Jon Schipp shows how to use tcpdump to capture Ethernet traffic and read MAC addresses, EtherType values, and frame structure. The -e option adds MAC headers to output, -xx displays full frames in hex, and -s 14 limits capture to just the Ethernet header. Tcpdump supports many Layer 2 protocols beyond Ethernet.
Chapters
Alright guys, I hope you're ready to get started on learning about the link layer and how to show that data with tcpdump. So first off, what we're gonna do is we're going to sniff on an interface, and we're gonna pass the -e option. And this is what actually, um, says, hey, give us the link layer information. And this E is short for Ethernet. Uh, so we can do this, sudo. Ooh, there's a lot of data there. Let's just print one packet to make it easy. And what you can see here is that we have a MAC address instead of the usual IP addresses that are normally seen here. And just to, um, contrast that, let's get rid of that. Print the next one, and you can see now there's this source and destination IP addresses, where here we have the source and destination MAC addresses. So what, who is this, this MAC address? Well, let's take a look. It's probably me because it's my machine. And let's do ip linkshow eth0. You can see that my Ethernet address is 80800 blah blah blah 84 is the ending, so let's just match that. 0x800 blah blah blah, and then 84th inning. So that was my machine sending out an Ethernet frame. Okay, so now that we see what that looks like, let's actually go over and talk about the Ethernet header a little bit. So here's the Ethernet header. Uh, you have a number of fields. The first one is the preamble, which is used in Carrier-Sense Multiple Access over Collision Detection algorithms to synchronize who has access to the wire. That is, they take their turns between sending frames, the hosts do. Then you have the destination MAC address, the source MAC address, the EtherType field. And this particular field is a 2-byte field that has the value of it set as a number that indicates the protocol that this Ethernet frame is carrying. So if it was carrying IP, an IP packet above it, then this will be set to 0800, and every single protocol that can carry at the internet layer of— in the TCP/IP model will— or the network layer, it will have its own field for this. I think ARP is 0806, for example. And these— the data of these, that is the IP field or the ARP field, will actually be carried in this data portion. It is It's just added right after. And then you have the frame checksum sequence number, which is a way to validate a particular frame. It, uh, if it does not pass the checksum sequence algorithm when it's received, the NIC, the network card, will typically discard the frame and then increment some variable that says, hey, we lost a packet or we lost a frame. Okay, so as far as the frame is concerned and you are concerned with sniffing, the preamble will never be seen by the host, right? Or I should say it can be seen, but in most hardware that you'll be working with, it will not be seen. It requires special, special purpose NICs to actually pass the preamble up to the operating system. Otherwise, it's typically chopped off. Same with the frame checksum sequence. This field over here is typically also validated, and then if it passes, it's removed. And if it fails, again, the frame is discarded. You won't actually see it in the operating system. Granted, tcpdump and other tools have support for this. There's a— in tcpdump specifically, there is a link type called Linux Net Analyzer, I believe, that allows you to— if that data is passed, as the preamble is passed, it stores in a structure and it can actually print it out and you can work with it. But again, you have to have special hardware to do so. Most cards will only give you between the destination address and the data when it's coming from the NIC to the host. Okay, so now you have a little information about that. Let's take a look at some frames. Now I have that john.pcap file from the previous video, which I used to make a web request to my website and then see the web response. So let's take a quick look at— let's read this in john.pcap. Let's just add the eth— Ethernet option, the -e. And what we're gonna do is we'll print, say, 3 packets, just to take a gander at them. And you can see with the Ethernet option, it's now like 3 lines per packet. I'm sorry, it is 1 line per packet as always, but they are wrapped based on my terminal width and height, wrapped to ending up being 3 lines. So the more data you output, the longer the wraps are gonna be. So you can see that here is a host. And it's sending a packet destined to this host. The Ethernet type value is set to 0800, like I said earlier, which indicates it's an IPv4. TCPdump lets you know that, it looks it up. Then you can see after, you can get the length of the packet, then it tells you the IP address information after, and then you can see that it's actually carrying a TCP packet, and I know this, um, by the, the actual output that TCPdump displays. This is a TCP sequence number, this is a TCP acknowledge number, these are TCP flags, etc. So this is showing you how the Ethernet frame carries the Ethernet portion, carries the IP portion, which then carries the TCP portion in these cases. Okay, so now what we're going to do is to get more closely familiar with the Ethernet data, or the Ethernet frame, We're gonna sniff live on an interface. I'll just do eth1. What we're gonna do is we're gonna pass the ethernet option to display that data, and then we're gonna pass— remember the hex option earlier, the x? Well, in the case if you want to display the in hex the actual Ethernet data, you have to use two x's. So double x's means display the entire frame including the Ethernet header in hexadecimal. And we're going to go ahead and print, uh, we'll just print one packet for now, see how it looks. Okay, need to become root of course, gonna open up a socket and bind to it. Okay, now we have it. In this particular case, um, this is not an IP, IP packet riding above the Ethernet frame. What we have here is we have the destination MAC address here. Remember, these are each 2-digit set of hex numbers is a byte, so So 1, 2, 3, 4, 5, and then 6. So this entire 6-byte address, as we correspond to 6 bytes here for the destination MAC address, is first. That's the destination MAC address. Then we count 6 again. So there's, there's 2 bytes per block here, and 2 times 3, 6. So there's the source address. Then after that, we actually have the EtherType field. If we go again, look over here, that is the 2-byte EtherType field, and that is a value of 0027. In this case, it is the Spanning Tree Protocol. So this is a particular protocol, um, to help eliminate redundancy of paths in switches. But let's go ahead and— so now that we see that, let's go ahead and try to get another packet. Hopefully it won't be Spanning Tree. Oh, it is. Let's try, um, try another interface. Let's do 3 packets. Aha! So now we have some IP stuff here. So let's start up here again, same thing, except now there's the destination. Now it's an IP because you can see that the TCP dump said, oh, it's 0800, that's IPv4, right? So destination, 6-byte MAC address there, the 6-byte source MAC address here, and then the 0800 here.. And then after that, the IP version number, number 4, and then a few other values. The 5 is the number of 32-bit words inside the IP header, and that 5 times 4, because a word in the way we're referring to it, our 32-bit word is 4 bytes. So 4 multiplied by 5 suggests that the header is gonna be 20 bytes. And we'll get all into this in other videos during the protocol review. But now you know that you can, you can see how you can parse this information to get further acquainted with this link layer level of data. I'm gonna give one more example with viewing the link layer data that just shows another way you can use the snap length. So, let's go back to our example where we're sniffing live. Here we go. And we want to just print the Ethernet header. We don't want any— like in this previous packet, we don't want all this stuff. We just want the first 14 bytes. So we're going to say, hey, set the snap length to 14. And remember, again, the snap length only works when you're capturing new packets, and that is from a live interface. Does not work while reading from a file, which is just because of the way the libpcap library works. So what we're going to do is say 14. That is going to capture bytes 0 through 13, a total of 14 bytes. And we'll go ahead and print the first 3. Now what we can see is we have the parsed out stuff that TCPdump has done this for us, and then we just have a single line that contains those 14 bytes. And Here we have the, again, the actual destination MAC address, the source MAC address, and then, which is 12 bytes total, right? 6 for each of these, and that's 12 total, or that's 12, and then we add 2 more bytes for the EtherType field, which is 0x0800, and voilà, now we have just the Ethernet header displayed for us right here. That's why we can just key in and kind of remove some clutter. It's just another reason to use the snap length. Let's go ahead and open up a browser and see if we can get TCPdump link— oh yes, perfect, first— oh, I just saw it— link-level headers. Where did that go away? There we go. Okay, so this is a list of all the link-level headers that TCPdump supports. Me kind of zoom out here a little, just a little bit. You can see that we have Ethernet, and then they have descriptions for each one. So the 10, 100, and 1000 and up, this is what we're using when we're capturing from our Ethernet interface. But also does other link layer protocols like SLIP, PPP, FDDI, and a few others that you may or may not need. So just be aware that these are available. So you can just, you can actually view more than Ethernet, um, at the Layer 2 level. All right, that concludes this lesson. Thank you.
More from Jon


What No One Knows the Podcast / Vodcast featuring The Tampa Bay Wave and Jon Schipp

Meeting the Exposure Management Challenge: Key Use Cases for Success | @OfficialRapid7 #SolutionSpotlight
Spot Security Control Gaps and Non-Compliant Resources Across Your Attack Surface