Dark Under Eye Circle Tear Trough Injections Chevy Chase Maryland
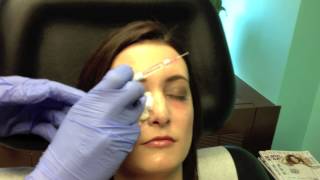
Dr. Shervin Naderi demonstrates tear trough injections with Restylane to treat dark under-eye circles. The procedure fills the hollow area under the eyes that creates shadows, with results varying based on skin thickness and depth of the tear trough.
Chapters
Hi. We have another injection in this series of videos. We've done tear trough injections before today with a patient here that already applied some top of a numbing cream. You can kind of see this clear gelatinous stuff that's applied here. We do this about 20 minutes before, let it sink in. It doesn't numb completely, but it does take the edge off. And then once we get started, the actual substance itself, which I prefer rest on for the tear troughs, does have lidocaine and it's going to numb things up more as we go and she'll be more and more comfortable. So I've already applied this about 20 minutes ago. I'm going to take it off. I'm going to have you look up for me. I'm taking this numbing cream off. It's already been sterilized with some alcohol before. And what I want you to really appreciate and especially sterilize. Closer up the camera you'll be able to see this. There's an area where there is some shadows and this is called a tear trough. And you can kind of see the cheek mound. Here's a cheek mound. And then above it there's this depression. That's what the tear trough is. And then above that there's the fat pads of the eyes. Especially if I have you look up with your eyes, you can really start seeing the fat pad. These are the fat pads. Here's the teardrop and here's the cheeks. Now, traditionally, 15, 20 years ago, all we could do do is remove this fat. The fat would be gone, the eye would be smoother, but it would sink in and be more hollow. Then came along fat injections and now more and more we use fillers and some fat injections in this area. There's also even some implants that can be placed in this area, but they can rub along a nerve here called a branch of the trigeminal nerve that actually can irritate, be irritated by the implant in that area. So basically the real main workhorse has become Restylane. Juvederm is an option. Radiesse is an option. There's other fillers as well, but Restylane is kind of the safest filler for this area in relative terms. And when I mean safest, it's a hyaluronic acid. It can be reversed, it can be melted away if we need it to be. But it's smooth, it's a clear gel, it's not very lumpy, bumpy, and it's very forgiving now as opposed To Juvederm, which is very similar in certain structures. In certain aspects, it's less concentrated. Juvederm can create a little bit too much bagginess, puffiness, swelling and even that bluish Tyndall effect that you may have read about on the Internet, where Restylane is a little firmer in certain aspects, but less concentrated. So it lifts the area up, lifts that depression without creating too much swelling in that aspect. So we're going to get started with these injections. Now. You can see she's very fair skinned. Fair skinned patients are the most complex and challenging of these injections because they can bruise significantly. And if you don't do the injections in the proper plane, you can see lumps and bumps. Heavier, darker, thicker skin. It's much easier to inject when you see somebody like her. If you haven't done this hundreds and hundreds of times, you shouldn't be trying it for the first time. It does take lots of practice and effort. Okay, so what we're going to use is Restylane and we talked about the fact that it comes in a clear gel and you can see it as you push it out of the needle. You'll see rest right here as you're priming it. It comes out of the needle and it's a clear gel right there. Especially if you focus on it, it's very soft, very forgiving. And this is what we're going to use to inject. Instead of a chalky substance like radies, or even the plastic beads of artifil, or even the lumps and clumps of fat, this is actually much more precise. So what we're going to do is the bevel is hitting down. It's very important. We've talked about this before. You can see the bevel. There's different directions. I like to put the bevel down so it's injecting the filler downward and the filler is going right on top of the bone. It's not in the muscle, it's not in the fat, it's not in the skin. It's right on top of the bone. The first one is always the one that kind of makes them jump the most. But it's nice and gentle. Don't jab it, just gently go in, feel the bone and then you inject. As you inject, you can see it plump up right there in front of your eyes. Right there. See? Now she's jumping. I'm just touching my finger and she's jumping. But you can start seeing as you Start going. And this is important, your patients will be jumping, you're close to their eyes, they're going to be nervous. So it's very important to have very gentle technique. And little by little by little you'll reassure them and they start trusting it and being less and less nervous about it. There you go, there's your next injection. You can see the bulge right there. You just press it down with your fingers and. And you just keep going. And again you're following the tear trough. That's the area that you're following. The closer you get to the nose, the more sensitive it can be. It's very important to make sure when you're inside that you're by on top of the bone. Because as you keep going, what's going to happen? The needle starts dulling out and you may feel that you're right on top of the bone, but you may not be. You actually may be above that area and you may put it into the septum or into the muscle itself. So just little by little, just walk it along. And this is why bruising is so common with this procedure, because there's lots and lots of little injections instead of just a few bigger injections. When you do the cheeks and she has such long eyelashes that actually kind of gets in the way. But that's a tribute to Latisse that she's been using so nicely. So here we go again. Now that it's starting to numb up a little bit more, you go back and just again, you can't over correct this. You got to do little by little and just walk it along, press it down, make sure you like the way it looks. Little injections. And again, the reason they're you have a higher chance of bruising is there's going to be lots and lots and lots of little injections. And each one has a good chance of hitting a small blood vessel. And bruising versus when you do, for example, the cheeks, where there may be only two or three or four injections with larger volumes. So what I like to do is I like to kind of let this start cooking and what happens is that the lidocaine actually starts working and kicks in. Open your eyes for me and look up and look straight at the camera and you can see right there. You just compare this side. You gotta again look past the little bruise, but compare it to this side. You can see now the cheek is actually kind of blending in better. It's a nicer, rounder mound. Close your eyes again. You have to have them open and close Your eyes to be able to kind of see what it looks like and see where it needs more, where you need less. Again, I'm confirming that I'm on top of the bone and fill it up as I go there. And again, as you start seeing, you can see the nice round mouth. Now there's not that double bubble here. You have a double bubble where there's a cheek depression. And then the fat here, the cheek is kind of blending upwards. And if there's any kind of bruising, you just kind of hold a little pressure. Now, it's very important to tell your patients the worst case scenario. You tell them, listen, you're going to look like you got hit by a train. That's how badly you may bruise because they may bruise minimally or moderately, but you want to prepare them for severe bruising. I tell them, if you've got a wedding you're going to, if you've got a graduation, big party, don't do it about two or three weeks beforehand. For most normal activities. You can see right there, open your eyes and look at the camera and you can see the immediate difference from the right to the left. And just keep looking there and go a little closer with the camera and you can kind of see the two sides. The shadow on the left side versus it's improved on the right side. We're going to keep going. Close your eyes now. So now at this point, what I do is I actually have her hold a little bit of pressure with her right hand and I change the needle and I go to the other side. So now we're going to go to the other side again. I have my bevel down again. You have to know that this side is still not numb. That's a brand new side. So again, she's going to be jumpy and you can see the blood vessels. There's lots and lots of little blood vessels in that area. You try to avoid them, but there's no way of avoiding all of them. Start the filling process going. You want to again confirm where you are, your location on top of the bone. Remember, she's going to be feeling a little bit more on this side right now, just because there's no numbing other than just that topical numbing. But again, once I start going, it starts numbing up. Got a tear reflex. You know, ultimately this stuff is not fun. It does hurt a bit. But the results for every single patient I've ever done has resulted in them coming back again next year for more. None of them have been deterred by a Little bit of a discomfort. It's not the most painful thing in the world. I think lip injections hurt a lot more, but it's not fun either. So if you have zero pain tolerance, you may not want to do this. But if you want to look less tired and look like you just put on a couple pounds on the face, which makes people look healthier and less tired, this is a great option right now. Right then and there, you can kind of start seeing where it's going. Those eyelet bags that were there before aren't as apparent. Sometimes if you move the camera back, you actually get a better view too close, you lose perspective. So open your eyes. Look straight. Yeah. I mean, the bags there are much less. I'm going to go a little bit more in this area. And I haven't even done half a syringe yet, so she may not need that much volume. And you'll see this. People with fair skin, thinner skin, especially Caucasians, they require much less. Middle Eastern patients, Indian patients, African American patients, they require much more. The patient right before her require two syringes. Very good. We're almost done. Is it starting to numb up a little more? Yes. Is your lip even going numb a little bit down there? Sometimes these nerves can actually. The same nerve comes all the way down and can numb up the lipid a little bit, too. Not always. Again, I want to confirm that I'm on top of the bone. As the needle keeps going, it starts dulling up a little bit. So I want to make sure I'm definitely on top of the bone. Be very careful. You got to know your anatomy. This is not for somebody who's just starting to do injections. If you are a primary care doctor who's entering the field of cosmetic medicine and you're starting to do some filler injections in your practice, this is not something you want to be doing for at least a few years until you're very comfortable with filler injections. Okay. So we're going to hold a little bit of pressure here, and after this is done, we're going to go to the other side. I'll take this ready, see if anything more is needed. I need a little bit more on this side, so what I'm going to do is just go right there. Are you feeling much of it now? No. It's pretty much numb now, right? Yes. Have you been forced to give those answers? No. All right, So if you go to a new area that you haven't really put much before, she's going to still feel it see how she jumped. But the areas that I did before are basically at this point completely. You can start seeing. Open your eyes. One more drop on this side and then we're done. It really takes it about four or five days to smooth out. But with bruising, it may take up to two weeks for it to look good because the bruising will actually attract more fluid, more swelling. Let's take this off. Let's take a look. Mascara is running too, a little bit. So now we got mascara and bruise. Look straight for me. Not up. Good. Perfect. We're done with the right side. Hold this for me. Just gently, not too much pressure. We go back on this side, finish up, and what we're going to do is we'll have some pictures of the before and after up. Once the bruises settle down, you'll be able to see the before and after. See, I'm pushing because at this point, the needle starts dulling a little bit, even though I've changed it before. And you just want to make sure that you're on top of the bone. And this really comes from experience because you may feel like you're on top of the bone, but you may be just barely in the muscle. And then you'll inject in the muscle, and that doesn't look good. Let's take that off. Look up for me. Clean it up a little bit. Good. Let's back up with the camera. Show her whole face. Go all the way back. Look at the camera. As you look at the camera, you see those tear troughs pretty much filled up and gone. There are no more tear troughs anymore. And that's it. Before one week after. Stand up. So beautiful I got a reason to dance alone Rise up like that. Sun in the morning Come on, come on.
More from Dr.
#DeepPlaneFacelift vs. #SMASLifting. Here are the actual differences and similarities
Preparation before and recovery after your deep plane facelift surgery with Dr. Naderi
Deep Plane Facelift vs SMAS Face Lift. Understand the difference and make the right decision.
How to expertly analyze the upper face for Botox injections to prevent complications #botox
Naderi 11-Fill™ Filler Technique for Deep Wrinkles Between the Eyebrows (Glabellar lines, 11 lines)

Master injector teaches safe botox & filler injection to 11 lines, crows feet & liquid rhinoplasty
What is the best age for a plastic surgeon? Does the age of your surgeon matter? #plasticsurgery
Buccal fat pad excision (Bichat’s fat pad removal) is a quick and easy way to slim the face.