How I Make Videos Using My Phone and Webcam [behind-the-scenes]
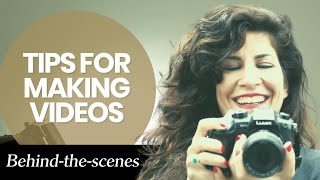
Hadar Shemesh shows how to shoot polished videos on a phone or webcam. Use daylight or soft artificial light, position your camera at eye level, and keep your background simple. A headphone mic or external mic fixes audio without extra gear.
Chapters
Hey everyone, it's Hadar. Thank you so much for joining me today I have something slightly different for you because today I'm going to share with you a video from one of my private memberships that teaches you how to make great videos using your phone or using your webcam. And I want to share that with you because I believe that making videos and speaking on camera is one of the best ways to achieve fluency. And sometimes technical reasons like you don't like how you look or you don't understand how to work with a camera prevent you from making videos and even sharing them online. And if you know the influency community, you know that the way we practice together is by sharing videos. So this video is designed to help you understand how to get comfortable on camera, how to take advantage of your phone or your webcam and how to do that so you can practice yourself speaking English on camera as much as possible and ultimately improve your fluency. So let's check it out. Hello. I'm glad you could make it. Come on in. Today I invited you to my work studio to give you a little bit of a behind the scenes of how I work and create videos and create content. We're also going to talk about how to create great videos, whether it's just using your phone or your laptop or a camera. So I'm going to show you all my equipment and the things that I take into consideration when making videos. So let me show you around. First of all, this is the main workstation where I record my videos. We created and built this work studio because I wanted an easy access to the equipment and to creating content. So right now all I need to do, if I need to go live or to make a video is just to hit play, maybe plug some things in, and that's it. I don't have to set everything up and then take it down. This hasn't been my reality for many, many, many years where I had to create everything and kind of like take it down at the end. But now we have created this, which made content creation a lot easier. So this is where we create videos. And that's a workstation where my team and I just sit for a meeting or discuss things, or we just sit and eat. And there's another workstation here for one of the team members. Well, now it's Covid, so there aren't too many people here as we used to have. But still we're hopeful. We're going to fill up the place really soon. And then this is the living room. And sometimes I host groups here. I don't teach a lot of groups anymore, but when I do, I bring them here. And I also have another studio right across the hall for that purpose. But this is another place for us to have meetings in a more relaxed way. And also this is another set for the videos. So sometimes I record videos sitting here in the living room on the couch. And this is the board where we write things like how to create videos today. Now, while this is my usual set, I often change the background and the backdrop to kind of like change the mood for the video. So it's not always the same. But when I go live or when I teach, I just use this setup, which is easy and fun and pretty. Okay, so now let's get started with how to make videos using your phone only. So I'm going to give you a few tips to make your videos look really good. Even if all you have is your phone, you really don't need more than that to get started. Plus, when you make videos for IGTV and for Instagram, using your phone is probably better than using a fancy camera because they convert better. Just saying. So, I want, I want to. I want to show you how to make great videos with your phone. So the first thing you want to ask yourself is what platform are you going to share this content on? Because if you want to share content on Instagram or igtv, you can. You want to hold it vertically, just like this. But if you are creating content for YouTube or LinkedIn, then you might want to do it horizontally because otherwise it's just not going to show up nicely on other platforms. So take that into consideration. First thing. Now, if you are starting with vertical videos, here's what you need to take into consideration. First, the background and the lighting. So first you want to look for a light source, ideally daylight, right? Ideally, you want to just record it in front of a window where you don't have direct sunlight because then it's going to burn the shot. But here, as you can see, I have drapes and it kind of like breaks the light so I get really nice sunlight. And if you look at me here, then you see that my face is lit and it looks pretty good in comparison to this, where I have more shadows on my face or this, where I have light only from one direction. And here I'm not that lit. Not that, you know, having light from one direction is bad, but I think it's better if you can find a way to kind of like light your entire face. Now, if you don't have a window with sunlight. What you could do is use artificial lighting. Now, when you use artificial lighting, you want to go for a soft light. Okay? This is why we use this. Because if I were to use just direct, the direct light, then my shadows are really, really harsh and hard. But if you use this, it makes everything a little softer and it makes me look prettier. Now, if you don't have artificial lighting, you can do the same with your lamp at home. I'll show you. If all you have is this lamp and you're at home and you don't have a window with daylight, then what you could do is just direct it to your face. Especially if it's just soft light. Here, this is like a yellowish soft light. Now, if I put it here on the side, I only have light on one side of my face. So I might want to sit in front of it and make sure that I hold the camera slightly to the side so it doesn't block the light. Okay? And if it's a little too much, which is what I feel, I might go back a bit until everything feels sort of evenly distributed. Hi, it's Hadar. Welcome to my channel. As you can see, my face is a little shiny. That's because of the light. So you can either powder your face or take a step back a bit more until you don't see it or feel it anymore. Okay? So once you find your source of light, then you want to record the video. And here are a few more things that you want to take into consideration. First is how your head fits within the frame. So two things you want to think about. One is that there isn't too much space between your head and the top of the frame. So you might want to drop it until you have, as my videographer says, a box of cigarette above your head. This is basically the space that you want to keep between your head and the top of the frame. Also, you want to make sure that there is even space between your right side side and your left side and the end of the frame. And lastly, you want to hold it not below your eye level, not at your eye level, but slightly above your eye level. And the last thing you want to take into consideration when you design your frame is that there isn't something weird sticking out. Like right now, if I do this, you can see the fan and you can see the light, and that attracts attention. And the cable here, and that's not great. So you might want to move around until it's pretty clean and nothing sticks out in the background. And that's it. Once you're ready, wink to yourself and start the video. Hey, welcome to my channel. It's so good to have you here. Now, sound is so incredibly important. First of all, make sure there isn't a lot of background noise because if you do, you're not going to sound that good, especially when teaching something. So you want to make sure that either there is silence around you or that you use your headphones. I know it doesn't look amazing always to have your headphones in, but it's better that people hear you well. So now I'm going to show you the difference between my sound without the headphones and with. So right now this is me. And now I'm connecting my headphones. Put one of them because that's a microphone and it probably sounds a little better right? Right now this is the cheap solution. So you don't really like. It's everything that you already have. You just put in your headphones and you make a video. Hey, what's up? It's Hadar. So good to see you. Today we're going to talk about how to pronounce headphones. You can use your phone headphones, but you can also buy a special microphone for your phone. You can't use any neck mic that will fit your camera because it has to be special for your phone. So if you want to use neck mics that can connect to your phone, we will put links to some of the products that we use in the workbook. Now, this is my usual background, but I don't always film my videos using this background because the background really changes the look and feel of the video. Let's see how the background affects the video and the look. When you're choosing a background, make sure the lighting source or the window is not right behind you because you. You are not going to be lit and everything is going to look dark. You always want to make sure that there is contrast between the background and you. That means that you want to stick out and the background should be a little less dominant. And one of the ways to do that is lighting. Now right now the background is well lit. Now see how it looks right now and how dominant I am in the frame. And now we're going to turn the lights in the back and and see how it affects the frame and how I look. Let's try it. Now. When the background is dark and I'm lit, I am more present in the frame and it looks better and I stick out more. And this is something you want to consider when shooting with different backgrounds. Now, if you want to make longer form videos, then I recommend using either a tripod or just create a setup where you can place your phone and you won't have to hold it the entire time. So let's see how it looks. Let's first start with this. Let's say you don't have a tripod just yet and you want to make videos. What you want to take into consideration is that it's going to be at your eye level. So right now it's a little low. So I might add this. I might like add another book here and make it a little higher. Maybe lower my chair a bit. Can't do it. But here. So this is a pretty good setup. And all I had, you know, all I needed is a box and a few books. Okay. Or you can just stack up a few books and use it really simple. You don't have to touch your phone. And that's it. You're speaking to the camera. Hi, welcome. Today we're going to talk about how to pronounce tripod. Now, one more thing I want you to pay attention to is that when you make the video, this is really important. So pay attention. When you make the video, it's really important that you don't look at yourself, but you look at the camera. Okay? So with some phones, it's not that obvious, but with others, it really looks like you're looking the other way. So you want to look at the camera. If you don't know where the camera is, just start covering different areas in your phone until you cover everything. And then that's when you know that your camera is right here. And fix your eyes on the camera and just look there. I know it's distracting because you keep wanting to look at yourself. But see how it looks when I'm saying it like this? So. Hi, it's Hadar. How are you doing? I'm so happy that you're here versus hey, it's Hadar. How are you doing? I'm so happy that you're here. Now it actually looks like I'm looking at you, which is what you want because you want to make that internal connection. Good. And same thing, if you set it up horizontally and here it's more distracting. So again, look at what happens if I'm looking at myself. Hi, it's Hadar. It's so good that you're here. Today we're going to talk about M, is and R, right? It doesn't look like I'm looking At myself. But if I look at the camera, which is right here. Hey, what's up? It's hadar. So good to have you here. Today we're going to talk about same idea with a tripod. You just want to set it up and always keep in mind headspace. And you have a lot more freedom. And you want to make sure that it's not too low. So I can use this now. And if it's not enough, I might actually use my books here to set it up. Then I can always tilt it. Hopefully it doesn't fall and break. Okay, good. So now we want to also check out the background here. I have empty spaces, so I might want to put back the books and this. So when you use this frame, for example, it is good enough to be used on YouTube as well. Okay. Just make sure that you have enough space. And actually, if you push it away a bit and move it further from the background without dropping the phone, it will look better. Okay. So you don't want to be very close to the background. Hey, what's up? So good to see you here today. Today we're going to talk about politics. Okay. Now that you know how to take steps stellar videos using your phone, let's talk about how to take videos using your webcam. This is good whether you want to record videos for social media on your webcam, but also if you want to create a video lesson, let's say, for your online course or for your students, and you want to use zoom for that and share the slides as well. So then you might want to use your webcam and also how to look good on zoom, because that's important too when teaching. Now, first of all, this is your default position where the computer is on the table and you look at the screen. And that's great. And sometimes if we get too close, it happens to me sometimes when I'm trying to look into someone's mouth, it looks a little weird because you're very close to the camera. So you want to make sure that you are not too far from the camera. You want to make sure that they don't see just like a part of your head, but you are right there, you know, the cigarette box right above here. And you have even spaces from your right side of the face and left side of the face. However, when I make videos using my computer or when I have a zoom call that is important, what I do is I want to bring my laptop up. And that is, of course, after setting up the lights first. Let's not forget so what does that mean? Because, as I told you with the phone, it's better if the camera is at eye level and above. So you can either take a few books. And this is how it looks like it's already better, but this is even. This is not even good enough. So I might take something like this and put my laptop up here and then lower the screen a little bit, which is more complimenting to your face. And that's it. Right? And it looks better. So take a look again. So this is the frame where it's raised, and this is the frame where it's on the table. So you tell me what looks better. I like this. Good. And again, like, tilt it a little bit and then take out weird stuff from the background, and you're good to go. Now let's see how it looks in a zoom meeting. Gil. Now look at his picture. I can't really see his face because the light is right behind him. Right. And it's really bright, so I don't see his face. Look at the difference between my video and in his video. Now, Gil, what if you just switch sides? Okay, good. Okay, so now I can see a much better picture of him. And you want to pay attention to those things because sometimes you sit before a call and you just, like, open up your computer and you speak from where you're at. And if you don't look good, it will affect the experience. Don't you think so, Gil? Totally. Okay, good. All right, that's it. If you liked it, then let me know in the comments below and of course, share it with your friends. And again, if you would like to learn how you can join the influency community, click the link below so you too can upload videos of you speaking English every single week. Thank you so much for being here. And I'll see you next week in the next video.
More from Hadar







Read Out Loud with me! Dare to Lead by Brené Brown | Pronunciation & Vocabulary practice