A demo video (YouTube) showing the Handtevy Mobile app in a simulated two-year-old anaphylaxis emergency. It demonstrates cross-platform behavior (apps on iOS/Android/Windows 8–10; web-only on Windows 7), guided pediatric dosing/airway/electrical actions (Epi, Benadryl, ET tube, i-gel, defibrillation), and the workflow to timestamp treatments and submit an electronic report that imports into an ePCR system.
Chapters
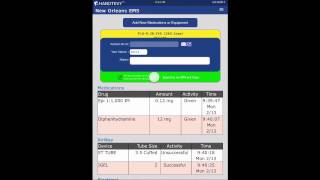
So right now we're actually in the New Orleans account. The Hands heavy mobile is going to be compatible with iOS, Android, Windows 7, 8, 9 and 10. All those platforms are going to function as an app, which means that they are going to live internally within the device itself. So that means that you only need to have an initial connection to the Wi fi or cellular in order to download the app and connect to it. Once you do that, the information will live internally within the device itself. The only other time that you will need Wi fi or cellular is when you submit the actual report. And of those platforms that were stated, the only one of those that will not function as an app is going to be Windows 7. So Windows 7 is going to be a web based browser version, which means that it will require a constant WI fi or cellular connection. This is due to Windows 7 just simply being an older software and not allowing for third party applications. But right now we're going to be going on a suspected anaphylaxis call. So let's imagine that we just got dispatched to a two year old suspected anaphylaxis call and we're en route to the scene. So prior to arriving with our system, as mentioned earlier, you're able to simply start up your app or mobile. So if we go to start a new patient, we'll select it from there you have a list of age groups from preemie all the way down to your adults down here at the bottom. So it is going to be everyday use. It covers both pediatrics and adults. However, let's say that we go into our two year old patient here. Click our two year old. Now, all that customized information that we had discussed earlier comes live right there on your screen. You have all your medications, your airway, your electrical and your vital signs. So prior to arriving on scene, as mentioned, you're able to start determining how much medication you might need to administer, what size airway equipment you may need on hand. That way there's more confidence prior to arriving and less anxiety on the scene itself, allowing you to actually stay on scene and treat that patient. So let's say we're going on the call, we arrive on scene, we pull out our EPI one to one. We realize the patient is in an anaphylaxis case. So we get out EPI 101, 0.1 MLS. We select it, we hit given it's going to timestamp it, turn it green. Let's say the patient has progressed and gotten slightly better. However, we want to administer some Benadryl now, so we select Benadryl.2 MLS. You can see you have the different routes administration here, IV, IO and IM. So let's say that we select IV.2 MLS. We hit given again timestamps to turn to green. Now we want to do some airway. So we go into our airway. Let's say that we tried doing an ET tube. We'll say that it was unsuccessful. 3.5 cuffed turns it red. Now we want to do an IGEL size 2. We select IGEL size 2. We'll say that it was successful, turns it green. And let's say for whatever reason, our patient decided to crash. And we want to do some electrical. So we go down to our defibrillation tab. We're going to select it. Select first round at 20 Joules. We'll hit rhythm converted. And now we're done. We ran our call and hopefully we saved that child. So the very bottom of the screen there you will see the vital signs as well. The vital signs are going to be the parameters of what a healthy patient in this category or weight range should be within. So let's say that we're ready to submit our report to the very top right corner of your screen. You're going to go to the hash marks. You're going to select it. You're going to go to new or you're going to go to review and submit chart.
From here. You will type in the EPCR number at the EPCR genital for that patient. So let's type in 1, 2, 3, we'll verify it. Type in again 1, 2, 3, hit save and verify. Put any notes in there about the call that you want saying that it was anaphylaxis, trauma, whatever the case might be that you want to put in there. You open the record.
Then everything you did is going to be timestamped for you right there if you want to make a change or something. Let's say we select Benadryl from here. You can change the route, dose, time, concentration, putting side effects about the drug in that notes section there for you. Let's say that we go ahead and back out of it. We'll type in our name saying that Patrick was the one who charted it. Put any additional notes with a column there. We'll say that we reviewed our chart. We'll hit submit. And what ends up happening from here is that once you submit that report, this report will go into our cloud, our cloud, and through that cloud, once we're integrated with whatever EPCR company you may be utilizing from there on your EPCR software, you're going to be getting a notification saying that there's a new report to import. All you'll do is you'll simply go into that message section, find that report, you'll hit import, and it will build and flow directly into the actual flowchart and patient care record that you're working on.