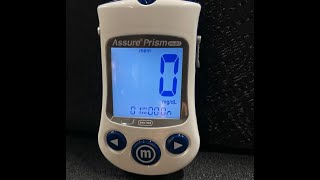
The Assure Prism glucometer measures blood glucose in about 5 seconds with a range of 20–600 mg/dL. It has a larger backlit screen, uses just 0.5 microliters of blood, and comes with quality-control solutions to verify accuracy before testing patients.
Questions this video answers
About 5 seconds.
Readings below 20 are 'low' and above 600 are 'high' (range 20–600).
0.5 microliters.
Two lithium batteries.
115–173.
Chapters
Today I'm going to introduce a new piece of equipment that we've recently had to purchase from the medical services division after learning that our glucometers are no longer approved for multi patient use. This is an FDA change and what we've done is we've purchased a FDA approved multi patient use glucometer and that's nearly identical to what we've had before. So I just want to take a minute to explain some of the details of this particular piece of equipment and what makes it unique and give you a quick in service on how to use it. So first is this. This is the new glucometer. It's called the Assure Prism. And, and if you notice it's a little bit, I think the screen is a little bit bigger, the numbers are a little bit easier to see on this. The results happen within five seconds. It's got an eject button on the side to help you eject the test strip after you've used it. The result range, and this is really important, the result range is now if it reads below 20, it's considered low. If it reads above 600, it's considered high. So the range is going to be between 20 and 600. It still takes two lithium batteries just like the other one before. It only takes 0.5 microliters of blood to get a result. And it has a backlight button in case you need to use that. So that you can see if you press the button on the side, it's got a little backlight button.
All right, so let me tell you what's going to happen. Whenever these things show up at the station, you're going to get a glucometer, you're going to get a little black carrying bag, you're going to get the control one and control two bottles to test this, to make sure that we've done our quality control on this before. We use this on patients. And we're going to have to get new test strips. They're going to come individually packaged in foil just like the old ones. But, but you're not going to be able to use the old test strips on this new piece of equipment. It has to be the new ones that we're purchasing. So when they show up at the station, all of the old test strips have to be thrown away and we're going to walk through on how to, how to get this thing ready to go, how to get it operational. We got to use our Control 1 and our Control 2 solutions. So let me go ahead and walk you through how that's going to work. We're going to open up our test strip. We're going to go ahead and put it into the port. And whenever we put it into the port you're going to see a little symbol that's going to come up that's going to tell you to go ahead and apply the blood. So we'll take out our control one and what we'll do is we're going to just put a couple drops here on this little piece of paper here and we're going to just take the tip of the glucometer and what you see is it'll automatically draw that fluid up and it begins to count down. As it begins to count down, you'll see that it says 141. Now the range is going to be detailed on the box of test strips. So control one will have a range for these particular test strips. It's anywhere between 115 and 173 whenever you you use control one. So now we're going to go ahead and test control number two. We're going to get our go through the same process, shake this up.
Just apply a couple of drops there and same thing.
It'S going to count down.
And this says 254. And again that falls within range. The acceptable range for these test strips are between 208 and 312. In addition to that, this solution is Only good for 90 days after you open the bottle. So there's an expiration date for printed clearly on it. Take a pen and Write on there 90 days from the date that you open it so that you know when it's going to expire and you can order a new one from the shop.
You should also test your glucometer. Anytime you think that it's giving you an improper reading. If it doesn't seem like it's matching the patient presentation, go ahead and run a test on this to make sure your glucometer is working correctly. In the event that it's not working correctly, obviously we'll take the measures we need to replace that. Alright. Step by step process on how we're actually going to do this. Nothing really changes with obtaining a blood glucose sample. Always notify the patient of what you're getting ready to do and always obtain informed consent. That goes without saying. The next thing we're going to do is we're going to take our, we're going to take our alcohol prep out, we're going to clean the site. The manufacturer recommends that you utilize the Middle finger or the ring finger and use the sides when possible. Obviously you want to avoid that, that nail bed or that bunch of. Make sure you allow the alcohol to completely dry before you obtain your sample. If you don't, it can contaminate the sample and cause a skewed reading. We're going to go ahead and open up our test strip and we're going to insert this into the glucometer like this. It's going to go through its self check. It turns on automatically and you're going to see the symbol that's going to be flashing on there telling you to go ahead and apply. That blood alcohol should be dried off the skin by now. We're gonna go ahead and pinch the skin and we're gonna obtain that sample. You can just hold this vertically.
Just like this to get that sample right off the skin. Now once you've obtained that sample, a five second timer is gonna start counting down and it's going to result. It does not require that much blood in order for it to result. So again, 0.5 microliters is all that it takes. This is a very small sample size. Let's just make sure that we are getting capillary sticks so that those numbers are as accurate as possible. Once you've obtained your reading and you've got your sample, you go ahead and just press that button on the side and it'll eject that for you. In the event that there's any errors, you're going to see an error screen that's going to come up and on Target Solutions, we're going to go ahead and put this up so that everybody can see the errors for this particular piece of equipment to tell you what's wrong with it. If you don't use enough blood, it'll give an error. If you have it out. If it falls outside of the temperature, it's going to give an error as well. So just some things for you to look at and to help familiarize you with this new piece of equipment. Thank you so much for your time. We appreciate it. Stay safe.