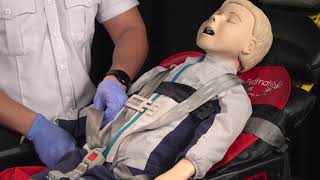
Lieutenant Movdy demonstrates the Ferno PD Mate Plus, a device for transporting pediatric patients weighing 10-100 pounds. Parents can no longer hold children during transport. The video covers setup, strap placement that doesn't restrict breathing, and raising the headrest 15-45 degrees.
Questions this video answers
10 to 100 pounds
SOG 520.001 patient transport
Between 15 and 45 degrees
At least once a month
Bios Disinfectant Solution
Chapters
I'm Lieutenant Movdy with Medical Services Division. Today we're going to be introducing a new piece of equipment that will be coming to all the rescues in the next coming weeks. Today we're going to be going over the PD Mate Plus. This piece of equipment is going to be used to transport any pediatric patients that meet the criteria for this piece of equipment. The past practice of having parents or guardians hold the pediatric patients is no longer going to be acceptable. The pediatric patients that meet the criteria to be used by the Ferno PDMate plus is going to be from 10 to 100 pounds. Remember to review SOG 520.001 patient transport as that SOG has been updated to include the Ferno PDMate Plus. Also, when it comes to pediatric patient positioning during transport, review your patient protocols. Now we're going to show you how to set up the PDMate Plus. Prior to setting up the PDMA plus, it is recommended that all restraints are removed from your stretcher when starting to use the PDMA Plus. The manufacturer recommendation that we raise the headrest between 15 and 45 degree angle. Placing the backrest at this angle will place the shoulders over the pelvis, which will allow the patient to maintain a proper center of gravity. Now we're going to set up the PDMA plus to our stretcher. We're going to go ahead and undo the Velcro straps and we're going to go ahead and unroll it. We want to make sure that we place the black straps to the position where we believe the patient's shoulders are going to be. The first buckle we're going to go ahead and secure is the back rest strap. The back rest strap is the black strap that's going to be positioned at the patient's shoulder. We're going to go ahead and wrap this around our stretcher. We're going to make our connection. We're going to pull the loose end, leaving some slack to tighten for final adjustments. The next buckle we're going to go ahead and secure to the stretcher is the floating gray and black strap. This is going to be positioned where we believe the patient's chest is going to be. With this strap, it's going to wrap around the back of the stretcher headrest.
Again pulling the loose end, leaving it some slacks for final adjustments. When placing the patient onto the PDMA plus, we want to make sure the black strap is in line with the patient's shoulders.
Now that we have the patient on our PDMA plus, we're going to go ahead and Tighten our straps that are around the back headrest of the stretcher. When making your final adjustments, we want to pull the straps that are behind the back headrest. Pull the loose ends as tight as possible to make sure that we are compressing, that they are compressing against the mattress. Next, we're going to secure the bottom gray buckles to our stretch.
Pulling on the loose end once again leaving slack for final adjustments. We're also going to go ahead and do the same thing on the other end. Next, we're going to pull the crotch strap between the patient's legs and rest it on the patient's abdomen. Next, we're going to secure the floating black strap across the patient's chest. We're going to buckle it. We're going to go ahead and pull the loose end.
When pulling the loose end, we want to make sure that we don't pull tight enough that it's going to restrict chest rise and fall on our patient.
Next, we're going to take the shoulder strap and we're going to put the shoulder strap over the patient's shoulder.
We're going to buckle it to the crotch strap and we're going to tighten it.
Leaving room for final adjustments. Now that we have one side done, we're going to do the same thing on the opposite side. Now that we've secured our shoulder straps, we're going to place the shoulder straps into the chest clip.
We're going to raise it so it can rest on the black chest strap. Once we've safely secured our patient to the PDMA plus, we want to go ahead and make sure all our straps are tight and secure as well. We want to make sure that we check the chest straps and that we have not restricted any chest rise and fall on our pediatric patient. During patient turnover, make sure to loosen and unbuckle all your straps and move the patient over safely to the hospital bed. Now that we transferred our patient over to the hospital, it's time to go ahead and clean and disinfect the PDMA plus. After every use, the PDMA plus should be clean and disinfected. One of the products that can be used to clean the PDMA plus is found at the station is called the Bios Disinfectant Solution. Spray the product into the PDMA plus and wipe it down with a dry towel. When you completed the cleaning process of the PDMA8 + and prior to going back into service, make sure to place all stretcher straps back onto the stretcher. Also, the PDMate plus should be inspected at least once a month. Once you're finished using the PDMate plus and you've disinfected and cleaning it, it's time to store it. The PDMA plus is very small and does not take up much room. To secure the PDMA plus, go ahead and secure all the buckles and we're going to go ahead and just roll the PDMA plus into itself.
The PDMA plus comes with two Velcro straps to go ahead and secure it.
And now the PDMA plus is ready to be put away for its next use. Thank you so much for your time. If you have any questions, please reach out to the Medical Services division. Please stay safe.