Pleural Decompression
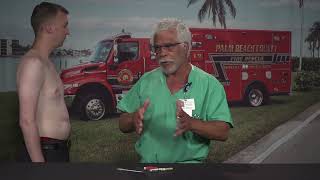
Prehospital clinicians learn to recognize and treat tension pneumothorax. The preferred landmark for needle decompression and finger thoracostomy shifts to the anterior axillary line at the 4th-5th intercostal space. Use a large-bore catheter, aspirate to confirm air, and in arrested patients, make a 1.5-2 inch incision at the same location, staying on top of the rib to avoid vessels.
Chapters
Today we're going to talk about tension pneumothorax. We were able to bring in Dr. Borrego from St. Mary's Hospital to go ahead and show us how to do this in the landmarks. So one of the things I want you to be mindful of is there is going to be a change in the protocol because of this education that we're gaining. If you look at the TECC criteria, the ATLs criteria, and you speak to the trauma surgeons, pretty much everybody is telling us that our new anatomical landmarks really need to be that anterior axillary line, not necessarily the mid axillary line. So if you look at your protocol books right now, the preferred spot for tension pneumothorax, for needle decompression, I should say, is that. Is that mid axillary line is what the protocol book says in that fifth intercostal space. However, there are some issues with that that we've noticed. And so the preferred location from this point forward is going to be the anterior axillary line in the fourth or fifth intercostal space. That is going to be your first place that you're going to attempt to place a needle in the event that you encounter a tension pneumothorax. Let's talk a little bit about what a tension pneumothorax is. First off, you should be suspecting this. Anytime you have blunt chest trauma, penetrating chest trauma, or barotrauma of any kind, you're going to notice this on your physical assessment, because the patient's going to have very, very specific symptoms of a pneumothorax, which is going to be air hunger. They're going to have shortness of breath, SpO2 may be low, and this patient is going to have may even have unequal chest rise. You're going to hear absent or diminished lung sounds on one side or the other. So we're going to do a full assessment on this person. Now, remember, when a patient actually has a pneumothorax, it's not a true medical emergency until it becomes a tension pneumothorax. And that is defined by hypotension. So when your patient now becomes hypotensive, this is a tension pneumothorax, and we have to do something about this immediately. So, so one of the things that we're going to do in the field as paramedics is we're going to go ahead and do that needle decompression. So for all intents and purposes, our new landmark is going to be the fourth or fifth intercostal space in the anterior axillary line. Now, our EMS captains and our flight crews also have the ability to perform what's called a finger thoracostomy. And the protocol book is actually very clear that it should also be in that fourth or fifth space. However, we also want to move that to the anterior axillary line as well. So from this point forward, anytime we're penetrating the chest, we want to use that anterior axillary line on the fourth or fifth intercostal space. So we have Dr. Borrego that's going to explain the anatomical landmarks and how to perform the procedure. And he's also going to explain how to do that finger thoracostomy as well. I hope you enjoy this. Reach out to the medical services division if you have any questions.
And if maybe the student could come, I could show this. This is a 10 gauge needle.
With a catheter, obviously. And it's a good size. It's what, like three inches? Yes, three inches long. So you can see that even an ebola, and this will penetrate very, very deeply. And that's why you want to make sure that you have the right diagnosis. Because if you don't have the right diagnosis and the media stem has shifted to that side, then it's very easy to hit the lung or hit any other structure. One of the ways to do it is to hook it up. You guys may not have the capability to do that in the field, I don't know. But if you put a syringe with fluid in it, saline, and you aspirate as you go in immediately, the minute you see air coming to the syringe, then you thread your catheter in, you thread your catheter, take the needle out. If you're doing it blindly, also without the syringe, the minute that you see anything bubbles, a little bit of bubbles, bloody bubbles, or anything like that, it means that you are already in the chest. And at that point, I would try to thread the needle and remember that it's like everything, it shouldn't take a lot of force. So if you can push it, if you can't push it for some reason in this resistance, then back out and do it again because most likely you're not in the right spot. If there's a pneumothorax or a hemothorax, this is going to be really easy. There's no lung there. You know, you're going to have a lot of space between the lung and the chest. Also should be really, really easy. And this is what I'm talking about here. So if you see, you know, his latissimus dorsa, here's the mid axillary line. But right there, I could still feel his lat. Now, even in somebody who's more built than he is, not that he's not built, but somebody who is, this muscle will come up even a little higher up to here. So I like to stay until I come to the nipple line. Because the ribs going like this, see, it's not a straight thing. The ribs are not like this. This ribs coming like this. So it's very easy to you when you come up here to get deflected. And your needle might go up or it might go down like this, where you don't want it to go. You want to try to get the needle to come straight in like this. So you want to come at least at the fifth intercostal space right here or right here, see? And then you feel the rib easily on him. Even if he puts his lung there, his arm down like that, which is anatomical, let's say that he has a shoulder that's busted, the arm is broken. You don't want to be doing this to a patient that has that. It's going to create more pain and more problems. Even in that situation. If you come a little more anterior, here's the anterior axillary line right there. Then if you come to, they tell you mid axillary line. But if you come a little more anterior to that, then you're going to have a much easier time in putting the needle. And in fact, for 31 years that I've been putting chest tubes, that's where I put my chest tubes. And this is the same thing that if you're going to do a needle decompression and you do get a pneumothorax, then your next step is to do. I don't know if your training is there yet or not, but the next step will be to do a finger thoracostomy, which is what I've been trying to show the medics when they come to the trauma center, to a trauma bed, they bring me patients with an impression. I'm trying to show them how to do the finger thoracostomy, which is for right now, is for patients that are in cardiac arrest. So that's one step further. So you have a patient with diminished breath sounds, and once it has been intubated, he's in full cardiac arrest. Then you want to do a finger throacostomy. On that patient. And you're going to do the same thing. You're going to come there and you will feel the rib and the whole thing. The reason why I say go a little anterior, because I want you to feel the rib. I want you to really feel the rib. Because once you feel the rib, you know exactly what you're doing. You feel the rib and you want to stay on top of that ribbon. You make an incision over the rib. You don't have to put your finger through it. That's what's called a finger through acostomy. So it needs to be at least 2 inches, 1 1/2 to 2 inch long incision. And then you make an incision above the rib. You cut through the muscle or you spread it with a clamp. Whatever you have, you poke into the chest and you want to put your finger in and spread that muscle with your finger and, and feel inside and feel the chest wall, feel the, feel the diaphragm and feel the heart and also feel the lung. And then obviously, if you do, patient gets vital signs back. You want to put a little dressing that goes on three sides. You want to leave it like a flap. You don't want to occlude it because the whole purpose is to open it, not occlude it. Now, there's some other pitfalls with that. Also one of the pitfalls with the thoracostomy, if you go inferior to the rib, you could hit intercostal vessels and that could cause bleeding in and of itself. Honestly, I'll tell you that that's not going to be a big deal if the patient's arrested. If the patient's arrested, you're doing this to save, to bring them back. And if you put your finger in, you're going to evacuate a pneumothorax. It doesn't really matter. But to be appropriate, you want to be on top of the ribbon. Then the other thing that's key about it is to make sure that you insert your finger all the way in. Don't be afraid to put your finger in. And also to spread the muscle so you make it big enough so that it stays open. Because even when we put a chest tube in, the minute you put the chest tube out, the muscle closes again right away. So you want to spread and spread the muscle.
So that's all. Those are the issues. So just to re. To summarize it.
The diagnosis has to be made appropriately. You need to use all your clinical assessment. Listen, look, listen and feel. You want to look for tracheal deviation, distended neck veins, you want to look for any asymmetry of the chest, any asymmetrical movements. And you want to also then subsequently feel. And the feel part when it comes to this is to be to percuss. And I know how difficult it is for the medics in the field. It's going to be much, much, much tougher than for us when we're in a controlled environment. But even like that, I still recommend to percuss always before you do a needle decompression and then finally when the patient is intubated, always suspect that it's a main stem intubation if it's a right main instubation. If the patient is intubated, you don't hear breath sounds on one side. The first thing you do is pull the tube back, pull the tube back and then you reassess, you look, listen and feel once again to see the breast sounds came back. And if they did, then you don't have to do the needle decompression in that situation. And then for the finger thoracostomy, it's the same position, the same row, right exactly where you took the needle out. Then you want to do your finger thoracostomy right there. And the pitfall on that or that procedure is to make sure that you go on top of the rib, spread the muscle big enough so it stays open, put your finger in, feel the diaphragm, the lung, the heart and the chest wall, and then finally put a three sided dressing so you don't totally occlude it once again after you have successfully resuscitated the patient. And just one going away message that I like to put out there is to for the medics to know that us working as a team together to provide the best possible care to the patients that we both care for together, is that we want to be able to help as much as possible. So whenever you guys bring us a patient that you have done a needle decompression, I would encourage you to stay for a few minutes longer because we already have to put a chest to bed in those patients. We like to at that time tissue the anatomy. When we put in the chest tube in so you can actually put your finger in the chest, feel the ribs, feel the angle of the ribs that I'm talking about, feel how you have to disrupt the muscle and make the opening bigger and also be able to feel where the diaphragm is, the heart and the lung. So just a couple of extra minutes. I think that we are working together on a whole bunch of projects. Whole blood needle, decompression, finger thoracostomies, fast out in the field. And I think the more we collaborate and work together, the better that our patients will do.
More from Peter

Melissa Olen MSN, FPN-C, CCRN: Sudden Cardiac Arrest Training in Schools (Project ADAM) 4/25/25



Pediatric Hospital Readiness: How Teamwork & CPR Metrics Drive Better Outcomes

Chelsea Kadish, MD & Kyle Goodknight, EMT-P, RT: Pediatric CPAP in EMS (3/14/25)