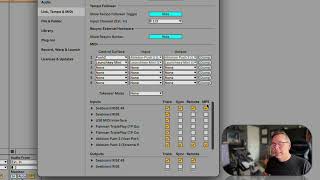
In this segment of his "Free Ableton Live 12 Music Production Class," J. Anthony Allen walks viewers through the four key checkboxes in Ableton Live’s MIDI preferences—Track, Sync, Remote, and MPE—explaining what each does and when it should be enabled. He emphasizes that Track must be on for basic note input and recording, while Sync and Remote are optional controls for keyboards with transport buttons, and MPE is a high‑definition MIDI mode supported by some devices. Allen then demonstrates a fast troubleshooting trick: using the MIDI indicator light in the upper‑right corner of the Live interface to confirm that the DAW is receiving MIDI data. By simply playing a few notes and watching the light flash, users can verify that their keyboard is correctly connected. He recommends making this a habit whenever a new keyboard is plugged in, using the indicator as a quick diagnostic tool whenever MIDI issues arise.
Chapters
The next thing you need is to look at these four checkboxes for your keyboard. Okay, Turn on track for sure. That means this keyboard can track notes, it can play in notes and record them onto a track. That's like the main thing we need to do, so do that. These other ones are optional and some keyboards can use these and some can't. So sync and remote are for things like if your keyboard has like a play button on it and a stop button on it, it can control the main play and stop of Live if you want it to. So you would turn on these controllers, so you would turn on these options. MPE is like, we'll talk more about MPE later, but it's like a high definition version of midi, which is an oversimplification, but that's kind of what it is. Some keyboards can do it, some can't. The, the cboard can. So I should probably turn that on as. But for just inputting notes and things, it doesn't really matter. Now, how do I know my keyboard is working and Live sees it? There's a fun little trick. Let's say I see everything here. It looks good. I have reason to believe that this keyboard is working. I'm going to get out of my preferences window and back into the main Ableton window and check this out. If we go up to, to the upper right corner, see these two little boxes right here? The top one? This box has one purpose only. The only reason it's there is just to be an indicator light for midi. That means that little box is going to light up whenever Live sees any MIDI information. That's all. And it's just to tell us, hey, midi's working. That's all. That's what it does. So all I need to do is hit some notes on my keyboard and see if that lights up. And it does. So midi's working. It's as easy as that. Okay, so whenever I plug in a new keyboard to live, I always plug it in, make sure it's turned on, and then do just like smash my hands on it for a minute, see that it's working, and then I say, great, midi's good to go. So get in the habit of glancing up at that. Whenever something goes wrong, something you're not expecting to happen with midi, look up there and that'll tell you if it's working or not.