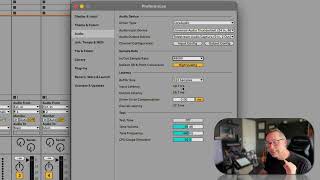
In this segment of the free Ableton Live 12 music production class, J. Anthony Allen walks viewers through the essential audio I/O configuration steps in Ableton Live. He explains how to select the correct audio output device (typically the speaker interface) and notes that his recordings use a separate software capture device. He then details input channel selection, emphasizing stereo inputs on channels 1 and 2, and advises on choosing an appropriate sampling rate (44.1 kHz or 48 kHz) for most projects to avoid unnecessarily large files. Finally, he introduces latency, describing its cause and offering a brief overview of how to adjust latency settings to reduce the delay between microphone input and audible playback, promising a deeper dive in a later lesson. The segment ends by highlighting the need to set the audio input device.
Chapters
Now our audio output device, this is just our speakers. This has nothing really to do with recording. In my case, it's always set to Universal Audio Thunderbolt, the same device, because my speakers are plugged into that device. However, just for the purposes of recording this, I have to set it to telestream audio capture. That's the software that does my sound capture for filming these videos. So you can kind of ignore that. Most of the time it's here. And then this is just anything that can make sound. Right. So wherever you have your speakers plugged into, this is what you need to, to select here. Okay. Now you may or may not need to do some input and output configuration. This just says what channels can I record onto? And in my case I have inputs on 1 and 2 and I can do a stereo input of 1 and 2. So that's the only thing that's selected. Okay. While we're here, you may as well select what sampling rate you want to use. Select 48 or 44. 1. 48,000 or 44,100. You can select these much higher ones. Unless you're doing like, really, unless you're like recording an orchestra, these aren't really going to do any good for you. And they're just going to make massive files. So I would select 48 or 44. 1. And then while you're recording, if you experience latency, latency means that I'm going to record a sound and then if I hear it back, it's like way behind. So it takes a while for the sound to get from the microphone into the audio interface, into the computer and then into live. That can take, you know, a couple of milliseconds. And if it's too much, this is where you can mess with that. You can control it a little bit to minimize that latency, that slowness between those two things. So you can experiment with this if you need to. We'll get more into that when we do like a more in depth recording in live thing in I think the next unit of this class of this series. But okay, so our audio settings are figured out. The thing we really need is audio input device here. So that is our audio input settings.