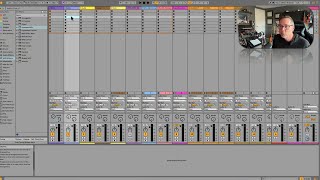
In this segment of the free Ableton Live 12 music production class, instructor J. Anthony Allen guides viewers through the Session View interface. He explains the I/O section (MIDI and audio inputs/outputs), the mixer controls (sends, volume, panning, track activator, and peak level meters), and the clip slot grid that holds individual clips. Allen highlights the orange outline that appears around tracks and the master channel, indicating which elements can be triggered via an Ableton Push controller, and briefly demonstrates how the Push can launch clips and act as a keyboard. The walkthrough sets the stage for a deeper dive into Clip View later in the class.
Chapters
Okay, now let's go back over to Session View. Take a look at the same stuff but from that other perspective. Okay, so here I have the same track that I was just looking at, but in Session View. So I haven't put any clips in here yet. There's a couple things that might jump out at you. First, this IO section, the I O means our ins and our outs. Like. Like our MIDI input, audio input. That section looks pretty familiar, right? Like, we have the monitor, the inputs and the outputs all set up basically the same. We have a little more information here now, but we basically have the same information. Our mixer looks a little different, but it's doing the same stuff. So this is where our sends are. Now they look more like sends because we have a little bit more room. This is our volume of the track. Here is our panning, our track activator, which doesn't look normal right now because I left this one soloed. So let's turn that off. So our track activator. So remember, yellow means it's on and working solo and arm to record. Okay. This up here is just showing me my peak volume. So you can see this one has volume. So it's showing where the peak is. That'll be useful once we get into mixing and stuff. Now we have each track up here, and up here we have. This whole area is called the clip slot grid. It's a grid of clip slots. Each one of these is a clip slot. Okay, now you can. Now, we'll get into how that works later, but something I want to point out while we're here is you see this orange outline around some of the tracks? We also have it over here on the master. What is that? That's a little strange. That means you probably don't see this orange outline. What it means is I have a controller plugged in to my computer that's able to launch clips. Now, in this case, it's this thing over here, this pad. This is called an Ableton Push. It's kind of like a physical controller for live. So you see this grid here? All of these things. I can launch all of these clips by going down this way, right? I can also play this like a keyboard using this instrument. Because this is armed to record, I can. Neat, huh? That's a cool toy. And I'll talk about how that works later in the class. We'll spend some time. The push controller. But the orange box here is telling me what I can access with my push controller. Okay. So it's kind of giving me a window into what the Push sees me doing More on that later. Okay. Now, there's a lot more here, but I just kind of want to keep it simple for the moment and just kind of go over the different areas of the program. So let's move on and talk about Clip View.