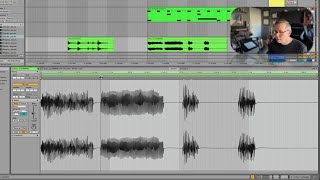
J. Anthony Allen shows how to warp an abstract organ riff in Ableton Live by placing markers and anchors to lock sections in place, then dragging notes to different beats until the groove lands right. When gaps appear, switching to Tones warp mode and adjusting grain size smooths the audio.
Chapters
Okay, let's try warping something a little more abstract. So I grabbed this little kind of organ riff here. Let's turn off the metronome. Okay, so where do these last two hits go? Do they go right on the beat? So this one's a little late and this one's a little early. Or do they go on the 16th note? What about this? Is this early? Should that go on beat two? I don't know. There's really kind of no way to know. In a clip like this, you can kind of feel it, like. And like, where this is landing right now is actually probably pretty good. But you really need some context for where you want to put any of these notes. Because warping is not about. Is not only about finding what's right, it's also about finding where you want the thing to go. If I want these to be in a weird place, I can put them wherever I want. So in order to really feel where these go, I need context. So I'm gonna put some kind of beat on this. So let's just go to. Okay, this is a MIDI clip with some drums. Sounds like this. Okay, now let's hear that with our keyboard riff and see how it sounds right away. Okay, so now in this context, I want to change this quite a bit. I want this to be on a second chord to be right on the second beat. Now, this gives me the opportunity to point something else out. I'm going to undo what I just did with command Z. So now if I drag this over to beat two. Here, watch what happens to all of this. This whole chord that's in beat one, it gets stretched out. If I don't want that to get stretched out, what I can do is put another anchor there. Okay, consider so with that warp marker. What I'm doing is just saying this part is fixed. Everything prior to this, I don't want to mess with. Now, if I drag this warp warp marker out, I'm not going to affect what comes before it. Okay, so there's that. And now this one, I think I want right on beat three. So I'm going to do the same thing because I don't want to mess with what's before that. Okay, and this one, let's try putting this one on the and of three. Okay, so let's hear it now. Okay, I actually want this on beat 4. I changed my mind. Okay, that's a cool groove. I could get into that. Let's say I don't want this gap. I could pull this over here and see how I can get that to sound. It's a little glitched out. Maybe not so far. Okay, well, let's try changing to tones. See if I can get that a little smoother. So by changing the tones, it smoothed this little gap. There was a little tiny glitch there. We got rid of it with tones. If that didn't get rid of it, you can kind of juice up tones with some of the settings. Grain size is going to make it sound better, but also it's going to eat up a lot of your computer processing. So you can mess with grain size, if you like, on tones. Okay, now let's talk about warping whole tracks.