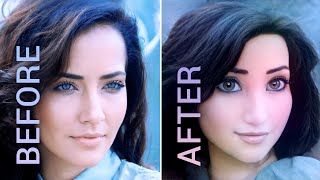
A Two Minute Papers video (presented by Dr. Károly Zsolnai-Fehér) showcasing a neural-network method that toonifies images and preserves identity/detail better than prior work. The video demos three main features—high-quality toonification, smooth interpolation between photos, and common edits (aging, smiling)—and explains that these rely on embedding images into a latent space and iteratively refining that embedding to recover lost details (e.g., beards, sunglasses). The presenter compares this method to earlier approaches (StyleFlow, StarClip), shows AB-test style examples, and includes links to demos and papers in the video description. The episode ends with a sponsor message from Weights & Biases.
Chapters
Dear fellow scholars, this is Two Minute Papers with Dr. Zsolnai. Today we are going to generate human faces and even better, we will keep them intact. You will see what that means in a moment. This new neural network based technique can dream up completely new images and more. However, this is not the first technique to do this, but this, this does them better. Let's look at three amazing features that it offers and then discuss how and why it is better than its predecessors. Hold on to your papers for the first example, which is my image toonification. Would you like to see what the AI thinks you would look like if you were a Disney character? Well, here you go. And these are not some rudimentary first paper in the works kind of results. These are proper tunifications. You could ask for money for some of these and they are done completely automatically by a learning algorithm. Whoa. At the end of the video you will also witness as I myself get toonified. And what is even cooler is that we can not only produce these still images, but even compute intermediate images between two input photos and get meaningful results. I'll stop the process here and there to show you how good these. I am blown away. 2 It can also perform the usual suspects. For instance, it can make us older or younger, or put a smile on our face too. However 3 it works not only on human faces, but cars, animals and buildings too. So the results are all great. But how does all this wizardry happen? Well, we take an image, embed it into a latent space, and in this space we can easily apply modifications. Ok, but what is this latent space thing? A latent space is a made up place where we are trying to organize data in a way that similar things are close to each other. What you see Here is a 2D latent space for generating different fonts. It is hard to explain why these fonts are similar, but most of us would agree that they indeed share some common properties. The cool thing here is that we can explore this latent space with our cursor and generate all kinds of new fonts. Here you can try this work in your browser. The link is available in the video description. And luckily we can build a latent space not only for fonts, but for nearly anything. I am a light transport researcher by trade, so in this earlier paper we were interested in generating hundreds of variants of a material model to populate this scene. In this latent space we can concoct all of these really cool digital material models. A link to this work is also available in the video description. Now for the phase generator algorithms. This embedding step is typically imperfect, which means that we might lose some information during the process. In the better cases, things may look a little different, but that's not even the worst case scenario. I'll show you that in a moment. For the milder case, here is an earlier example from a paper by the name Style Flow where the authors embedded me into a latent space. And it indeed came out a little different, but not so bad. A later work, starclip, was able to make me look like Obi Wan Kenobi, which is excellent. However, the embedding step was more imperfect. The bearded image was embedded like this. You are probably saying that this looks different, but. But even this is not so bad. If you want to see a much worse example, look at this. My goodness. Now this is quite different. Now that we saw what it could do, it is time to ask the big question. How much better is it than previous works? Do we have an AB test for that? And the answer is yes, of course. Let's embed this gentleman and and see how he comes out on the other end. Well, without the improvements of this paper, once again, quite different. The beard is nearly gone. And when we toonify the image. Let's see. Yup, that beard is gone for good. So can this paper get that beard back? Let's see. Oh yes. If we refine the embedding with this new method, we get that glorious beard back. That is one heck of a toon image. Congratulations. Loving it. And now it's my turn. One of the results was amazing. I really like this one. And how about this? Well, not bad. And I wonder if it can deal with sunglasses. Well, kind of, but not in the way you might think. What do you think? Let me know in the comments below. Note that you can only see these results here on 2 Minute Papers. And a big thank you to the authors for taking time off their busy day and doing these experiments for us. And here are a few more tests. Let's see how it fares with these. The inputs are a diverse set of images from different classes. And the initial embeddings, well, a bit of a disappointment, but that is kind of the point, because this new technique does not let it stop there and iteratively improve them. Yes, getting better. And by the end, my goodness, very close to the input. Don't forget that the goal here is not to implement a copying machine. The key difference is that we can't do too much with the input image, but after the embedding step we can do all this toonification and other kinds of magic with it and the results are only relevant as long as the two images are close. And they are really close. Bravo. So good. So I hope that now you agree that the pace of progress in machine learning and synthetic image generation is absolutely incredible. What a time to be alive. This episode has been supported by Weights and Biases. In this post they show you how to use their reports to explain how your model works, show plots of how model versions improved, discuss bugs, and demonstrate progress towards milestones. Weights and Biases provides tools to track your experiments in your deep learning projects. Their system is designed to save you a ton of time and money and it is actively used in projects at prestigious labs such as OpenAI, Toyota Research, GitHub and more. And the best part is that Weights and Biases is free for all individuals, academics and open source projects. It really is as good as it gets. Make sure to Visit them through wnb.com papers or just click the link in the video description and you can get a free demo today. Our thanks to Weights and Biases for their long standing support and for helping us make better videos for you. Thanks for watching and for your generous support and I'll see you next time.