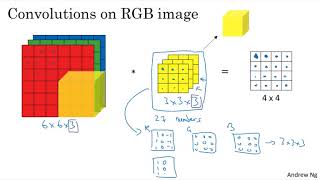
Lecture explaining how to extend 2D convolution to 3D volumes (e.g., RGB images). Uses a concrete example: a 6×6×3 RGB image convolved with a 3×3×3 filter (27 parameters) to produce a 4×4×1 output when using stride 1 and no padding. Emphasizes that the filter must have the same number of channels as the input, and shows how multiple filters (e.g., vertical and horizontal edge detectors) produce multiple 4×4 outputs that are stacked into a 4×4×k output volume. Provides the general dimensional formula: (n−F+1) × (n−F+1) × (number of filters), and notes that literature may call channels the volume "depth."
Chapters
You've seen how convolutions over 2D images works. Now let's see how you can implement convolutions over not just 2D images, but over three dimensional volumes. Let's start with an example. Let's say you want to detect features not just in a grayscale image, but in a RGB image. So an RGB image might be, Instead of a 6x6 image, it could be 6 by 6 by 3, where the three here corresponds to the three color channels. So think of this as a stack of three six by six images. In order to detect edges or some other feature in this image, you convolve this not with a three by three filter as you had previously, but now with also a 3D filter that's going to be 3D by 3 by 3. So the filter itself will also have three layers corresponding to the red, green and blue channels. So to give these things some names, this first six here, that's the height of the image, that's the width, and this 3 is the number of channels. And your filter also similarly has a height, a width and a number of channels. And the number of channels in your image must match the number of channels in your filter. So these two numbers have to be equal. We'll see on the next slide how this convolution operation actually works. But the output of this will be a 4x4 image. And notice this is 4x4x1. There's no longer three at the end. Let's go through in detail how this works, but let's use a more nicely drawn image. So here's the 6 by 6 by 3 image, and here's the 3 x 3 x 3 filter. And this last number, the number of channels, matches between the image and the filter. So to simplify the drawing of this 3x3x3 filter, instead of drawing it as a stack of three matrices, I'm also going to sometimes just draw it as this three dimensional cube like that. So to compute the output of this convolution operation, what you would do is take the 3 by 3 by 3 filter and first place it in that upper leftmost position. So Notice that this 3x3x3 filter has 27 numbers, 27 parameters, that's 3 cubed. And so what you do is take each of these 27 numbers and multiply them with the corresponding numbers from the red, green and blue channels from your image. So take the first nine numbers from red channel, then the three beneath it for the green channel, then the three beneath it for the blue channel and multiply it with the corresponding 27 numbers that are, I guess, covered by this yellow cube shown on the left. Then add up all those numbers and this gives you this first number in the output. And then to compute the next output, you take this cube and slide it over by one and again do the 27 multiplications, add up the 27 numbers, that gives you this next output. Do it for the next number over, for the next position over, that gives you the 3rd output, and so on, that gives you the 4th. And then one row down, and then the next one, the next one, the Next one, and so on. And you, you get the idea. Until at the very end, that's the position you would have for that final output. So what does this allow you to do? Well, here's an example. This filter is 3 by 3 by 3. So if you want to detect edges in the red channel of the image, then you could have the first filter be 1, 11 minus 1 minus 1 minus 1 minus 1 as usual, and have the green channel be all zeros and have the blue filter be all zeros. And if you have, you know, if you have these three stacked together to form your 3x3x3 filter, then this would be a filter that detects edges, vertical edges, but only in the red channel. Alternatively, if you don't care what color the vertical edge is in, then you might have a filter that's like this, whereas this 1 1, 1 minus 1 minus 1 minus 1 in all three channels. So by setting, you know, this second alternative set of parameters, you then have a edge detector, a 3 by 3 by 3 edge detector that detects edges in, you know, any color. And with different choices of these parameters, you can get different feature detectors out of this 3x3x3 filter. And by convention, in computer vision, when you have an input with a certain height, a certain width and a certain number of channels, then your filter will have a potentially different height, different width, but the same number of channels. And in theory, it's possible to have a filter that maybe only looks at the red channel, or maybe a filter that looks at o only the green channel and the blue channel. And once again, you notice that convolving a volume a 6x6x3 convolve with a 3x3x3 that gives a 4x4 a 2D output. Now that you know how to convolve on volumes, there's one last idea that'll be crucial for building convolutional neural networks, which is, what if we don't just want to detect vertical edges. What if we want to detect vertical edges and horizontal edges and maybe 45 degree edges and maybe 70 degree edges as well. But in other words, what if you want to use multiple filters at the same time? So here's the picture we had from the previous slide. We had 6 by 6 by 3 convolved with 3 by 3 by 3 gives 4 by 4. And maybe this is a vertical edge detector or maybe it's learned to detect some other feature. Now maybe a second filter may be denoted by this orangish color, which could be a horizontal edge detector. So maybe convolving it with the first filter gives you this first 4 by 4 output. And convolving with the second filter gives you a different 4x4 output. And what you can do is then take these two four by four outputs, take this first one, put it in front and you can take this second filter output and let me draw it here, put it back as follows. So that by stacking these two together you end up with a 4 by 4 by 2 output volume, right? And you can think of the volume as if you draw this as a box. I guess it would maybe look like this. So this would be a 4 by 4 by 2 output volume which is the result of taking your 6 by 6 by 3 image and convolving it or applying two different 3 by 3 filters to it, resulting in two 4x4 outputs that then get stacked up to form a 4x4x2 volume. And the two here comes from the fact that we use two different filters. So let's just summarize the dimensions. If you have a N by n by number of channels input image so in an example this was 6 by 6 by 3 where n subscript capital C is the number of channels and you convolve that with a F by F by and again this should be the same nc. So this was three by three by three and by convention this and this have to be the same number. Then what you get is a n minus F plus one by n minus F plus one by. And I'm gonna use this NC prime or really it's really NC at the next layer. But this is the number of filters that you use. So this in our example would be 4 by 4 by 2. And I wrote these assuming that you use a stride of one and no padding. But if you use a different stride of padding, then this N minus F plus 1 would be affected in the usual way as we saw in the previous videos. So this idea of convolution on volumes turns out to be really powerful. Only a small part of it is that you can now operate directly on RGB images with three channels. But even more important is that you can now detect two features like vertical and horizontal edges, or 10 or maybe 128, or maybe several hundred different features. And the output will be then will then have a number of channels equal to the number of features you are detecting. Oh, and as a note and notation, I've been using your number of channels to denote this last dimension. In the literature, people will also often call this the depth of this 3D volume. And both notations, channels or depth are commonly used in the literature. But I find depth more confusing because, you know, we usually talk about the depth of a neural network as well. So I'm going to use the term channels in these videos to refer to the size of this third dimension of these filters. So now that you know how to implement convolutions over volumes, you now are ready to implement one layer of a convolutional neural network. Let's see how to do that in the next video.