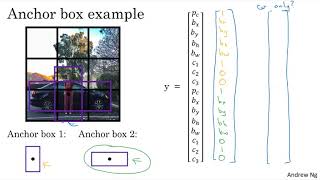
Andrew Ng explains anchor boxes, which let a single grid cell predict multiple objects instead of just one. Each object gets assigned to the grid cell containing its midpoint and the anchor box with the highest overlap. The approach changes the output tensor shape and works best when anchor shapes are chosen to match your data.
Chapters
One of the problems with object detection as you've seen it so far, is that each of the grid cells can detect only one object. What if a grid cell wants to detect multiple objects? Here's what you can do. You can use the idea of anchor boxes. Let's start with an example. Let's say you have an image like this. And for this example I'm going to continue to use a 3x3 grid. Notice that the midpoint of the pedestrian and the midpoint of the car are in almost the same place and both of them fall into the same grid cell. So for that grid cell, if Y outputs this vector where you are detecting three classes, pedestrians, cars and motorcycles, it won't be able to output two detection. So have to pick one of the two detections to output. With the idea of anchor boxes, what you're going to do is predefine two different shapes called anchor boxes or anchor box shapes. And what you're going to do is now be able to associate two predictions with the two anchor boxes. And in general, you might use more anchor boxes, maybe five or even more. But. But for this video, I'm just going to use two anchor boxes just to make the description easier. So what you do is you define the class label to be. Instead of this vector on the left, you basically repeat this twice. So you would have PC BX by BH, BW C1, C2, C3, and these are the eight outputs associated with Anchor Box 1. And then you repeat that PC BX and so on down to C1, C2, c3, another eight outputs associated with Anchor Box 2. So because the shape of the pedestrian is more similar to the shape of anchor box one than anchor box two, you can use these shapes, eight numbers to encode that PC is one, yes, there is a pedestrian. Use this to encode the bounding box around the pedestrian, and then use these to encode that that object is a pedestrian. And then because the car, the box around the car is more similar to the shape of anchor box 2 than anchor box 1, you can then use these to encode that the second object here is the car and have the bounding box and so on, be all the parameters associated with the detected car. So to summarize, previously, before you were using anchor boxes, you did the following, which is for each object in the training set, in the training set image, it was assigned to the grid cell that corresponds to that object's name, midpoint. And so the output y was 3 by 3 by 8 because you had a 3x3 grid. And for each grid position, we had that output vector, which is, you know, PC, then the bounding box, then C1, C2, C3. With the anchor box, you now do the following. Now each object is assigned to the same grid cell as before, assigned to the grid cell that contains that object's midpoint, but it's assigned to an anchor cell, but it's assigned to a grid cell and anchor box with the highest IOU with the object's shape. So you have two anchor boxes. You would take an object and see. So if you have an object with this shape, what you do is take your two anchor boxes. Maybe one anchor box is this shape, that's anchor box one, maybe anchor box two is this shape. And then you see which of the two anchor boxes has a higher IOU with the ground truth bounding box. And whichever it is, that object then gets assigned not just to a grid cell, but to a pair. It gets assigned to a grid cell comma, anchorbox pair. And that's how that object gets encoded in the target label. And so now the output Y is going to be 3 by 3 by 16, because as you saw on the previous slide, y is now 16 dimensional. Or if you want, you can also view this as 3 by 3 by 2 by 8, because there are now two anchor boxes and Y is 8 dimensional. And dimension of Y being 8 was because we have three object classes. If you have more objects, then the dimension of Y will be even higher. So let's go through a concrete example for this grid cell. Let's specify what is Y. So the pedestrian is more similar to the shape of anchor box one. So for the pedestrian, we're going to assign it to the top half of this vector. So yes, there's an object, there'll be some bounding box associated to the pedestrian. And I guess if a pedestrian is class 1, then it'll be C1 is 1 and then 00. And then the shape of the car is more similar to anchor box 2. And so the rest of this vector will be 1, and then the bounding box associated with the car, and then the car is C2. So that's 0, 1, 0. And so that's the label Y for that lower middle grid cell that this arrow is pointing to. Now, what if this grid cell only had a car and had no pedestrian? If it only had a car, then assuming that the shape of the boundary box around the car is still more similar to anchor box 2, then the target label Y, if there was just a car there and the pedestrian had gone away, it would still be the same for the anchor box two component. Right. Remember that this is the part of the vector corresponding to anchor box two. And for the part of the vector corresponding to anchor box one, what you do is you just say there is no object there, so PC is zero. And then the rest of these would be don't cares. Now just some additional details. What if you have two anchor boxes but three objects in the same grid cell? A, that's one case that this algorithm doesn't handle well. You know, if you hopefully it won't happen, but if it does, this algorithm doesn't have a great way of handling it. I would just implement some default tiebreaker for that case. Or what if you have two objects associated with the same grid cell but both of them have, you know, the same anchor box shape? Again, that's another case that this algorithm doesn't handle well. If you implement some, you know, default way of tie breaking. If you that happens, hopefully this won't happen in your data set. It won't happen much at all. And so it shouldn't affect performance much. So that's it for anchor boxes. And even though I've motivated anchor boxes as a way to deal with what happens if two objects appear in the same grid cell, in practice that happens quite rarely, especially if you use a 19 by 19 rather than a 3 by 3 grid. You know, the chance of two objects having the same midpoint out of these 361 cells, it does happen, but it doesn't happen that often. The maybe even better motivation or even better results that anchor boxes gives you is it allows your learning algorithm to specialize better. In particular, if your data set has some tall skinny objects like pedestrians and some wide objects like cars, then this allows your learning algorithm to specialize so that some of the outputs can specialize in detecting wide, you know, fat objects like cars. And some of the output units can specialize in detecting tall skinny objects like pedestrians. So finally, how do you choose the anchor boxes? And people used to just choose them by hand. You know, choose maybe five or ten anchor box shapes that spans a variety of shapes. That seems to cover the types of objects you seem to detect as a much more advanced version. Just an advanced comment. For those of you that have other knowledge of machine learning, an even better way to do this in one of the later YOLO research papers is to use a K means algorithm to group together the types of object shapes you tend to get. And if you use that to select a set of anchor boxes that is most stereotypically representative of the maybe multiple of the maybe dozens of object classes you're trying to detect. But that's a more advanced way to automatically choose the anchor boxes. And if you just choose by hand a variety of shapes that reasonably spans the set of object shapes, you expect to detect some tall, skinny ones, some fat white ones, that should work reasonably as well. So that's it for anchor boxes. In the next video, let's take everything we've seen and tie it back together into the YOLO algorithm.










