Easiest Way to Convert 2D Image to 3D Animation
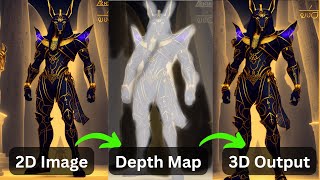
LARRUZ walks through Liapx, a free converter that turns 2D images into 3D animations using automatic depth mapping. You can adjust motion amount, animation length up to 6 seconds, and manually edit the depth map by hand, then export as GIF or MP4.
Chapters
We all know that Image Journey can create some amazing images, but they are just static images. Today I'm going to show you this amazing tool with the help of which you can animate your images and convert them into 3D animations. For example, you can convert this tiny house into a beautiful animation or bring this portrait to life and make it to a nice video. So let's get started. So we are going to be using this website, Liapx converter. And the website lets you convert your 2D images into beautiful 3D light field images. So basically you can create 3D animations by adding the depth information. One of the great features is that you can define your own depth map. So that way you can control the animation the way you want. You need to have an account. So just go ahead, create an account. It's completely free to use and I'll put a link in the description. Let's first upload an image. So come here. Click on this plus sign. Okay, so I'm uploading an image. It instantly creates a depth map and then animate the image based on the map that it created. So let's look at a few options. So the first one is animation length. So here you have different options. For example, you can make it a way smaller one. So there's like two seconds. The maximum you can have is around six seconds. The next one is the animation style. So right now it seems like it's just moving horizontally left and right. But you can change it. For example, it will start moving in a white circle, right? Or like a normal circle. And you can try a tall circle. And then there's this vertical option, up and down movements in this case since it's a portrait. So I think this vertical or tall circle will make more sense. Okay, next one is the amount of motion. So you can have like a less motion so that you can see that the animation barely moves now regular. Or you can add a lot of motion. And the last option on this page is the focus point. So that's like close you focus on to focus on the center or focus on the far. So I think there's going to be a lot more movements. Now if you want to control the depth, you can actually try the depth map. So we'll talk about this in a second. Okay, let's look at some other examples. So for example, here I have a tiny home. It's a tiny house in a glass mall. Probably a white circle would be good. Now this one has a lot of depth information from the start. So you kind of see that this area is close to the lens as well. It's blurred out. Then focusing is on the house, right? And again, you can control it exactly the same way you want. This also looks pretty, pretty neat. One thing you want to make sure is the image that you're providing, they're not completely flat. So for example, in this case, the focus is on the face. The rest of the body is blurred out. That's why you see a pretty nice depth profile. If it's a flat image, you're not going to see much. Let me try a couple of more examples before we go to the depth map. So like, here is another one. And all of these images are AI generated and actually added a pretty nice animation style because you can see that area in the background. It goes way back. Here's another one. And the great thing about this tool is it automatically figures out what thing is closer to the camera. For example, in this case, the sunflower and the hand compared to what's far behind. So that's. That's pretty neat, even with the default settings. Okay, so let me upload this image and let's change the depth information. So for that we will have to go to the depth map. So this is the depth map. A whitish area is basically closer to the camera. And if it's the more darker it gets, the far away it is from the camera. Remember, the white means near the screen and the black is far away. Now let's first go over this preview. So if you click on it once, it simply shows you the original image. Then here's the depth map. And if you click it on it again, that's the depth map overlaid over the original image. So first look at this depth. Now, as we said, the white means you're closer to the screen, black means you are far away, right? So if you want to make changes, you can use this slider. Like if you want to make something far away, right? So that you can use this slider to control the depth information. And then the second is the size, which controls the simply the size of your brush. So let's say to make it very dramatic, let's say we want to make the head far back compared to the rest of the body. So you should initially, initially, let's say what the level it is at, right? So the. You see, like when I clicked it brought the slider here, it means it's near to the screen. But just for fun, we want to take the head back. Let's say I want to take it far back, right? And then I can use my brush. So I highlighted the head, and if you click preview, you see it actually moved back. That's why you see the movement of the head. It looks weird, but that's. That's how you do it. Now let's look at a more practical example. Let's say we want to bring this rock much closer. So, for example, they are almost the same level as the character. What I'm going to do is I'm going to bring it all the way near and then simply highlight this area with the hope that it's going to really pop it up. Right. And then you can control the hardness and softness of your brush with it. See what happens. And you see, you might see this subtle effect that it kind of popped it up, brought it closer to the screen, and also actually use this picker tool. So let's say this file is way behind, but there is this little file here which is closer to the tree on the same level. So I can use the picker tool, basically pick that and then use my brush to draw it. Right. So let's. Let's see what the effect is going to be. Let's preview. Yeah. So I think it. It sent it back. Once you're happy with your depth map, you can just save that, and that will bring you to your inner editor, where you can again control the movements or change the style, the animation, and so on and so forth. Now, if you want to share this with a few people, you can come here to share. Okay, let's look at another example of death map. So here there's a pretty uniform distribution, I would say. So let's go to preview. Okay. We can add some dramatic camera effects, I think. So let's make this house in the tree really pop up. So what I'm going to do is I'm going to go to near, right, and simply highlight the house and let's see what happens. Let's first look at the. Just the floor. So you see the floor is actually a lot closer to the screen. Now let's apply the same effect. I'm not really being careful, but if you want, you can, like, use a smaller brush size and be a lot careful with this. So let's preview this. Okay. It's actually coming out. All right, let's see. Maybe I will select the trees as well. Hey. And I will just leave the stairs. Let's see what happens. Yay. Okay, there's some deformation, so let's highlight the trees as well. And we're keeping this at the same level. So I think it's pretty neat. Okay. Yeah, it's kind of pops out from the glass ball. Let's see. I want to take this back. Okay. Preview this. Yeah. Probably not a great change. So you can undo that, Right? So using this, you can actually create different effects. I think it's pretty cool. Just play around with it. Now, if you want to share it, just click on share. And then it gives you different options in which format you want to share. For example, you can create a GIF MP4 and the live field format, light field format, or the depth map. So I'm going to just store it as an MP4 file. I hope you liked the video and found it useful. If you did, please consider subscribing. Thanks for watching. See you in the next one.










