Leonardo AI - Create Consistent Characters
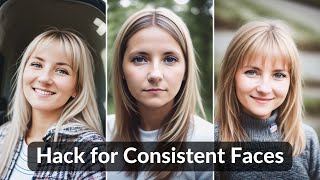
A tutorial on generating consistent characters in Stable Diffusion and Leonardo AI by using unique character names as anchors in the model's latent space. The presenter walks through prompt construction, compares platforms like Leonardo AI and Automatic1111, and shows how tweaking descriptors like age and pose produces consistent variations of the same character.
Chapters
In this video I will show you a very simple hack to create consistent looking human characters in stable diffusion. You don't need to train your own Dream Booth model or use Lora. It's a very simple hack. So let's get started. So for this purpose you can use any stable diffusion model and platforms such as automatic 1111, invoke AI, playground AI, or in this case I'm using Leonardo AI. I prefer Leonardo or automatic 1111 because few here you have the same models, but you don't need any local installation. And since it's a web ui, so it's a lot easier to use if you are new to Leonardo Death AI. It's a tool that helps you create images using text and it's very similar to Midjourney. But here you have multiple models that you can choose from and create images with those. Similar to Midjourney, you can see a community feed where people are posting their creations people. Before showing you the trick how to create consistent models, let me give you a quick overview. Leonardo AI gives you 150 fast generations per day. It's much better than Midjourney, which is just 25 generations for the free tier. And right now it's not available. Next, you have the ability to upload your own training data and actually train your own models. And then there are community models available which people have fine tuned as well, so you can potentially use them as well. So now let's look at how you can create consistent human characters. So first select any one of these models. So let's say I'm going to select Deliberate 1.1. If you run a simple prompt like this, a photo of a woman smiling, looking at the camera multiple times, you will get different images. For example, in this case we have this image, I run it again so it seems to be a completely different person. These look very different people because we are not fixating the name of our character, but we can actually use this to create very consistent characters. The technique I'm about to show you uses the unique name of your character as an anchor in the latent space. To explain this concept, let's look at this simple prop, a photo of Emma Watson. And then we define the camera that we want to use for photo generation. Right. We have a negative prompt and we are using the Deliberate model. So if you simply click generate, it will generate image of Emma Watson, hopefully. So it generated a photo of Emma Watson, although it's a little bit distorted, but you can improve the prompt to remove these distortions. Now we can use a similar concept for generating our own images. So what you want is you want to have a very unique name of your character. And to get unique names, we're going to be using this website, random name generator. So here you have an option of different countries and ethnicities, and then based on the parameters that you select, it will generate different names for you. What I usually like to do is to select two. So that way it's going to be a mix of it and the name is going to be very unique. So let's say French and let's say Serbian, and let's say we want to generate five different names. So click generate a name and these are different names that it came up with. All right, so let's select the first name. So I'll go back to Leonardo AI and replace Emma Watson with this name. And let's change the prompt a little bit. So looking at the camera and then you can simply, I'm going to say generate two images. Click generate. What it's generating, you can actually look at some other parameters. For example, you can define the size of the image, the height and width, the aspect ratio, the guidance. And if you want to use image to image, and you can also define the seed that you want to use. Okay, so the generation is complete. We have two images and they are. The facial structure looks pretty similar, right? Like, definitely the hairstyle is a little different, but overall the facial structure is similar. Let's say if and want to modify a prompt, we will say let's say smiling, right, and looking at the camera. So just keep in mind that I'm not using a fixed seed. Now if you compare these two images, there are definitely similarities. So one thing is if you want to have like a unique look, you need to select very unique names. So for example, I had a lot more success with this image. So there are like different variations of the same face, which looks very similar. Right? So like this one, this one then holding the flowers, smiling and looking at the camera as a painting. And so I think this, this look pretty reasonably good. And here's another example. So smiling, looking at the camera and then holding flowers. Okay, let's experiment with another name before looking at a different model. So I'm going to replace this with this new name and let's see what it comes up with. So here's the picture of Vedrana simply smiling and looking at the camera. And the same person or character as a queen. They definitely look images of the same person. So it's pretty neat. So let's look at a couple of Male characters. I'm going to select Danish and let's say German. Okay. Then masculine. Click. All right. Christopher, I think is pretty common name, so I'm not going to use this, probably this. Okay, so in this case, I will simply replace the name and then looking at the camera, click, generate. I actually had to change the name because for title, it actually produced a female image. So I think. And the other change was I added 30 years old. So here, like it gave me a picture of a child. So I just want to have a picture of a man. Okay, first let's modify this to smiling. Okay, let's run this. All right, so here are the results. It's not really smiling face, but still it's very consistent with what we had before, especially this image and the one here. So I think they definitely look the same image. Now, one thing to keep in mind, as I said before, I'm using very simple prompt, right? And making small tweaks. If you want to really control it, you can actually add a lot more details in your prompts. Now lastly, I want to show you that this technique actually works with other models as well. So here, for example, instead of this deliberate 1.1, we can select, let's say the NADO diffusion model, right? And let's try to generate an image with the same prompt. Now, in this case, the image probably is going to look different, right? Because the model is completely different and we are not setting the seed to the same. Right? But if we use the same name for different model. So for that specific model, it should give us very similar characters. So for example, here's the image right now, Leonardo diffusion model thinks that Hilmar, which is the name of the character, should look something like this. Okay, let's make him superhero. All right, let's see what it comes up with. All right, so the first row actually shows different images that were created by the Leonardo diffusion model. So for example, this is a close up of superhero, right? Another close up this, the image looks a little different, but if you compare it with this one simple hero superhero. And then they came smiling. Although the key is not really smiling with the faces there. So they look pretty similar. So I'll put a link to this post on which it is based. Go away. It's pretty helpful just to summarize. The trick is to use very unique names for your characters and that way you will get consistent characters. Hope you found this useful. Thanks for watching. See you in the next one.










