Reverse Engineer Prompts from IMAGES for MidJourney & Stable Diffusion:
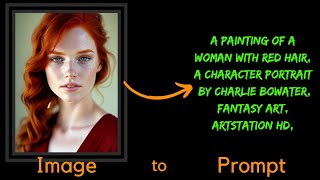
LARRUZ shows how to use an Image to Prompt tool to convert images into text prompts for Stable Diffusion and MidJourney. The tool generates prompts that capture style and content reasonably well, but they're starting points, not finished prompts, since they skip negative prompts and other refinements from the original images.
Chapters
Hello everyone and welcome to today's video. Have you ever come across a stunning image online and wish you could recreate its style in your own artwork? Well, you are in luck today because I have a tool to share with you that can help you just do that. Whether you're using Midjourney or Stable Diffusion, this tool can take an image of your choice and generate a text prompt that approximates the style used in the original image. It's the perfect starting point to get your creative juices flowing and create your own masterpiece. So, without further ado, let's dive in and see this tool in action. The tool that we are going to be using is called Image to Prompt. It's based on the clip model and it is optimized for stable diffusion. But we are going to be testing it both on Stable diffusion as well as on midjourney. The idea is very simple. It gives you a text prompt that approximate the style of the input image. In simple words, it expects an image is an input and the output is a text prompt. I'll put a link to this page in the description of the video. In this page they have provided a demo which you can run. So you can simply provide your own image and then test the model on it and get in a prompt. Oh, they have also provided a few examples as well. So let's first go through the examples. Then in the next part of the video we will use our own images. So the first example is they have given this input image of a cat wearing a suit. Here is the output that was generated by the model. Let's copy copy this model. According to them, it's optimized for Stable diffusion. But we're going to use this prompt as an input to both Stable diffusion based models as well as mid journey and see what the output looks like. For testing Stable diffusion, I'm using Playground AI. They have two different versions of stable diffusion. So stable diffusion 1.5 and then you have an option of 2.1. Stable diffusion 1.5 is really good for general things, but if you really need like more realistic things, for example faces, then 2.1 is pretty good for that. But we are going to test it on both. So let's say this was the prompt initially. I'm going to test it on 1.5. So simply click generate and wait for the output. So here is the result. Actually these two images both have clear cat as well as the cats are wearing suits. So for example, you check this out and this out. So it actually give us pretty close to the original image that was provided. Let's test it on stable diffusion 2.1 as well. Copy it, paste it. Okay, here are the results. It seems like in this image and this image there is a clear suit and even in this one. So the prompt seems to be working. Now let's test it on on midjourney as well. I ran the prompt in midjourney and the style of image is actually pretty close to the original image. So for this specific example, it seems to be working pretty good. Let's look at some other examples. So for example, I have this image. It seems to be pretty complicated one. So let's copy this prompt. That is the output from the model. And then there are a couple of others that we can test. And let's first test it with stable diffusion 2.1. In the meanwhile, I'm going to run the same prompt in mid journey as well. Okay. Yeah, this one like in style, it's closer to this image for sure. The overall structure is a little bit different. Let's see what stable diffusion 1.5 thinks about this. Here are the results for stable diffusion 1.5. It seems to have generated images in similar style. And here's the output from midjourney in Mid Journey. It does add a lot of elements that you can expect from any output of midjourney. But I think overall this style can be replicated using this prompt. So I would say the model did a pretty good job. Let's do this final example before we test it on our own images. So let me run it initially on stable diffusion 1.5. Here is the result. It does seem to have actually pretty good comparison between the style of the original image and as well as the output from the stable diffusion 1.5 for comparison. Let's do it 2.1 as well. Okay. The same elements are there, so I think overall style looks pretty similar to the original image. Now here's the output from Stable Diffusion did add some extra elements that you can expect from mid journey. Okay, now if you want to run this on your own images, so simply click this, run this model and now you have an option to actually upload your own image. So let's say I will give it a first a simple example and then more complex and more complex. So let's say simple, this image of a woman who has red hair. To run it, click Submit. Then it will start the model and start getting the prediction. It it will take a few seconds. So I'm going to stop the video here. Okay. So the model came up with this output, a red Headed woman with freckled hair and blue eyes. A character portrait by right, so. So let's see what Stable Diffusion can come up with based on this prompt. So we are first checking in on 2.1. Right click generate. So here are the outputs. That's from stable diffusion 1.5, stable diffusion 2.1, and then mid Journey. Overall, I think the prompt is able to recreate the style of the image. Okay, next let's test it on this tiny house glass ball. So simply click submit and let's wait for the model to give an output. So in this case the output is a glass ball with a house inside of it. Tilt shift photo by div. So it actually seems to understand the picture pretty good. And the output reflects the contents of the image. So based on the output, here are different images that are generated by stable diffusion 1.5, 2.1, and midjourney. And I think they did pretty good. They conserved the style of the image and were able to replicate that. Let's see what it does with this image of a teddy bear. Let's submit. So the output is a brown teddy bear sitting next to a red present box. It seems to have completely ignored the shirt of the teddy bear. But let's create images based on this prompt. So here are the outputs from all three different models for comparison. One thing which we need to keep in mind is these images are simply generated using the vanilla prompt that is output from the model. Right. But the original images, they definitely had a more complex structure. So it's not just the prompt. There are negative prompts involved. So but in this case we are simply getting the single positive prompt, no negative prompt. So you always need to use these as a baseline and not like the final prompt that you're going to use for your AI generator. As a last test image, we're going to look at the picture of a joker and let's see what it comes up with. This picture was originally generated using Mid Journey. So it's not a Stable diffusion based image. So the output from the model is indeed a painting of a joker with green hair. So let's test it on three models. Here are the outputs from all three different models. Mid Journey seemed to replicate that style pretty good, pretty accurately. So I usually use that as my starting point. So if I like the certain style of an image and just want to get a quick prompt to replicate this tab, I use this and you can use it in your own workflow. Just use it as a basis for your images. I hope you like the content. If you like the video, please consider subscribing. Thanks for watching. See you in the next one.










