You Can Now INSERT Faces in MidJourney
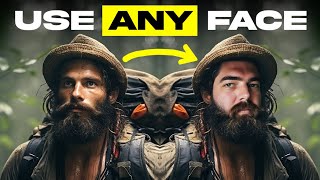
Matt Wolfe demonstrates Pixi AI, a Discord bot that swaps your face into MidJourney images. He walks through installing it, registering your face ID, and using commands like saveid and swap to iterate until you get a match. It's faster than his old DreamBooth workflow but struggles with face shape and hair differences.
Questions this video answers
August 15, 2023
Pixi AI (by Insight Face)
saveid, set, swap id, in Swapper
Alphabet and numbers only; cannot exceed 10 characters
Up to 20 IDs
Chapters
Up until recently, it's been nearly impossible to get your own face into a midjourney image, unless you were some super famous celebrity that was already trained into midjourney. However, now there's a way to get images that look close to what you look like out of midjourney. This image was generated with midjourney. So was this one. And so was this one. Now, it doesn't work 100% of the time, but it's a heck of a lot closer than what we used to be able to do a few months ago. Let me break it down for you. So today I got an email from somebody at a company called Pixi AI by Insight Face, and they claim they have a really, really cool way to search swap out your face on any Mid Journey image. Now, about eight months ago, I made a video about injecting yourself into AI and make any image with your face. And this method still works really well to this day, but it does take about an hour to an hour and a half to actually go through all of the steps to do it. It also uses the stable diffusion models. So if you really like what Mid Journey generates and you want to put your face into it, right now, the current workflow is you've got to generate the image in Mid Journey and then pull it into stable diffusion and then train your face with Dream Booth and then take the face that you trained with Dre Booth and do an image to image to inject your face into the Mid Journey. It's just a long process to do it and it's what I've been doing to make all of my thumbnails up until now because I really like the images Mid Journey makes. I just haven't been able to train my face into them. Well, this email about Pixi AI claims to do pristine and seamless face morphing using just one good clear image of yourself as a source picture and a target picture. So instead of training 20 images into the model, I can do it with just one. It can actually merge multiple source faces together to create unique composite faces onto a target image. If you upgrade to their Pro Plan, they can actually animate faces and create gifs from them. Lossless quality, up to 248 pixels. And they claim that the other competitors out there use older open source models like Roop, which I am familiar with Roop. So I figured, you know what, this could really speed up my workflow of injecting my face into images when making YouTube thumbnails. So let's give it a shot. So I was linked over to this GitHub page. I'll make sure it's linked up in the description below if you want to try this yourself. But you're getting my real time reaction. We're going to see how this works on the first go through here. So if I scroll down to the bottom here, there's some explanation of how it works. We're going to get to that in a second. But first we need to install this Insight Face Swap into our Discord server where we generate our Mid Journey images. Now, I've made several previous videos about creating your own server. I created one called AI Art Tests and here and I've got Blue Willow installed, Mid Journey bot installed, and the Wirestock bot installed. And now I want to install the Insight Face Swap to it down here under step two. I'm going to invite this bot by clicking on this link here. It asks which server I want to add it to. So I'm going to add it to the AI Art Test server where I do all of my Mid Journey generations and I'm going to authorize it and we should be good to go. Let me jump Back to the GitHub page here with all the instructions and the first thing I need to do is use this Save ID command and upload an image and give it a name. So we'll jump over to our Discord bot here where we can now see that Insight Face Swap is available. We'll type saveid and now it has an option for me to upload an image. I'm going to use this image of myself here and we'll drag and drop it right into this box. And then for the ID name, I'm just going to use Mr. Eflow. They do have some guidelines about how to name it. It says all ID names could only be Alphabet and numbers and cannot exceed 10 characters. And you can register up to 20 IDs on their free plan. They also have some guidelines about the image that you should upload. Front view, high quality, no glasses, no heavy bangs and ID photos are preferred. But we're going to see what we get with this one. So let's go ahead and hit enter. And now ID Name has been created. So let's go ahead and prompt an image with Mid Journey. Imagine a man standing in a cyberpunk city at sunset. Let's just see what it gives us with that. None of these images really work because they're not looking at the camera. So let's go ahead and adjust our prompt a little bit here. A man standing in a Cyberpunk city at sunset, staring into the camera. All right, so now we got these images. These three all just ignored my extra prompt. But this one, we're staring into the camera. So let's see what happens. If I swap out the face on this. We're going to go ahead and upscale number one. Now if I come up to the three little dots over by this upscaled image and I come down to apps, we should see a new option that says in Swapper. Let's go ahead and click on In Swapper. And that's what it generated. So if I look at this one versus this one, I think the beard got a little bit heavier, but not much else changed about it. Let's try a different image. Imagine a close up headshot of a man standing in a rainforest. Sure. All right, so we got some really nice images here. They're all a little bit closer up. Let's go ahead and do this top right one first and see how that comes out. So we'll upscale number two here. Click on our three dots. Come down to apps. Click on In Swapper. Okay, so it did fix the beard a little bit. It definitely made some changes. I guess it looks closer to what I look like. So one thing I am noticing is that it will follow the shape of the original face and kind of keep the hairstyle of the original face. It just kind of changes some of the facial features. One thing I'd like to try is let's go ahead and upload my image that I was starting with here. I'm going to go ahead and copy the link to this image and let's use that in a prompt. A man with a beard in a rainforest. So now it's going to use this for inspiration for the prompt as well as my man with a beard in the rainforest. And ideally give me an image that's close to what I look like and then I can fine tune it and dial in that face a little bit closer using this other insight face swap tool. All right, so we've got these images. Let's go ahead and use this third one because this one probably looks the closest to what I look like, I suppose, and also has the shortest beard of them. So we'll go ahead and upscale number three. We'll click on the three dots here, come over to apps and use our are in Swapper. And now that one looks much more like me. I mean, a little bit thicker of a beard than what I had in my picture, but probably actually pretty close to what my beard looks like right now. Although my neck beard isn't nearly that bad at the moment. A man with a short beard looking at the camera with a cyberpunk city in the background at sunset. I'm gonna try just a prompt without an image again and just adding the short beard to it. Maybe it'll come up with something that's close to what I look like and then I can use my Insight face swapper to get it. Really dial. I'd say of these, maybe this bottom left one is probably going to give us the best results. Let's go ahead and upscale number three. Use our in Swapper. Not too bad. Kind of a bummer that it doesn't fix the hair for you. Here's the original. Here's what it generated. I don't really feel like it looks that close to me. Let's try a different image. Let's go save ID. I'm just going to call this MrEFLOW2. And here's another headshot of me just kind of looking straight into the camera. So let's try this one. All right, so id name MrEFLOW2 is created. Now I need to go to Set and then make sure we have it set to Mr. Eflow2. So now it'll default to that second image that I just uploaded. And let's go to this image that we generated here. Let's go to Apps and let's use in Swapper again and see if this one comes any closer. I'm not noticing much of a difference still. Here's our second generation. Here's what we generated the first time. I don't really notice a difference. So this can also do regular images. They don't have to be images that were generated with Mid Journey. So if I go to the interwebs here and I search Superman, we'll grab this image here of Henry Cavill. We could come in here. We can type/Swap ID. We could plug in ID name as Mr. Eflow2 to use that second image that I uploaded and then pull in this image that we just downloaded of Henry Cavill and hit Enter and I guess that's me as Superman. Let's go ahead and try it again. Swap ID this time, ID name. I'm just going to use Mr. Eflow to use that original image. Let's pull in our Superman image again and see if this image generates anything much different. So it actually generated pretty much the same exact image with both of those. Another way to do the same thing. Thing. Let's go ahead and drop in this picture of Ken here and let's see what happens if I do the in swapper this way. And there's me as Ken with blonde hair. We can also try to put Elon Musk's face as Ken. Let's go save id. Upload this picture of Elon Musk here, and we'll just call it Elon. I could go swap ID Elon. Pull in our picture of Ken here. Hit enter. We should get a Ken with Elon's face on it. Why does that look so much closer than when I run my own face? Let's do swap id. We'll use Elon. And once again, we'll throw in this image of Superman. See if we can get Superman Elon. And that looks pretty dang close. I think my beard's throwing it off. So let's try this again. I'm going to pull in this picture of Sam Altman. And I'm going to put Mr. Eflow over Sam Altman. And there's me as Sam Altman. Let's go ahead and do Elon as Sam Altman. There's Elon giving his testimony in court. So here's an image I tried to generate of me in front of a hobbit house. It already kind of looks like me. So maybe if I pull something like this in and then use the face swap, it'll look just like me. So let's go swap ID Mr. E. Flo. And I'll pull this image in. See, that one worked pretty well because it already kind of looked like me. Here's the original image. Here's the new image. And finally, here's a cowboy. Let's make cowboy Elon. I can see it. And cowboy Mr. E. Flo. Not bad. Not bad. I think part of the problem is it just tries to follow the face shape a little too closely. And if you don't have the exact same face shape, it's going to use other details. It's going to try to match what your eyes look like. You can see this one. It's put eyebrows on the hat. It's going to try to match some of the facial details like the eyes and the nose and the beard. But it's still going to follow the original contours of the original image, even if the original contours don't really look like you. So the only way I've been able to get images that look close to me are by uploading images that already start out looking kind of close to me and then swapping them. Now, out of all of them, this one probably looks the Best. So let's go ahead and try to use a similar prompt to what we got out of this one, which I did use a image prompt to get close to to start with on this one. So if I go ahead and just copy this prompt again here, use my image prompt to start. A man with a beard in a cyberpunk city at sunset. I really want to get that picture. Let's try this again here. But since I'm using the image prompt, I'm using a man with a beard. I'm trying to get it as close to what I want as possible, and then let this insight face swap go that final extra mile to get the details even closer. So if I look at these, they already kind of start off looking like they've got similar features to what I've got. So let's upscale this bottom right one. And here's what we got out of that looks pretty dang close. But I mean, the original image looked pretty dang close too. Here's the original. Here's the updated. A little closer, I guess. Let's try with this top right one. Yeah, that one's not bad. It's close. So it's getting there. We're getting closer and closer to being able to generate images with our own face inside of Midjourney. It just takes an extra little bot that you gotta install and you could get pretty dang close. I think my beard is sort of throwing things off because it difficult with the facial shapes of the orig images that I'm trying to overlay this over. But it does a pretty decent job at getting, you know, the eyes, the eyebrows, the nose, the mouth, some of that kind of stuff, it just follows really, really closely to the facial shape that you originally uploaded and even at times tries to put eyebrows over hats. So while I definitely think this is a cool tool and I'll definitely spend some more time playing around with it and trying to get it more dialed in, because I still really love the contrast and the. The color palettes that Midjourney chooses. I'll probably still use my current workflow for thumbnails of generating an image in either Leonardo or Midjourney, pulling it into my stable diffusion automatic 1111, and then inpainting my face that was trained on Dream Booth. Still kind of a hassle, still kind of a pain, but it definitely still gets closer images to what I'm looking for. But I'm really, really excited to see how this one progresses. And it's free. And if you're using Midjourney already, Might as well add it to your Discord bot and start playing around with it because you can still create some pretty funny images like Elon Musk testifying in court, or Elon as Superman or, you know, six Pack Elon. And sometimes, just sometimes, it absolutely nails it and gets really, really close. So check it all out. I will make sure it's linked up in the description below. I'm still going to continue to make my Friday news videos because I know everybody seems to love those videos. Those are the videos I get comments about the most. But I also run future tools. I'm also seeing and reviewing 10 different to 20 new AI tools every single day. And I haven't been making as many videos, just kind of checking some of the tools out and putting them through their motions and making quick little tutorials on how to use some of these tools. And I want to get back to the roots of doing more videos like that so you can expect more quick, short, fun tutorials. Me messing around with some of the tools that come across my desk because I'm playing with this stuff anyway. Why aren't I hitting record more often to show them off as I'm playing with them? So hopefully you like this style of video. The news videos and the cool research breakdown videos that I've been making, those aren't going anywhere, but you'll probably start to see more of these as well. I'm going to be speaking at the Artificial conference this week and after that conference my calendar is cleared off to really go heads down on making you some really amazing content around all of the cool tools that I haven't had a chance to talk about. So starting towards the end of August, I'm going to start just cranking out some awesome fun video tutorials and tool breakdowns and and shown off cool research again because I miss making those types of videos. I've stacked a little bit too much on my plate. I've been speaking at conferences, I've been going on a lot of podcasts, I've been jumping on a lot of phone calls. I've been going back and forth with a lot of sponsors. I really just kind of overwhelmed myself and sort of fell behind on creating as much content as I normally would like to create. And now I'm going back to my roots. I'm clearing my schedule, I'm keeping my schedule clean, and I'm just going to keep on making some awesome videos about cool AI tools and tutorials and get back to where I was a few months ago, which built this channel in the first place. Thank you so much for tuning in. I really, really appreciate you. If you haven't already, make sure you check out FutureTools IO. This is the site where I curate all of the cool AI tools that I come across. I'm adding new tools every day. I'm going to start making more videos about a lot of the tools that come across here that I just think are cool or exciting or different from other tools. Check this site out if you haven't already, because this is going to be feeding what you're seeing on this YouTube channel. I keep the AI news up to D here every single day as well, so make sure you check that out as well. If you aren't already, make sure you subscribe to the newsletter, click to join the free newsletter button and every week I'll send you the TLDR of everything you need to know in the AI world. I'm going to be bumping it up to two a week pretty soon here, but as of right now, I'm sending them every Friday and I'm going to keep you in the loop. Once again, thanks for tuning in. You like videos like this? Make sure you give it a little thumbs up and subscribe to this channel and I will really appreciate it because I really appreciate you and I'm having fun making these videos for you. You so see you guys in the next video. Bye Bye.










