Everything I Need to Know to Drive a Tractor (Kubota)
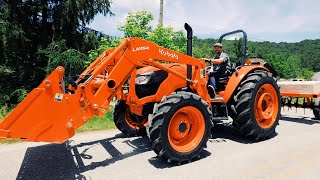
A Kubota M7060 tractor and RTV are demonstrated for a homestead farmer by Kubota staff. The tractor lifts 2,000 lb feed totes, has six hydraulic connections, and works with interchangeable implements like a 4-in-1 bucket and bale spear. The team covers startup, controls, maintenance, and how the self-leveling loader handles diverse farm tasks.
Chapters
There's more. As if a tractor wasn't enough, a diesel utility vehicle as well. And corporate Kubota folks are here. Excited about that being a diesel. Hey, one less reason to leave the farm. The diesel comes to us. I want you guys to meet the team here. What's your name and what do you do at Kubota?
Hi, I'm Matt Walker. I'm the product manager for the M60 through M series tractor lineup.
Ah, nice. And that's what I got. I got the M60.
You've got an M7060.
Okay.
Hey, I'm David Bowman. I'm the regional sales manager with Kubota Tractor.
Nice.
Hi, I'm Casey Roberts. I'm the product marketing specialist for the M60 through M6 series.
All right.
I'm Evan Wise. I work at Kubota Vashville, the local dealer.
Nice. You're my local contact. That's me. So, um, why the M60?
What—
why did you think it was a great fit for this homestead?
Well, we were, you know, talking to myself and, uh, we were looking at the type of work you're trying to do here, what you're trying to achieve, what current product, you know, you're currently using. So the M760 is the ideal tractor for this sort of size operation. It's a great all-round tractor, you know, you got a great front-end loader on there, lots of lift capacity, and plus it matches really well with an awful lot of the Land Pride Performance Matched equipment, right?
Yeah. And so one of our big pain points with our old tractors. We couldn't lift the 2,000 lb tote off the tractor trailer, cuz if we got— if we buy feed in 2,000 lbs, we save a lot of money.
Yeah, exactly.
And this thing will do it, I'd think, no problem.
Yeah, no, you've got plenty of lift capacity on here. We've got the weights on the rear end of the tractor there, so you got plenty of stability. So you're going to be able to do everything you need to do with this machine.
And it'll be super versatile, which is important on a homestead, cuz it's not like we're just going out and plowing all day or something. Gotta do all different kinds of things from scooping out bedding to unloading feed to hauling wood or whatever.
Yeah, that's right, and you've got a great line of equipment here. We've got the 4-in-1 bucket, we've got the pallet tines, we've got the bale spear, so you know, whatever you want to do with the front-end loader, you've got that covered.
Yeah.
And then you've also got your discing and you've got your rotary tiller for smaller feed plots that you want to put in. You've got the rotary cutter and then we've got the aerator here. So you can go out there and do your pasture improvement.
Okay, so I got the— I got to use that, the tractor, yesterday, and I feel comfortable with that. Maybe, maybe you could show me something on it. Maybe we could start there. Yes, and that's what you're here today too, right, to teach me a little bit?
Yeah, we just want to make sure you're comfortable with everything we've got out here and everybody can use it safely.
And okay, maybe you could give me a tour in case I'm not thinking of a certain feature or whatnot.
All right, well, I guess, uh, start here on the back of the machine. We've got the Land Pride Quick Hitch 15, so this will make it real easy when you're wanting to change out the various different implements that we bought you. You can just back up, you got some locking pins, right? You know, once everything's lined up, hook your implement on, you know, take things on and off real quick. Just makes life a lot easier for you.
We'll demo that in a second, but basically You line up these 3 hooks.
That's right.
And that's it. That's right.
Secure it with your latch and that's it.
You make it easy.
Then you just left the hydraulic connections or PDO connections depending on which machine you're using. When you want to take it off, lift your catches, there we go, pull the implement down on the machine, it just unhooks itself.
Okay, so what are, what are all 6 hydraulic connections for? Does it matter?
You've got 3 remote valves. Okay, so you've got, um, 2 standard detent and 1 float detent, which we'll go through later on. So these, uh, yeah, basically gives you 3 connections because it's an out and a return.
Oh, okay.
The hydraulics, so I think really we'll do that when we're using that on the, um, on the aerator down there. That'll be your raise and lower, lifting it in and out of work. You'll do that using one of these valves.
Okay. Similar to the quick hitch on the back, you have these 2 levers that make it really easy for you to scoop in and pick up, drop this, and then pick up the next implement.
It's one of the big differences you're going to find from your old, your old Ford there is you've got a forward-reverse shuttle lever here, so you can change direction without having to use the clutch. Yeah, that'll allow you— once you're driving your forward, you want to move to reverse, obviously a little lower speed for make sure you're safe, just lift the lever, slide it into reverse, and the tractor will stop. And then starts moving reverse. A 4-speed transmission, and then you've also got a high and a low, so you've got an 8x8 transmission.
Nice.
So 4 in, uh, high range, 4 in low range.
And then this is—
that's your hand throttle. Yeah, yeah. You raise and lower, and your draft controls there on the— for the rear linkage. The yellow knob there is your PTO engagement.
Yeah.
So push it down, turn it to engage. To disengage, you just have to push.
Nice.
Yeah, so the idea behind that is if you're, you're working, something happens to the machine behind you that kind of scares you, or something's going wrong, you just hit it and it stops the feature. Yeah. And then here you've got your 3 remote valve control levers. So you've got 2 standard detents. So that's just—
yeah, and what does that look like?
Extend and retract. So that's working those 3 valves on the back of the tractor. Okay, and then this one, a float detent. So, and we'll show you when— if we want to hook on the aerator, you'll see how that's all right.
All right, yeah.
Four-wheel drive engage and disengage.
Are we disengaged now?
That's disengaged. To engage, you pull up. Okay, uh, as far as a parking brake, I think you probably figured out. Yep. So yeah, press that one, that'll adjust your steering wheel.
Yeah, let's adjust the steering wheel.
You got some work lights, so that's your work light switch. Obviously hazards, which hopefully you're not going to need. Um, these are for the exhaust regeneration system, so for the Tier 4 final legislation that was passed, so all diesel engines have to have a filter system. There's a limit on the number of particulates an engine is allowed to produce. So there's a DPF filtration system under here, so basically that's catching all those harmful pollutants and all the particles, and after a certain number of hours it will do a regeneration. So basically the tractor does it all by itself. It will heat up that part of the exhaust to such a slight— I can't remember now— it's like not 1,000 degrees, but yeah, it gets crazy hot. And it basically burns off all those particulates in the filter, so it cleans itself out. What you will find is if the tractor has been used and working hard, it'll do that itself and you won't have to worry about it. If you're running around the farm here and you're not using the tractor and it's not really getting hot, which is fine, the tractor will tell you it needs to do a regeneration. Now all the instructions are here on this sticker on the dashboard. So there's a procedure that you have to go through to allow it to do that regeneration. So normally it just involves parking it somewhere out the way, put the engine speed to like 1,500 RPM, and it'll take care of itself. Leave it for 20 minutes.
Yeah, it says all that right here.
There is a way if you're working in the hay barn for an extended period of time and it needs to regenerate, you can inhibit that. So you can delay that, which is this button. Now that will allow it to— you can inhibit it it'll basically delay that regeneration for, I think it's a maximum of 3 times, and then it will go into a derate. So the engine will say, no, all right, enough's enough. It'll restrict the amount of power you're gonna get from the engine. And to reset that, you'll have to call Evan and he'll have to send somebody out with a computer to do it. So that's probably one to avoid.
Yeah. Yeah.
We do get people that, you know, maybe a little resistant to the technology that keep hitting the delay, delay, delay, and then, oh, My tractor doesn't work.
Yeah, very impressed with how quiet— yeah, this was because he had left his truck running and this was running at the same time, and I was thinking that this was what was so loud. But then when I walked past it, I was like, that's not like anything.
Truck's louder than the tractor.
Yes, it is, it is. I was very impressed with that. I was like, oh, this is nice.
I guess the one thing we did forget, down by your foot there, there's the diff lock. A differential lock. So if you do find you're in a sticky situation trying to pull out, one of the rear wheels starts to spin, okay, and dip the clutch, push your— put your foot down on that orange lever.
That's the gas.
Yeah, right here.
Yeah, that one at the back there. That's it.
Push this a little bit. Yeah, just push it back. Push that. Come on, that's what they said we need to do.
So then this locks the—
yeah, so that'll lock the rear differential, so that locks the rear wheels together. Okay, so you get more traction. Hopefully that'll get you out of trouble. But yeah, try not to— if the wheel's spinning, try not to jump on the pedal and try and engage it because it'll take you a certain number of times. But then, yeah, even machinery has its limits.
Popping the hood.
There you go, popping the hood.
Nice.
So you got your air filter. So this all, you can unclip this. That'll be part of your regular maintenance. If you're doing a lot of dusty work, you'll probably want to be doing that every day. Yeah, normal operation, probably not every day, but if you're really getting in a lot of dust, it's always a good idea to keep that clean. You've got your cooling package, so your radiator here. It's got a nice little grill on the front that you can unhook. There's two hooks, that unhooks, pull that out, clean it out. So that stops a lot of the heavy dust and debris getting into the engine. That's the electronic engine controller, so that's the heart of the engine. That's what's controlling your engine while you're using it.
Okay, nice. One cool thing about these forks I noticed, I lift the— I lift and the forks stay level.
So this is the hydraulic self-leveling. Okay, well, so it's normal operation up. If you're on the hydraulic self-leveling, you push that down. So that means that you've got the bucket or the pallet ties level and flat on the floor. As you raise it to its maximum height, it will maintain those pallet ties.
Yeah, that's a nice feature.
Yeah, and that's all run through this hydraulic valve right here. That's it. Load control button.
We're going to get to work with this thing. First thing we're going to do, demo, is we're going to put these concrete weights on the aerator while we have the fork on. All right, now we're going to get the forks off and the bucket on.
Real easy, quick attach system, two levers, that's it.
That's it.
Now you just pull that, put your forks flat on the ground, lower the bucket and slowly back away. Okay, that's your front lane Let's try it.
Oh, that was easy.
Now that locks the pins in place.
All right, and then how do we hook this up?
So close that up to make it easier. You probably want to just roll the bucket forwards, put it flat on the ground. That gives you access to the two points there on the front.
Okay, so we'll twist this bucket to get it out of the way and then we can get at that easier.
Okay, you can probably reach, but it's easier to do it.
Okay. All right, how do you know which one goes to which? Oh, I guess you can't.
Yeah, you can't.
One's a male, one's a female.
Okay, real simple.
Take this off. What is this called?
The drawbar.
Yeah, okay.
Pull the pin, that slides out.
Okay.
Don't forget your pin.
And for storage, just slide it back in there.
Okay.
Hopefully it won't get lost. The cylinders that raise and lower it, you see they're all the way in now. There's no silver shaft. So what we need to do is actually lengthen these.
Oh, lengthen them a couple of inches.
Okay, that's making it so we can go down low enough.
Yeah.
Ah, now.
We can do it manually.
Do this one manually. I'm gonna rip this thing.
You ready to keep going?
You ready?
Yep.
Oh yeah, that's smooth.
Okay, gotta turn it.
Oh well, I can turn it, just make sure I got it on there, but Next up, the aerator. So we got to get the quick connect off. We don't need that. It's just pins.
3 pins.
Moving the top link out of the way.
This is where it gets heavy.
Okay, good to know. Picking up your safety chain. Winding down the jack. Now how do you know which ones? Tell you quick, go where? Oh, okay.
Now for this one, I'd go with the number 3 valve, the float detent.
Okay.
So when you're in the field, you can just run it on the float, and I'll show you how to set the heights on the rear.
Why are you saying number 3? Because it's accessible right here on top.
1, 2, 3. But this is the one with the float detent.
So this is where you push the lever all the way forwards.
Okay.
Basically takes the pressure off the system, and this will go and work in its lowest position.
Okay.
As you're lifting it, that's raising and lowering this, you're basically moving this hydraulic cylinder. So when you're on the road, or as this arrived this morning, the transport lock, and if you're doing any work on the machine where you're getting under it, that slides in there.
Then there's no way it can collapse on you.
Pins in place, exactly.
Okay.
And yeah, when you're on the road, you probably want to drop that in.
Depending on how far you're going.
If you're just working around here, it's not worth it.
Okay, probably required deep.
You want to go in the field, we've got these clip collars.
These are your deep.
So they just clip on there.
So how deep do we want to go?
That's a good question.
So more, more, more is depth?
More is shallow.
Okay, well, let's go shallow. We'll go shallow for the demo.
That'll probably be enough.
Okay.
If we get on the flat, you'll see if you put the machine down, that'll come down now, and it probably won't even hit those because we're on hard ground.
Okay.
On the soft ground and those tines are going cutting into the dirt, you'll see it, that'll go down.
Okay.
Should come down.
And that's what those concretes we're doing is it's going to weigh this down to push the aerators down, and that will overall get oxygen and water deeper into our pastures and make them better.
That's right, faster improvement.
Yep. Next up is the UTV with Evan.
Okay, so on the RTV— so RTV, starting it, so you're in neutral to start, and then parking brakes right here, and then just your standard key start right there.
Okay.
2 and 4-wheel drive selector right in the middle.
Nice.
Um, light controls right here. You have 4-way flasher button right here.
Okay.
Tilt steering, make it easier to get on and off. Windshield wiper control right there in the center by coffee, ready to go. That's right, for sure. Then over here on this side, locks your rear end. You just step on that, that'll get both rear tires pulling. Whenever you get unstuck or whatever, just let off and it goes right back to normal.
Nice.
If you need to hold that in, step on it, you just got a little pull cord right there, a little cable that locks that in. Okay, so your hydraulic dump bed, all the way down is float, this is your up, this is your down.
And that's machine power, that's not hydraulic? Nice, that's nice. We're using a dump bed now.
I want to show you how to change it. So this is convertible between 2-seat and 4-seat.
Nice.
All right, I'm gonna walk you through this. You man this side, I'll man this side.
All right.
Start with disconnect this, just this little rubber bolt.
Yeah, there you go.
A U-handle.
Yeah, so far so easy. Yep, lock that out of place. Nice, nice. Watch out. Good pinch. Cool.
Mhm.
Back into that back hole. Keep it up.
Nice.
Over here, pull handle out there.
This?
Mhm.
And it latches. You're going to latch into this part right here.
All right, nice.
You get to where you can do this pretty quick, I imagine. That's it, it's ready to go.
Yes sir. So now you're in 4C.
We'll go with Jonah and Josiah first. Evan, you want to go or should I just go?
Oh, you're good to go.
Okay then. Uh, Lily, come on, Lily. Everybody get your seat belts on. We're good. Okay, listen to that diesel, boys. Look at that, guys, we're working now.
There we go.
Good like that.
There's a lot of space, a lot of power underneath our seats here. I like this closed-in cab window here.
That's glass.
Oh look, we've got a windshield wiper.
Nice.
What do you got, some swag?
Yep, we've got some good hats for you, got some Land Pride merch.
Nice.
And then you've got your grow local right here.
All right, I like it.
And some sweatshirts for y'all.
Okay, well, thank you. All right, you guys are gonna have to go. You gotta drive to the airport. Thank you for coming all this way. That means a lot. I learned so much.
Good.
Well, you know, feels so much more comfortable and confident.
I hope you enjoy the machinery. And yeah, it'll put it to good use. Okay, I'm sure it'll help you a lot with what you're trying to do here.
For sure. Thank you guys so much.
Good deal. All right, yep.
No kidding, maybe an hour after Kubota left, the feed is here. So we get to try this tractor out in a really practical way. Well, it starts.
More from Justin


If I had to start my Homestead all over again, it could only pick one animal…