In this instructional video Victor Justin Rhodes walks viewers through the complete process of raising roughly 100 jumbo Cornish Cross broiler chickens from hatch to market in just 58 days, yielding about 473 lb of meat. He begins by recommending ordering 100 chicks from McMurray Hatchery and timing delivery three weeks before the last possible frost date, ensuring the birds are old enough to withstand early spring temperatures but not so old that they encounter frost later in the season. He details brooder construction—a 4 × 6 ft space with 1 sq ft per four birds, hover brooders, heat lamps, tray feeders, grit trays, and waterers—plus the transition from starter feed (organic, soy‑free) to larger feeders and 5‑gallon water jugs as the birds grow. Bedding management uses fine wood shavings, maintained at 4–18 in depth, turned regularly to promote composting heat and sanitation. At three weeks the chicks are moved to pasture in a “meat shawl” enclosure, with a guard goose for protection, and provided with king feeders, grit, and ample water. Daily management includes moving the birds within a fine‑mesh coop and rotating the surrounding net every 1–3 days to encourage foraging and prevent over‑grazing. At eight weeks the birds are harvested, chilled in a cool‑room fridge, and frozen in batches of ~30 to avoid overloading the freezer. Throughout, Rhodes emphasizes precise timing, temperature thresholds, space calculations, and equipment choices, and he offers a free downloadable packet of plans, butcher instructions, and supply lists in the video description.
Chapters
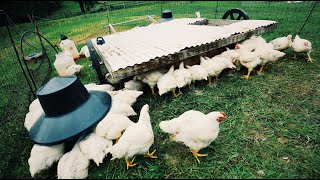
Step number 1: get 100 jumbo Cornish Cross from McMurray Hatchery. I say the Cornish Cross, which I like to call C— how would it look for you guys— C for Sea Monster, because they are bred to grow so fast and so big in such a short amount of time. The second reason is this is the chicken you're used to eating, the big breasts, the super delicate, like soft, not stringy. Step 2: Get them delivered at an appropriate time. So get them 3 weeks delivered before your last possible frost date. So you're going to set these guys out at 3 weeks old. You want them to have their feathers. You want that to not be too frosty, like you don't want it to be below 30 degrees. So So for us, being May 12th is the last possible frost date, that means we would get our chicks mid-ish, late-ish April. On the other spectrum, I would say you don't want to grow them more than a couple of weeks past your first possible frost date. So for us, October 10th, we would probably want to have a 6-week-old ish bird. I mean, we can push into that. You definitely don't want to be having them out there in snow or going below 30. So for us, 6— having chicks 6 weeks before October 10th. So what would that be? Late August, early September. The third step is actually picking them up. Post office calls really in the morning. You go and you get them. Yes. Hey, this is Belinda from the post office. Your chicks are here. Hey Linda, thanks. You're welcome. Fourth thing is you set up the brooder. Well, actually, hopefully you've set up the brooder before you went and got them. You've turned it all on. These are not Cornish Cross, these are regular chickens grown up to be layers, but it would look very much something like this for new chicks. Here's a big one. Oh, they're both the same. Okay guys, bring them on. It seems like you got it. Over there's a room. Oh, you want to go do it? Okay, Josiah's going to take my spot. I'm gonna go start milking the Hey, you did a good job! This is a 4 by 6 foot area. That's enough. You need 1 square foot per 4 Cornish cross, so this is enough for 100. It would look a lot like this: 2 tray feeders, some grit up on a, on a dirt trap there, a half-inch wire mesh on a frame so that shavings fall off before it gets to the trap. Now the waterer would be down on a trap like that, lower, so they could get to it. These guys are older, they're spry, they're getting up to that. We're just keeping the shavings out of it. And that's it. As they get older, maybe 1.5, 2-ish weeks, we put in this king feeder because they start going through their feed a lot. We might put in 2. And instead of a gallon waterer jug, we might use a— well, we will use a 5-gallon jug as they get older. What we don't have in here now is because we've hardened them off is the, the brooders, or the, the heat. So we have these hover brooders. I like to use a combo of hover brooders, 2, 2 for 50. These are big, these are the large ones from Premier One. And then I also like to use heat lamps. We'll, we'll mount these boards, hang heat lamps over that, and it encourages them to come out and get their food. And they get all they can eat 24/7 this year for their entire life. This time around we used New Country organic starter feed and was really impressed. It's soy-free. Since these guys only go out to 8 weeks, you can feed just starter feed. You'll notice I have wood shavings in here. I actually like the Tractor Supply fine shavings. They fall themselves to the ground. You can see some of the manure there. They don't stick up high, so the chickens aren't walking around and getting manure on it. You have to fill this up every day by the end. I mean, you have to sprinkle new wood shavings on an inch or two by the end of the— every day by the end. But in the beginning, maybe every few days. You can start seeing the manure, definitely if you smell it, putting some of this shavings down. In between batches, I'll come in here and stir it up. Look, I've gone ahead and stirred some up. This is to accommodate up to 18 inches of material. And once it gets up here, maybe at the end of the season, we will compost this. But if you can run a number of batches a number of years, the deeper the bedding, the better. It's vibrant decomposition. It's, it's helping keep this sanitary. So we'll turn this. I'm digging it up here, throwing it up here. We'll throw it back, go to the other side, and wet this, and then put dry material over before the next batch comes. And this will also start composting and give them a little bit of heat. That's a lot easier with a friend. Gideon came and sprayed it. Now, it wasn't this high at first, it was way down low. I would say start with a minimum of 4 inches, and we like maximum of 18 inches, which it's about there. Well, maybe one run, one more batch. We're going to do some ducks and geese, we'll put in there, and then we'll clean this out for the season. And that's lasted us 2 years. Step number 5 during week 3 is kind of what you see here. You don't see any heat lamps. So first, cutting off the heat source during the day for the first half of that week, and then this The second half, no heat source because you got to get them ready. They're about to— at 3 weeks old— go out to the big bad world. Why 3 weeks? Well, they're just like these guys and their feathers have developed and they're ready to go. Hey Gideon, you want to go with me out to pasture to move sea monsters? I'll walk out there when I'm ready. Okay, good deal. It's a good helper washing the pans. I got feed in these, well, 1,000-pound totes. There's 2 of them stacked right there. We're about empty there. I wanted to show you this before we go out into the field because, well, we're going to grab a couple of buckets at the end. They're going to eat almost 2 buckets a day, big 5-gallon buckets. In the beginning, maybe 1 inch less. At 3 weeks old, we set them out to pasture like that, preferably in the afternoon when grass is dry and preferably when it's not going to rain, rain like for days. It's gonna rain, rain for days, then let that clear. If it's an afternoon thunderstorm, they're gonna be fine. They have their feathers. Put them out in my meat shaw, which by the way, I have plans for that and more resources down in the link. There's a link down in the description. Say, free the birds! Free the birds! First time, and for the rest of your life. Yay! And then we gave them a guard goose. Meet your new buddies. We just want to make sure she doesn't attack them. We kept their feeders full. We had 2 king feeders and 1 plastic tray feeder from Premier One. Absolutely loved them, absolutely kept them full in feed the entire time. We kept them in grit, what I like to call rooster teeth, little rocks that they eat They get down into their gizzard and they move— that muscle moves those rocks around, therefore acting as teeth, breaking that food up, making it more efficient. We've noticed we were better about it this time and they were more efficient with their food. And most importantly, we kept them in water, filling their water up in the morning when it's cool, checking it in the afternoon. We used two— well, we used one 5-gallon Miller Manufacturing vacuum-sealed water and one 7-gallon. And most days All the time. They were always in water. Some afternoons we did have to refill them, especially towards the end when they're drinking more. So the 7th step is we move them every day inside of a Premier 1 Shocker Knot. Has this really fine webbing so it's hard for chicks to get out. We move them, we move them in their coop, their meat shawl, every day, but then we move the net. This would be the next step. We move the net every 3 days until their last week, and then we move their coop every morning and afternoon. And that meant moving the nets every day and a half. Nearing the final steps at 8 weeks old— harvest them. Next up, we got the chickens in a fridge. For us, we have a cool room fridge, not to tenderize it. We haven't found that necessary with the Cornish Cross. Some folks say to tenderize it for 3 days in a fridge before you freeze it, but more to not overload a freezer with 100 unfrozen chickens all at once. That can be a lot of them in the freezer. And then over 3 days, putting in 30 into the freezer, the next day 30 more, 30-ish, and then the next day 30 more, etc. Just eyeing it, doing it by thirds, getting in that freezer bit by bit. And finally, we eat. Hey, that's our chicken, Josiah. That's our fresh brand new chicken right there. So that's how to grow a crazy amount of meat in just 58 days, guys. It would take you 2 years to get that much weight, 2+ years for a steer. It would take you 4 pigs and over 6 months. That's an incredible amount of meat. I want to teach you guys actually how to do this further. What if you want my meat shop plans? What if you want to know how to butcher? Hey buddy, hey! And what if you want to know all, all my supplies? And what if you just need notes of all I just went over? So I'm going to give all that to you for free down in the description. That's a nice happy ending, wasn't it, Teddy? That was a nice happy ending.