How to Set Up A Poultry Net with Justin Rhodes
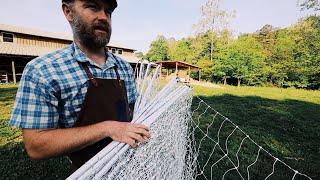
Justin Rhodes walks through installing an electric poultry net from start to finish. He covers mowing the site, staking the fence with rebar or FiberTuff posts, grounding the energizer, and handling tricky terrain. He also shows how to safely enter the fence and manage the net on rocky or sloped ground.
Chapters
You've identified where you want to put your chickens. The first thing you got to do is mow down the area. Two reasons: one, chickens do not like tall grass, and second reason is electric fences do not like tall grasses either. It grounds out on that. We're gonna overestimate. You might not necessarily know how big of an area you need, so just exaggerate and just make sure you mow plenty of area to make sure you encompass this fence. 164 foot long fence is going to be about 1,200 square foot. 100-foot fence is going to be about 600 square feet. So really not that big, but this is our backyard. We can just mow it just to get our backyard looking good. This is how the net comes. This is— it looks fabulous. So you can do one of two things. You can unroll it standing up. Most of you are probably going to want to unroll it sitting down. Should just be in bow ties, right? Yeah, this is just coming off easy enough. And let's do one demo. So that's not tied in— oh, it is. So it's not quite tied there on the end. See how that is? So here's a little hack for you. That's only one— what do you call that, the square knot? Well, we're going to make a square knot, okay? That, that way it stays in place. And then we'll use this when we roll it up to move it we roll it up to store it. And these can just hang. I don't believe they conduct electricity, so it doesn't matter if they hit your fence, and they can just hang down. And just do that with all these wires. You want to make sure that you move your chickens at least, I'd say, once every 2 weeks if they're on grass. If they're gonna be in a permanent spot and you're gonna like— please tell me you're doing deep bedding, so you're putting down wood chips or something— then you you can— what would you do? So you're going to keep this in one spot, do bedding unless it's a big area, and then you'll have to periodically mow. We'll talk about that more in a bit. You'll have to unhook your clips. You should just be able to pull them off just like that. And to unroll this thing, if you could stand up, but make sure you hold all these posts Or you could do like that and unroll it. I prefer to stand up. So make sure you grab every post. Don't lose one post or else it'll get tangled. So you do like this, and then see how the posts are on my left? I'm right-handed, so the posts actually need to be on my right. So I'm going to grab all the posts. I know it's backward for you guys. But now see, see how the spikes are then on my right? It looks like we got drivable posts, so they're double spiked. I'm going to estimate where I think my corner is, and you can move it if you set it up and it's not right. I'm not going to put the energizer on it, I'm not going to put the, uh, and then these things are nice because you can just step on them. If you didn't have a step and you couldn't just drive it in, that's where the rubber mallet comes in handy. Oh look, my cameraman's got the rubber mallet. Just hammer it in a little bit, right? It doesn't matter. You— I could have gone counterclockwise, I could have gone clockwise, it absolutely does not matter. I've got— look how I've got my fingers through here. That's how I'm holding up all these nets. It is quite heavy. This is the 164-foot. It's too heavy for you, get a smaller net. And so then I'm just gonna walk backwards trying to get in a straight line. Doesn't have to be— doesn't have to be round, doesn't have to be square, doesn't have to be rectangle. It can be stair step. But I'm going to do this square. So I've counted these. I've decided if I'm going to do a square, I can have 4 posts on each side, and then I'll have a little leftover at the end. So notice I'm walking backwards, okay? I'm I'm got my right hand on the— and then that's how I found my loose one. So I'm walking out, I don't know which one of these poles is next, so then it starts tugging on it and I can see, okay, it's this one. And then I'll— here's a little trick from Premier 1 themselves, is you want to make sure this gets really tight. Don't pull up here because look what happens to the bottom. You want to have your pullage here. So if I'm doing this by hand, I'm, I'm You might even bend over a little bit and pull that, but I'm just using like this. I don't like to bend over, but I'm flexing that. I'm really doing it. You might not be able to see that, but I'm really putting— look how tight that is at the bottom and loose it is at the top. Doesn't matter how loose it is at the top, you want it tight at the bottom. Make sure your double spike isn't going over the grounding wire. There's a grounding wire down there, and sometimes I'll show you. This is a new net, so it's not happening, but sometimes that could be like that, so to speak. Okay, and you would just, as you went, you would just kind of like this and fix it and get it going in. Notice when I set this down, if you had to set it down to do two hands to untangle something, put all your posts together. I'm kind of making sure my net fold stays in front of me. I'm not, I'm not necessarily putting it on top of it. All my net is on this side, you know, it's not all tangled up in the spikes. And then to re-grab it, I grab all the spikes. I'm making— see how my hand's coming through there? I'm making sure I get all the posts. A commenter wanted this in real time. Well, that's what you're getting. Here to this first corner. Now that didn't go all the way in. It's probably in far enough. If you're going to keep this here for a week or two, maybe you're prepping a garden, then, then you're going to want to drive that in. Let's demo that. And perhaps this is because it's rocky, poor soil. Most the time, uh, a rubber mallet will do here. If not, they make a hammer that has a rubber on one side and a metal on the other. We have that one, it's out in the field right now with the boys. But that's great. But most time, the rubber mallet's going to do. See, it's working just fine. Okay, now to demo the rest of it, let me show you this. Pretend you didn't get double spikes. Use a rubber mallet here. Don't use a metal mallet here because the metal will break this plastic. Rubber won't, and it's driving it in. If you have double spikes, I would definitely hammer down here though because it's going to get both spikes in a little bit better. If you have single spikes, rubber mallet is your best friend. Just play around with it at first. You might not know, hey, how big can I make this? How many sides? Oh look, I hit a rock. Okay, I hit a rock right there. It's not going. Usually you can move, maybe move it over a hair. And how do I know I'm getting in a straight line? Well, does it matter? Just do your best. If it matters, you could draw a string. You could get two posts, two, two, uh, fence posts. And go from one end to the other. See that? That— okay, so that's not going in real good even for a temporary situation, but I think I got it in enough to hold it. So I'm just gonna— how many I got? I got 1, 2, 3, 4. So I'm gonna have 4 posts in the middle, not counting my corner, and that should get us there. So that drove in nice. I'll come back and get any of these that didn't get in with my mallet in a minute. For my corner, I'm just like everything else, just put it straight in, and then I'm coming out. I'm estimating square here. You can always go readjust it if you have to. That's another reason to— like, like that didn't go in all the way. That's another reason not to go ahead and do a rubber mallet, because I might move— I might tweak this fence and move it a bit. Really rocky soil there. That one didn't go in much at all, but even, even 2 not going in— well, the 3rd one's rough too. This is shallow soil. They're falling over. That's okay. That's another method. Let me show you that method. So there's 1, 2, 3, 4. You can drop it. You can just drop it. Polyface Farm does it this way. They drop it, then they walk by and install it, and that way you could adjust it more once it's on the ground, you could adjust it. So this is our corner piece, so I'm gonna make sure it's tight. Okay, that's going to be a work of a rubber mallet here because I made this corner and that's not in. I had to go until I started pulling the corner, and then I knew that that's going to be where it is because there's no resistance. I could have just kept going. I'm counting my post as I go. 1, 2, Oh wait, I'm not gonna have nearly enough, so I'm glad you're seeing this. So I've miscalculated. Here I am at the end, so I've done 1, 2, 3, 4, 5. 1, 2, 3, 4. So if I do— I'm gonna have to do 1, 2, 3, 4. So okay, let's do a demo of, uh, we're just gonna pick it up. That'll be in our next lesson, so I'm just gonna cut to it picked up. I realized that was too big. This net might not be as long as I thought it was, but just redo it. It's not that big of a deal. That took me less than a minute to get it up. This is good. I'm glad you guys are seeing this. Untextbook. The ground's hard and it's measured at first. I'm kind of putting it in loose. It's just in case I got to pick it up again, right? So here we are with extra. You should have one extra, but I got a little more than extra, or a little more than one. It's like, but what do you do with this extra net? I like to then wrap it around and it'll end up going like this. But I don't do that yet. I don't do that until the very end because now that I've got my fence in place and it's the right size— now this looks like a— this is a 100-foot net, okay? This looks like about 625 square feet. So this corner is great. This one was great. We're going from the same end we started, and then we'll just go around and we'll pull it tight, which that one was. And then we'll, uh, we'll rubber mallet. Okay, doesn't have to go all the way. I better get on the inside where the spike's going to be. And I'm pulling from the bottom. I'm going— I'm not worrying about how tight it is there because I'm coming from that end. So I'm making that tight and then I drive it in. Uh, the ones that didn't make it at all, let's get them straight. Look, you can take your foot and pull it tight, get it in place. And rubber mount. See how rubber mount's making that super easy? And notice how this black wire, it's not electrified and it's touching the ground, and that's okay. It's not grounding things out. It's this one you want to watch out for. So, so far we're keeping that up off the ground and the grass. I've put up two corners. I'm coming back, I'm looking at my fence, and I'm trying to go parallel with that. Is this parallel? Is that parallel? It seems like about right there is parallel. So I'm just estimating with my head. I mean, you could draw strings if you're anal, but hopefully you're keeping this fence as a— you're keeping this fence moving. I mean, if it's going to be like a permanent and you're going to put deep bedding in here, then yeah, you might want to make sure it's square. Now to deal with my excess, I'm just going to wrap it around that corner. So we got a problem. We have that spike there. We don't want to put the spike over the electric, see? Okay, we don't want to pin that other fence down, so I'm gonna go ahead and lift that other fence up until I can get that in there. Oh, that worked. There you go. Make sure when you're doing this that this, this doesn't catch under that, because if that catches under that It's hitting that metal and it's going to ground out. Okay, we'll pull our fence taut here to the end. See how the spike is out and it's easier for me to step on? Well, that works because you have a little bit of flexibility on the end. Okay, let me show you this. I didn't want to do that here because this would have been twisted. So this would have— if I would have put the spike out which is more convenient for driving it in, we've twisted it up here and we've twisted it down there. So make the extra effort, even though it's a pain because your spike's kind of getting in the way, to put that in. One thing you can do here, you got a little sagging net, why not rest it up on that and you got a little unsag. If you have a sagging net, it's not that you need to do that somehow. You need to actually tighten up your bottoms. If you'll notice, we do have some sag, and that's natural. We do not have sag at the bottom. That's going to hold in a chicken. That's going to keep all your predators out. What about these FiberTuff posts? The kit comes with 4. I like to go a little diagonal. See, I'm not going straight up and down with that, and the, the post goes out I was able to drive that in with my foot. And then you pull this net back. You can move your post over a little bit. Okay, here, let me, let me see my mallet. Drive this in a little bit more. Now pull this. Now I can get it up on there. And boy, that makes a difference. It's leaning in. Let's fix it with this FiberTuff post. It's such hard ground. Now I'll pull that back, hook it in there, and it's not leaning. Now this corner post is straight up. Suppose you didn't opt for the FiberTuff post, you need to save some money, or you need more strength. Get it, get you a rebar post, $1.69 at your local hardware tractor store. Up and drive this in. Look how I'm doing it diagonal. One thing to note here is this is good if, say, you are going to put them on deep bedding. The FiberTuff posts only reach in this far, or maybe this is going to be more permanent, then yeah, you're going to want these rebars anyway because you can drop— you could— heck, I could drive them in 2 feet if I wanted to. You guys could do this knot. I'll do it slow. Okay, then I'm wrapping that around. Okay, I'm gonna go back around that. I'm gonna bring this in. This is the one thing I learned in college. I learned this in canoe class, this amazing knot. See how that's pulling it back? So kind of holding here at this knot, and I just keep— I just keep pulling it real tight. Look how it's pulling this. Look, look, it's beyond vertical now. So then to tie this off, I pinch this right here, okay, and then I do another bunny ear and it's good, okay. And look how straight that pole is. Actually, it's beyond straight. To untie this, take your loose end. Look, we're done. Ready to go. Okay, so let's get it tight. So this is a little more work, but it's— it actually is better. We're tying it with this. This does not conduct electricity, but it's probably best practice not to let it touch your electric line because this metal will conduct electricity. So you can't be having it so close that that hits. Here we have our corner. So how are we going to do that? I'm going to— I reckon I'm just going to wrap this end around because it doesn't have a place where I can hook up the— now, these clips are handy because they are set up to just— you can tie them on themselves there, see? And that should hold. I got to get my notes out. Yeah, now's a good time to tell you how to get— how do you get in? I mean, Premier One does make a gate if you don't have the agility to. But to get in, let's turn the fence off. You want to not get in at the corner because you have so much pressure at your corners. Don't get in right there. Try to get in at least one away from the corner or in the middle, and try to just do it as gently as possible. Just hold it down. And get over. Okay, now I can grab my notes. Maybe they can help, you know, help push it down as I get back over. Another way, say you just can't turn it off and you're out in the field, you got rubber boots on. Now if it's wet, I don't know if I'd risk it. My kids risk it all the time. I don't even really like to risk this. Gird up your loins here. I'm stepping on with my rubber boots. I don't know if it's gonna work. You could do that in a pinch and hope— I did catch it. Hopefully it's on a— this pulses, it doesn't like continually shock. So you do have a 50/50 chance if you touch this fast, it's not going to be on a pulse and you're not going to get shocked. Let's see if I can do that a little bit better. I don't like doing this method because it's kind of scary, but it also puts a lot of pressure on your fence. But if you're in a pinch and you got to get through it and you don't want to get some family members played a trick on you. Look at that. And they've left the fence on. Trick-or-treaters getting out. Oh, then you're just screwed. Then you are screwed. Maybe I don't recommend that method because you're getting zapped and then you're panicking. So yeah, Justin Rhodes did not teach you that method. Another method is if you can't just go turn off the Energizer, you've got a bucket Gideon went and got me this little bucket. 5-gallon buckets would definitely be preferred. Uh, plastic doesn't conduct electricity, so you can touch the fence all day long with plastic and it's not going to shock you. I might try to pin it down like this. Got to be careful. It ain't easy. It's probably just easier just to go turn off your energizer. Okay, but I did it right there. I mean, in a pinch I had to do this textbook and do this fast for you. So see what I'm saying? Let's go turn off the fence because I just got shocked on my knee. What not to do, how not to get shocked. Some problems we already talked about: if it's rocky, you just got to use your hammer. It can't be so rocky that you can't get the metal in even with your hammer. You just have to find someplace else. You could maybe, um, concrete in a tire. And then, uh, you know, mounting that to a post in that and mounting that post to this. What if you have a hump here, which, which can happen? What if you have a rock? Okay, so maybe this is your rock or your hump and your net's doing like that. I mean, if it's— if the ground's arching up and humping, that's okay. But if it's acute like that, it's certainly not okay because your chickens can get in. You could go, you could go around it like that. See, I just went in with my net and I still made it tight. I went in until I could feel it tight. I could go this way. Look, I can't go this way, it's too tight. So I'm gonna have to move it in. So just move it in. Your fence is going to look a little weird right there, that's okay. Suppose, suppose you had to have a It's a big boulder here, or a corner of your house. Well, you could have done like this. Whoa, I've got that in good. I can do this. There's no rules saying it has to be in a square, okay? But then I would put my FiberTuff post on this side. I've done that before. I've had to have a corner out for— oh, you know what, because I would build a compost pile here. So if you want to have a compost pile on your run, Jason, you have chickens in one spot, you could open up a corner, build your compost pile in a pallet, and let it warm up, and the chickens can't get to it yet. It doesn't even have to be on a pallet if you protected it from your chickens. You let your compost be here for a week, let it warm up, and then put this back. And you take your compost pile that had been cooking for a week and turn it, but turn it in so it gets further away from this fence, and then build you another— get you another compost corner by then going to the next, next side. And it could be that you're a homestead and you don't have all the material at once, you could just keep this open, and this is your designated compost pile until you've had enough to get up to 1 cubic yard, and then you could start doing the compost corner. And you go around. What's cool about 4 corners, if you go on a week, turn your piles every week, build your pile every week, by the time you get back to this one after you've done the rest, this one's ready to go. Ready to go in the field or on the flowers or in the garden. Another reason to keep it tight is keeps it safe for your animals. If this is all loose and you have a goose— some member has had a goose get caught up— I've had a goose get caught up in here and probably get electrocuted and die. So keep it tight and it's more— I don't know, it's more of a straight wall, it's more bouncy, it's more— they're not going to get all tangled in it. That'd be another reason to keep it tight. Notice at the end of your line, I've heard of people that getting pushed down somehow over time and that loop getting down below your, uh, plastic. So that needs to be pulled up. And John Suskovich, fellow YouTuber, teaches that you can actually put like a— if I can get it back up Anyway, you could put like a zip tie right here to keep it from sliding down. Or if you're a foot or so short— well, if you're that short, you might be able to pull up this one and nail it. So say we were— there was still a little too much. So say we're that much short, well, you might be able to just pull that corner in and pull that corner in, and you got it. Okay, but let's say you're this short. Well, that'd be kind of a pain to unwrap your whole net, wouldn't it? Well, there's no way you're going to reach it with that. So the next, the next easiest thing to do is to unwind one side. You can just bring— I don't know, make yourself an estimate, probably overestimate because you can always overlap. Bring in that one corner. I mean, if you don't care if it looks square, that you have one corner kind of coming in Well, then you can just redo one side. And then I'm cutting across to it. I have more than I need, so I would go around. So you're setting up your fence and that's all caught up, especially with these double spikes. That can definitely happen just as you're unrolling it. Just make sure it doesn't— like, the more you do this, the less tangled it's going to get. So it's better to untangle it at first. We're gonna put the grounding rod in the corner with the most sun, so we're furthest away from our house. There's nothing blocking the sun here. Our south is that way, so we're going to face it that way. Gideon, you want to hammer it right here? I know we're gonna have to hammer this because the time we've been having with this fence. Letting the chidler help, just drive it all the way in. I don't know, maybe a couple inches above. Let's test our fence. Let's test it about where the chickens would touch, maybe right there. I'm holding down my button. Get in. Yeah, see, it's on 8K. That's hitting real hot. Anybody want to touch it and demo it? Nobody? Okay, so you're going to make sure that it's hitting at— well, this is your minimum, I'd say 2.5 for sure. 4 is better. 8K is the best. One last thing before we close this installing this thing. This is a brand new solar, but if this was coming out of storage, you want to make sure it's dusted off. You want to make sure there's no mud or anything on it because this is where your power coming in. But it's a good bright day, this fence is going to be very, very powerful. Suppose you want to set up your net on a bank. We found an extreme bank, pretty steep here. So what if you have a post here on the flat and your next post is on an extreme bank? The problem is you pull that tight and, well, you go, you put this into the ground and you have, you have a sagging fence. Notice how I put this post in. I actually put it parallel or perpendicular, whatever that is, to the bank. I didn't— the temptation is to put your pole straight. You actually put your pole straight up and down from the bank, which is going to be sideways. Okay, so now we have a terribly sagging fence. So one thing you can do in that case to make it a little better is go diagonal up the hill. Okay, this is on flat. We go diagonal, look how much better that is already. Okay, so instead of going straight up a hill, straight from flat to hill, go diagonal flat to hill. What if you're on an extreme hill, period, and you have to have your whole fence there? We're putting it on diagonal or perpendicular. Is that how it is, Jason? Perpendicular. I'm going straight up and down off the hill. Do you understand what I'm saying? That's how you deal with a hill. To go across it, here, to go across, same thing. If that was my corner Look, I'm not doing this, I'm doing this. I know it seems, it seems weird, but trust me, that's the way to do it. Otherwise you're pulling up on this, you're gonna create this gap in your fence. So that's the main tip with building on a hill, is keep your pole at the same angle as your heel.
More from Justin

If I had to start my Homestead all over again, it could only pick one animal…