Editing videos using Sony Vegas : Tutorial / Crash course
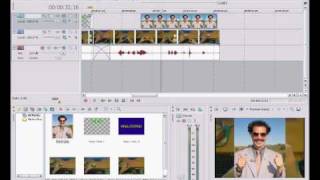
Andrej Karpathy shows how to edit video clips in Sony Vegas and compress them with VirtualDub. He imports clips, splits and speeds them up, adds transitions and effects like radial blur and glow, overlays text and images, then renders and compresses the final file.
Chapters
Hi guys! Many of you have your own YouTube channels and many of you make your own videos. I think that one of the major reasons that my videos here on YouTube are as effective as they are is because I post-process them. So instead of doing one long 10-minute take, I do several short takes and then I stitch them all up later on. This helps a lot because if you make a small mistake, you can just reshoot that part right away and it's no big deal. You can also add a lot of cool effects like, for example, speed up or slow down the video put in text, images, and many other useful things. Allow me therefore to take a small detour from cubing and show you just how easy it is. So this is the program that I use for video editing. It's called Sony Vegas 7.0. I think the most recent version is 8.0 though, or even 9.0 by now. So you can get free trials of these programs on the internet, and I'm gonna post some links into the video description, but they will work only for 30 days. After that, they will ask you to buy them, and they cost $600. So, needless to say, none of us have that kind of money. But unfortunately, I cannot legally in this video tell you if or how you can get around that. But, I mean, if you don't know how you can get software like this working on your computer, then you're probably not advanced enough to be using it in the first place. So the best way to teach this is through an example. So let's create a small video together. I made 3 clips in advance. So, and this whole thing is very easy to use, and most of the time you just drag and drop stuff around. So select these 3 clips, hold down Ctrl if you need to select several things, and just drag them in there. Okay? Basically, Vegas is just gonna pile them one after another. You can see the divide here and the divide here, and you can just drag these videos around. And we have the timeline going across, we have a video layer, and we have also the audio layer. So here you can see the noise levels. So you can navigate around just clicking around, and you can hit spacebar to play, and you can hit spacebar to stop. So basically you just navigate around with space and mouse to see the video. And I'm gonna show you the video now. I have a short introduction here, then here I scramble the cube, here later on I just solve the cube, and then here I show off that the cube is solved. So those are the 3 clips that we'll be putting together. Okay, so let's start editing this. By the way, you can zoom in or out using your mouse wheel. So let's zoom into this section here. This section is just basically me scrambling the cube. It's really very boring. So what we're gonna do is we're gonna speed this section up so that it's quick. So let's navigate here somewhere where I stop scrambling and hit S on your keyboard. That's going to split this clip into two clips: the scrambling clip and the rest, the solve. You can also go to Edit Split, I think, as well. So anyway, we have this short portion here which is just me scrambling, and we want to make it fast. To do that, go with your mouse to the edge of the video, and this is very important, hold down Ctrl on your keyboard. And now, as you scale this, if you scale it short, Vegas is going to make this clip very fast because it has to play all of it in a very short period of time. If you make it long, it's gonna basically slow down the video. So you wanna make it short so that it's really fast. Okay, so you can see that I'm really quickly solving the cube there. I mean, scrambling the cube. So now basically, let's join this up. Okay? So to make a continuous transition from this video to this one, drag it slightly into it, and Vegas is gonna make a continuous transition into it. And then just attach this clip after. So basically it's gonna look like that. Okay, now let's zoom out of there, and we see that we have the last clip here. We're gonna wanna make it join with this one. But notice here that after I solve the cube, there's a long pause here where nothing is happening. So we wanna cut this portion out. To do that, basically just go to the edge and drag it in. For there, for example. So Vegas is going to erase that part there because we did not hold Ctrl. If we held Ctrl down like before, then it would make the video faster in this case. But in this case, it just erased that portion there. So now let's drag this video on top there with some transition. So basically, I drop the cube and transition into the next video where I just show off. And then here, when the video ends, it just snaps to black. Let's change that so that it fades to black. To do that, go to the top right corner of the video and just drag to the left. That's gonna make, like, a fade-out effect. And that's it. Okay, so far so good. Let's zoom out of there. Let's zoom again to this portion here where I'm scribbling the cube. I'm gonna show you how you can add an effect to the videos. Here, there's a small icon on the right of the clip. It's called Event FX, it's like a rectangle thing. Beware because there are two icons. The first one is Event Pan/Crop, the second one below it is FX. Click that. And Vegas lets you choose a couple of effects here. Usually when I'm scrambling, I add two of them. It's called, uh, Radial Blur is one, so click Add. And the other one is Glow. Click Add, and now hit OK. And we get a small preview here of the effects, so click on Radial Blur first, and let's increase the strength. Okay, it looks pretty good. Let's go to Glow and let's increase some sliders here. I don't know what they do, but I don't know, this looks, this looks good to me. There's a little bit of glow going on. Okay, and, uh, click out of here, and now let's see what happens. We got basically a glow effect with the radial blur while I scramble the cube. It looks kind of cool. Okay, now let's zoom out. Let's add some text. So here where I finished the cube, let's display the time that I got for this solve. So to do that, we're going to have to add another video layer. Go to Insert, uh, Video Track. And we're going to put the text into this video track, and it's going to be basically overlaid on top of this video track because it's above it. So go to approximately this part here somewhere where I dropped the cube and go Insert, Text Media. Okay, so change the sample text to, I don't know, what, what that was, it was probably 14.57 or something like that. And Placement, Placement tab, and adjust the placement. Go to Properties tab and adjust the color that you want. Go to Effects, Draw Outline, select black. So that it's outlined a little, so that it looks cool. And you can of course do anything here, make it smaller, bigger. Okay, that's good. So it's gonna overlay that on top of there. So here I dropped the cube, so let's display the time somewhere here, and let's end the display of time here because there's a transition to the next video there. So basically I dropped the cube and it shows the time. And you can even— I'm gonna zoom in so that it's better visible— you can even make it fade in so that it doesn't appear all of a sudden. And you do that again by by going to the top left of the video and dragging across. So it's going to appear. Okay, good. Let's now add an introduction to our video. So go— for that, go in here in the beginning. Put your cursor at the very beginning there and let's do Insert, Time. And let's insert 3 seconds. That's good enough. Let's do 2 seconds to start. Uh, these are basically, I think, hours, minutes, seconds, and these are probably milliseconds. I don't know. Anyway, click OK and it's going to shift everything to the right by 2 seconds. And now let's go Insert, Text Media, and welcome, something like that. I don't know. And placement is good. Properties, make it something like that on something like that. Background effects, I don't know, drop shadow looks good. Okay, so now Vegas created this image for us basically, and it put it there. We want it to be shorter, and we want it to transition from this one to this one to the beginning. So for that, drag it into the first video and make sure that it basically ends after this one begins, and Vegas is going to make a continuous transition from one to the other. Because they're basically on top of each other there. So, "Welcome," and then it zooms in. That's it. Okay, good, let's go on. I'm going to show you how you can add images to your videos. So here, when I'm showing off the cube, I prepared an image of Borat. He shows a thumbs up. So again, just drag it in there. Vegas is going to insert it, so we have the image there, but we're going to have to move it around. So make it shorter, um, put him somewhere here. So again, he's in this layer, so he's going to be overlaid on top, right? So here we have those two icons. Before we went to Event FX, now we go to Event Pan Crop, the one— okay, and it shows up with this. And it's really unintuitive the way this works. You can zoom in and out using the mouse wheel again. But basically, to make Borat smaller, you want to make this thing bigger. So you drag this out and you move him around. You move this around and the image moves around, so it's very weird. And he also disappears. To make— to be able to go even more to the left, you have to basically go here, lock aspect ratio, I think. No, no, okay, unclick lock. Aspect Ratio, and then drag this to make this wider, and then put him there. I never really figured out how this works, I always just play around with it until I have it. So you figure it out too. So I unclick, and there we have Borat. And let's fade him in again, so go to the top left, Fade In, to the top left, and again drag. So Borat fades in. He approves and then fades out. Okay, good. That's basically my accelerated course in Sony Vegas. Let's go to the beginning here and play. So we have continuous transition, some introduction crap, glow, We have the solve itself. I should have timed it here. I don't know how long it actually is. Oh, but that F2L was pretty good. Snap. Okay. And Borat approves. And fade out. And that's it. To compile the video, go to File, Render As, and just basically enter the file name, click Save, and that's it. Okay, so I rendered our video. This is it. In our case, it's 132 megabytes and it's only 36 seconds long or short. So basically, sometimes I get videos that are just 2 gigabytes or something like that, so you need to compress this. To compress the videos, I use VirtualDub. It's free, so I'll give you a link and you can just download it. It's very good. So basically, just drag and drop to open it. Once you have it there, you have to set up the audio and the video compression. So go to Audio, hit Full Processing Mode to turn on audio compression, and then go to Audio Compression. And your list is going to look completely different from mine, but select one of these things and hit OK. You're going to have to try different things. Go Video, Compression, and select again one of the things in the list. Your list is going to be completely different from mine. Hit OK. And, uh, hope that everything worked and do File, Save As, and basically just save the video there. And, uh, try to change up the audio and video compression techniques. These are all, like, different ways to compress audio and also for video. Different ways of compressing video, so try one of them. You might probably have Microsoft Video 1 that looks pretty— that works pretty well, and you can adjust the quality. So low quality means the video is going to be very short, very small in size, but the quality is going to suck. So it's a trade-off, and you're going to have to try to compile it under different settings and just see what works. Okay, so that is a very, very fast crash course on video editing. The editing itself, as you saw, is very easy, and most of the time you just drag and drop things around. So, try it. Most likely you will run into some trouble, like your interface will look slightly different or something like that, so you may have to improvise and play around with it. I expect to get a ton of email about how something does not work for you or that something is different in your computer from mine, and I'll tell you right now that I will most likely not reply to these messages because I simply don't have the time to be your tech support. There are way too many things that could be wrong and there are just way too many of you. So I showed you that video editing in itself is easy, and if you are interested, you can try to get into it. But for the most part, you are on your own, just like I always was. So let Google be your best friend. Okay, bye.
More from Andrej

Skill Issue: Andrej Karpathy on Code Agents, AutoResearch, and the Loopy Era of AI






Andrej Karpathy: Tesla AI, Self-Driving, Optimus, Aliens, and AGI | Lex Fridman Podcast #333