Instructional video demonstrating straight-in and 180-degree autorotation procedures for the Bell JetRanger. Emphasizes visualization before the maneuver, aiming at a fixed touchdown point, and managing two primary energy controls — airspeed and rotor RPM — to achieve either minimum descent (60 mph / 52 kt) or maximum glide (80 mph / 70 kt). Gives typical rotor-RPM ranges (about 95–97% in a normal loaded auto, ~90% light/solo; up to 99–100% when heavy/high temperature), a practice entry scenario from ~1,000 ft downwind at cruise (120–130 mph with ~75–80% torque), and flare/landing cues (begin flare at 50–70 ft; collective entry and leveling around 10–15 ft; final 3–5 ft).
Questions this video answers
60 miles per hour (52 knots)
80 miles per hour (70 knots)
About 95–97% rotor RPM
Around 90% rotor RPM
As high as 99–100% rotor RPM
Chapters
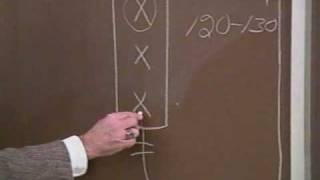
The purpose of this video is to discuss the basic straight and auto rotation and the basic 180 autorotation. We feel that this may help people to go out and shoot the actual auto rotation if they can see a video that's set up to show the breakdown of the entry into autorotation, the flight down to 50 to 70ft, and then the procedure from 70ft on down. We want you to remember that when you're shooting an auto rotation in practice, that you always shoot the auto rotation to a specific point. We want that point to be a specific point on the auto rotation lane that you're shooting the auto rotation to. We want you to pretend that that point is a football field, that it is a soccer field, a creep bed, whatever you want that point to be. Because we want you to make as much realism out of this auto rotation as you possibly can. Imagine it to be a real auto rotation every time you roll back a throttle container. Auto rotation. The purpose of this visual also is to help you learn to visualize what the auto rotation is going to look like. It's very important that you be able to visualize all maneuvers that you're doing. If you're going to do a normal approach, it is important that you learn how to visualize what a normal approach looks like. If you're going to do a straight and autorotation, you should be able to visualize what that auto rotation is going to look like. If you're going into a confined area, always visualize before you make that entry into that confined area, what that approach is going to look like. Visualize your downwind, Visualize your base leg. Visualize the final. Visualize the approach into that confined area. You know, all professionals visualize the things that they're going to do. A professional golfer like Jack Nicklaus always visualizes his shots prior to making that shot. He visualizes the approach to the ball. He visualizes the swing, the follow through the trajectory of that ball to the green and the ball landing on the green. He says he visualizes that shot several times before he actually makes a shot. So we feel that by being able to visualize what an autorotation looks like, that you will be able to do a much, much better autorotation. So first of all, let's talk about the very basic autorotation. We're going to talk about the point of entry into that autorotation. As you enter autorotation, we all know that you go down on the collective. You add right pedal, as we do in the Bell Jet Ranger, and that Time, it becomes very, very important that you start learning what the sight picture is and what you must do with the aircraft after entry into the auto rotation. Once you enter autorotation, the most important thing for you to remember at that time then is airspeed, airspeed, control. And one thing that you want to remember is once you enter that auto rotation, always bring that airspeed back to 60 miles per hour or 52 knots. This is the airspeed that gives you your minimum rate of descent. Now, when you enter that auto rotation, you bring the airspeed back to 60 mph. You must take a look at the sight picture. And if you think the sight picture is right, you stay with that 52 knots or 60 miles per hour. But if you think you're not going to make that point of touchdown, that's that parking lot or that football field, whatever you're pretending you're shooting to, then you must increase that airspeed to 80 miles per hour or 70 knots. 80 miles per hour or 70 knots gives you your max glide distance, that is your max glide distance, airspeed. So it's very important that you have complete control of that airspeed. You either should be at 60 if you're on site picture, everything's looking good, you stay at 60. But if you see you're going to be short and you need to increase your glide distance, you go to 80 miles per hour. Now, at this point, if you see you're still going to be short to that spot of touchdown, then you have another tool you can use, and that is using your collective. By bringing your collective up just a little bit, by letting some of your RPM come down, pulling your rotor RPM down, you can actually stretch your glide some more with that tool. Normally, in an auto rotation with one man on board and a full load of fuel, the auto rotation is set at about 95 to 97% rotor RPM. Now, remember, if it is a warm day, and let's say you have a full load of passengers on that aircraft, your rotor RPM will be higher as you load the aircraft up. But if you have just yourself and about 20 gallons of fuel, or 140 pounds of fuel, your rotor RPM will be down around 90%. So the higher the load, the higher the growth rate, the higher the density altitude, the higher the temperature, your rotor RPM may go as high as 99 to 100%. And if you're light, if it's cold out, low density altitude, then your rotor RPM will be lower. It's very, very important that you always know where your Rotor RPM is. So with these two tools available, AirSpeed and Rotor RPM, you can stretch the glide on an auto rotation. The next thing to remember is that if you're overshooting your point of intended touchdown, you want to leave that airspeed at 60 miles per hour. But then you maneuver the aircraft to take you in to that point of touchdown. Do not let your airspeed go below 60 miles per hour. That is your minimum rate of ascent. That is when things are happening in the slowest. That is when the aircraft is coming down at its slowest rate. So it's very important that you hold 60 miles per hour. Let's go to the blackboard and demonstrate a straight in auto rotation. And we'll just set it up where you're coming on a downwind 500ft above the ground. In this case, we'll just say you'll be at 1,000ft. You use your glide, your cruise power of about 75 to 80% torque, and we'll have you at about 120 miles per hour to 130 miles per hour. Now, as you come on downwind, carry that same power setting base, carry the same power setting airspeed, and then we're going to turn into final. Now, let's say your instructor wants you to go to spot number three or the number three X. We'll say that's right there. 1, 2, 3, 4 or 5, you want to go to number three X. The thing you have to remember, it's not very important where you chop that throttle because an engine never is going to quit at the exact moment to get to a field or that parking lot. What is important is after you chop that throttle that you maneuver and manipulate the aircraft to go to the point of intended landing. So don't get so concerned about the exact precise second to roll that throttle back to flight idle. It's not that important. The important thing is how you manipulate the aircraft afterwards. So caring. You're 80% torque, you're 120, 130 miles an hour to final at this point, someplace in here, go ahead and roll the throttle back to fly to idle or chop the throttle to enter your auto rotation. Once you've come down on the collective, you've added your right pedal, you've got everything under control. We then take our airspeed right to 60 miles per hour or 52 knots. So we'll say we're about right here at this point. We are now at 60 miles per hour. You determine at that point are you going to be long or short. In this particular case, let's say we're going to be long. We're going to overshoot our point of intent landing. At that time, manipulate the aircraft back and forth until you get the right sight picture and then take the aircraft on in for the touchdown. Remember, you hold that 60 miles per hour all through this maneuvering of the aircraft. That is the safest speed to maneuver the aircraft. Then when you have your right sight picture, take it on in for your straight and auto rotation again. A lot of people get so wrapped up in the point of chopping that throttle that they forget about the rest of the auto rotation. So don't get too concerned about that point. Just whenever you think you have the proper sight picture or close to the right sight picture, go ahead and enter your auto rotation.
Based on airspeed distance away from our intended point of landing, our entry will begin down, throttle back to idle, collecting smoothly to the bottom. Now cycling to decelerate the aircraft, maintaining our altitude here. And then as we begin to enter that region of airspeed, we'll allow the synchronous to begin. 65 knots and we're short of our intended land. At this point, we'll begin to accelerate an air speed, reduce the rotor RPM minimum, and as we come back on the glide path, we begin our flare at 50 to 70ft. Collective entry there and 10 to 15ft leveling and 3 to 5ft.