H269 / Schweizer Preflight Part 3
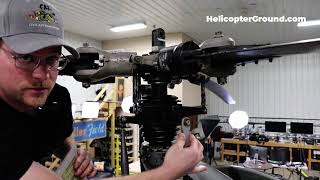
Part 3 of a Schweizer H-269 preflight covers the aft crossbeam, landing gear, main rotor gearbox, and swashplate. You'll learn to check for the structural
Chapters
So now we're going to check the aft crossbeam. So if you get down here and look, we've got the aft crossbeam here, and we're looking to see if there is a distinct smile to that cross beam. So if we have a hard landing or a hard set down, that beam is designed to be a failure point within the frame of the aircraft to absorb impact forces. Enough of those hard landings, over time, you'll develop a good smile. In our case, ours is pretty straight, so it's actually in really good condition. We'll come up here, check the landing light for security. That's good. Come around to the side. We'll check the rear oleo strut, just like we did the front, looking for any leaks. Zip ties are secured, mounting bolts are tight and have their cotter pins in place. We're also going to check the drag strut. Now, this sends structural rigidity to the landing gear. So we want to make sure that there are no bends in this. It's not a step, just like the light here. We want to put our feet on the landing gear itself. So if you do step on it, take a step back and look, making sure that the mounting bolts are secured both fore and aft. We also want to check our cluster fittings real quick. Looking for cracks here. Get your hands on there. You can feel them sometimes. There are three distinct ones. Two on the bottom, fore and aft, and then the center one. I like to get a good look with the light, too. Check the aft cluster fitting. All of the bolts that attach here, we'll also check the battery. So for the battery, we want to verify that the wing nuts are tightened and safety wired in place. The the battery itself is secured, the electrical connections are tight and as they should be. That looks good. And we also will check the top bolt here for that cluster fitting. Verify these are all straight with no bends, all wires are secured and everything looks good. So now we're going to start working on the main rotor system and the main rotor gearbox. So we're going to start by checking in here in the actual gearbox. So I begin by checking all of the bolts down here on the main rotor gearbox. Just checking those for security, make sure they're fully tightened. Again, my hand's not a torque wrench, but make sure they don't wiggle or move, they're not loose. Check any safety wires. We have here that they're secure. No cuts. Nobody cut one of those safety wires and forgot to replace it. And as we continue to work around, there are a couple of Bolts on the bottom around the edge of the gearbox as well. Those are hard to see, but reach under there and check those. Alright, I'm going to climb up here and reach on this side. Okay. Those all look good. So next we're going to check the oil level in the main order gearbox. That one's a little tricky because it's got this very hard to replace dipstick. Getting to it itself is pretty easy right there. And we're going to check that for the appropriate level. So if you look we've got full low and just like a regular dipstick. We're going to wipe that off and retest to get a clear reading. And this is where it gets tricky. If you look in there, there's that tiny little hole that you can't really see. So you kind of have to feel around for it and you'll kind of learn where it is the more you do this. You can also feel for it with your finger if you need to. There we go. So back in and out to check for level. And it's full. So we're good there. We'll replace that. Okay. And we're going to continue down here by checking our bolts that secure the lower end of our control rods, making sure those are secure. And each control rod should rotate freely but should not have excessive wiggle up and down or side to side. That ensures that that connection is actually secure without slop. And we're going to do that to each of these. And there's a few on this side we'll check. That's there's quite a few of these bolts in here, so make sure you catch all of them. And then there's one on the back for the mixer bell crank. We'll check. Okay. And then we have a few frame supports that support our main rotor mast. We'll check those. Alright. The next two are a little tricky. It's there these two mounting bolts here for the engine. You might be able to see one on your side. So reach under there, make sure those are secure. I'll swing around here real quick and check the one on the right side. Get a light up there for you. Okay. And then if you keep looking, there are a couple of sensors in there for our main rotor gearbox chip detector and temperature. Just feel and make sure that those are good. Now before I climb up and continue checking the main rotor system, I like to check the tank as well. Just kind of keep a good flow as I work my way higher up. And I'm going to make sure that the straps themselves Are secured and safety wired. The cap is in place. And check the vent line to make sure that there are no bends or kinks that shouldn't be there that would prevent the tank from venting if it needed to. So now we're going to work our way up into the actual swashplate assembly on the rotor head. Now, to do that, you can use a ladder if you'd like, but you can use the frame of the aircraft. However, when you use the frame of the aircraft, you need to be very careful that there are certain areas you don't step on. So one, of course, is the tail rotor drive shaft. It's painted red on our craft, so it's very easy to see. They are usually labeled no step, though. Also, the tail boom supports are labeled no step, so we don't want to step on these either. The two 6 9s that I have time in all have a skateboarder grip tape location on each of these aft support beams. These are our stepping locations, so it's okay to step here. But none of the other beams. You can, however, use this rear mast support as a hold. So I come up with my foot on the landing gear, and I put one foot on the grip tape on this side of the aircraft, grab a hold of the rear mast hold, and you can then come up and put your foot on the other side. And now we can access everything up here on the main rotor system. So we're going to continue with the same checks for bolt tightness and security, Our pitch links and control rods, as well as safety wire here to make sure that it's interlaced correctly with the pitch link so that it can't rotate or get intertwined in the rotor system. There's a lot that goes on here, so if you need to take your time, make sure you don't miss anything. Of special note are these scissor links, what these are called. So this lower scissor link keeps the lower or stationary swash plate from rotating. We want this to stay in place because when we make our control inputs, if this is moving around all over the place, then we're no longer applying the proper input at the right time with the rotation of the main rotor blades. And so we're not going to actually get the control input we're looking for, Verify that that's secure. The scissor link on the upper swash plate is on my side, so it's a little hard to see from where you're at, but go ahead and check the bolts there. And then moving on we're going to check all the bolts for the lead lag dampeners, the blades themselves, and we're also looking, aside from tightness, to make sure these all have cotter pins in them to prevent rotation. All right, So everything looks to be in good condition up here. There's lots of grease up here if you need to wipe your hands before you get down. If you get really greasy, go ahead and do that. Don't want you to grab onto the mast support and lose your grip. So to come back down, we'll just reverse the process, moving both our feet to the left side support. Verify you've got a good foot on the skid, and then work your way down. Okay. And then the last thing we want to do, and we're just going to cover this in video, we're not going to do it inside because we have a policy of not rotating our. Our rotor blades inside the building to prevent us from hitting anything that's inside. But the last step here is there's a timing mark. I don't know if you can swing the camera over here and look, there's a white mark on the tail boom itself. And then just on my side, there's a black mark here. And you would rotate this by hand to align those marks so we can check for tail rotor drive shaft twist. But we're going to cover that in another video once we're outside.










