Height Velocity Diagram
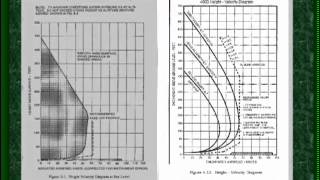
Kenny Keller explains the height-velocity diagram, a safety tool that shows which altitudes and airspeeds are dangerous if your engine fails. The diagram has two danger zones: one where you can't climb out, one where you can't glide to safety. Check your aircraft manual's performance section before flying.
Chapters
All right, welcome back, guys and girls. I want to mention that about 10 to 15% of our full fledged members are women. And I think that's awesome. You guys have heard me say before. And girls, women make great pilots. They have the finesse you need to pilot these aircraft. Here we go. Let's talk about the height velocity diagram. And I'm going to do something here. I'm going to throw in some Schweitzer and some instrum. Both. I've been talking a lot about the Robinson and the instrument and I haven't been saying much about the Schweitzer. And one of our members said, hey, can you start throwing in some Schweitzer stuff? So here you go. Just for you. So for the high velocity diagram in this, I'm going to talk about the Schweitzer 300 CB and the Enstrom 480. So first let's go to the Schweitzer 300. Now, on the Schweitzer manual, it says pilot's flight manual in there. You want to go to the performance section, which is section 4. The tab only says performance, but it is the section four. And what you notice when we go to talk about the instrument, it's called the operator's manual and rotorcraft flight manual. I've heard people argue about pilot, PoH, rotorcraft manual, whatever. Well, right on the right on the covers of these, the ones, the pilot's flight manual, the other says operator's manual and rotorcraft flight manual, whatever. Yearbook, whatever helicopter you're flying is what the name of it is on the COVID Instrument 480B, same thing. Performance section or it says performance data. Section 4 is the actual tab in the operating handbook or the PoH. And it is against Section 4. So in your helicopter manuals, it's always going to be section four. It's going to be your performance section. And you want to know those. You want to know that. The first one is limitations. Number two is normal procedures. Number three is emergency. The next is performance. Good to know. If the examiner asks you, it's nice to be able to know you know your manual well enough that you can tell him which section you're going to go to to look something up. Height, velocity diagram. Very important. First we're going to use the Schweitzer. If you look here, you're going to see that we do have two shaded areas, the upper shaded area and the lower shaded area. So what's important is the examiner in your checkride is going to say, hey, pull out the high velocity Diagram and tell me what's important about it. To answer that question, you got the two shaded areas. You want to avoid both areas, the upper area and the lower area. Now, in my teaching all along, I've said quite a few times to people, well, no matter what you're flying, they all look pretty similar. On the height, velocity diagram, they change a little bit. So I want to jump to and show you the Enstrom 480, the turbine aircraft. You can see this looks a little bit different, but you still have the upper shaded area. It's not shaded in this one, but you should be able to get the drift. The upper area and the lower area are the two areas to void. So when you throw them side by side, there's both of them. You can see whether you look on the left or look on the right. Here is the Schweitzer piston powered. Over Here is the 480 turbine engine. They're pretty still. In general, they're pretty close. And what I want you to look at the bottom on both of them. If you look on the left on The Schweitzer, around 30 to 35 to 40 is where they. Well, actually they want you climbing before you get to 30. Okay. Now on the nstrom f28 like we have, they want you climbing around 30 to 35. If you jump over to the right on the turbine model, you can get up almost to 50 before they really want you to start climbing up. But the point is somewhere around 30 to 50 is where you want to start climbing up. You have to check your specific aircraft for what you're flying. But they all look very similar to this. So the trick here, and the point that I want to get out is, yes, you have to know this for your examiner. You got to be able to answer this. But even more important than that, this is your takeoff profile. These are the danger areas. So not only is it important to know this and be able to give your examiner a good explanation of what the height, velocity diagram is all about, it's extremely important because this is what can keep you alive. These are designed for takeoff, they're not designed for landing. On a takeoff, you're pulling power, you have high pitch applied, you know, are putting the aircraft under stress, and you're doing your takeoff. So this takeoff profile is helping you set yourself up for trying to recover. If the engine does quit when you come in on an approach, you're coming in with low pitch, low power applied. Could the engine quit? It could, but it's more likely that it's going to quit on a takeoff, not on approach. So they designed these diagrams for takeoff. And let's look back to the left, to the Schweitzer. The shaded area. If you were in there, in the center of that gray area and you're a test pilot and you've been flying for 35 years, could you recover in that gray area if you have an engine failure? Possibly. If you are a new private pilot with 123 hours and you have an engine failure in that shaded area, are you going to be able to survive or get the aircraft on the ground without wrecking it? Probably not. They go out and they test this stuff, and that's where. Throw in the Robinson. I went to the Robinson Factory safety school over 10 years ago. Great school. Loved it. And that's what they talked about. They explain how they design these. These guys that are experts go out and they fly these things and they do the testing and figure when they can and cannot get it on the ground. And they take in consideration the average pilot. These are not geared for experts. These are geared for the average guy like me and you that haven't been flying for 40 years. We don't have 80,000 hours. This is geared for us. We want to avoid those shaded areas at all cost. So the two shaded areas. Let's talk about the lower shaded area first. You see the takeoff profile, you want to get rolling. And on the left, we're still talking about the Schweitzer around 20 or 25, they want you to start climbing up. Now, that lower area is, if you're fast and you're near the ground and the engine quits, what do you need to do to slow the aircraft down? You need to flare. If you're only 10ft above the ground or 5ft above the ground, you go to flare, you're probably going to smack your tail. Boom. Well, we can all imagine what's going to happen if that happens. The problem is being fast, close to the ground. You're going to need to slow, you're going to need to flare. To do a proper rudder rotation and be that close to the ground is probably not going to happen in the upper shaded area. Let's say you were coming up out of a confined area. Will you ever do this in your lifetime? Yes, you probably will. But you want to be thinking about these things and taking off straight up and down like they do on television isn't the best idea. If you have to do it, so be it. But you want to avoid it and not do it any more than you have to, because that upper shaded area, let's say you're in the center of the gray range, you do not have enough altitude and you do not have enough airspeed to safely get that aircraft back on the ground if the engine quits. If you have 70 knots of airspeed at 150ft above the ground, okay, you have a good chance of surviving that because you can descend, you can flare, and you can probably get on the ground. Vice versa, if you're 50ft above the ground and you don't have any airspeed, how are you ever going to speed up in time to flare to get on the ground? It's probably not going to happen. The high velocity diagram is very important. Yes. You need to know it on your checkride. Examiners are going to say, let's check out the high velocity diagram. Where is that? Oh, it's in the POH section four. Okay, cool. Show me. You're going to open it up and you're going to explain to him. It shows you the takeoff profile. You have the upper and lower shaded areas. Those are the danger areas. And you're going to simply explain to him why are they a danger. The upper shaded area, you don't have the altitude and airspeed you need for a safe landing. And if you're in a lower shaded area, you're too close to the ground for a safe landing. That is the gist of it. And again, I put these two side by side because I really wanted to make the point that, yeah, the numbers change a little bit. No matter what POH you pull out, they're always going to look pretty similar to that. Yes. For your particular aircraft, whatever you're flying, wherever in the world, whatever country, wherever you're at, whatever aircraft, you still want to know your height, velocity diagram and fly that aircraft to that takeoff profile, because that is your best chances of surviving engine failure. So again, it's in your operating handbook, your poh, whatever you want to call it. It's section four. Why is it important? Know where it's at, Study it. Know the numbers. Be ready to explain to your examiner what this chart does. And fly the aircraft this way when you're out there doing your normal takeoffs, this is another reason why we train. Get your power set and start a normal takeoff, very slowly, painfully slow, we say. The reason we say that is if you don't change the power, you don't move that collective up and down, you have less likely of a chance that the engine is going to quit. They tell us the engine is going to quit during a power change, most likely. It doesn't mean every time, but if you think about it, it makes sense. If, say you've got a rod that's getting ready to let go in the engine. This is getting ready to puke. You want to be in a profile with some altitude and some airspeed to where you can handle that emergency. You don't want to be 40ft and 40 mile an hour. You can probably. Well, you should let me rephrase that. You want to follow the takeoff profile for your best chances of doing a safe auto rotation. That is the bottom line. And you don't want to change the power setting and make the engine quit, not during that takeoff. I'd much rather be at altitude and have some open areas below me and some choices on where to go when you change that power. So if the engine quits, you have some choices. So we want to limit the power changes during a takeoff. Set your power start just barely moving the helicopter forward, little bit by little bit. And I know this is what's hard for people. It's very tough to do that slow summertime takeoff, especially in the wintertime when they have lots of power available. But the point is, you want to train this way all year round. You always want to do that super slow to takeoff, slowly building your airspeed so that you don't have to change that power. If you just keep pushing a little bit forward, a little bit forward in that cyclic, just creeping faster, creeping faster. It's going to take you a little bit, but eventually you'll hit etl. When you hit etl, push through that ETL so the aircraft gets the better performance. If you don't push forward, it's going to pop straight up or start popping up on you. You don't necessarily want to pop right up. You want to push a little bit forward, start your climb. So again, the high velocity diagram is huge. I want to throw in one other part of this argument. You'll have instructors that will argue and say, Well, I keep 60 all the way in on my approach because of the height velocity diagram. Hey, that's his way of thinking. That's his way of training. I'm not going to say it's wrong. I am going to say that back when I did my training, I did too much ECH rides with a gentleman who's been given check rides for many, many years and is a Vietnam pilot. And he's been in all the big rotorcraft magazines. He's won all kinds of awards for his efforts and his contributions to helicopter training over many, many years. And that's where I first learned about the high velocity diagram as far as the takeoff and the approach. And he said, it is not designed for approaches, it's designed for takeoffs. And he is where I first got down and approach. You're coming in. Low power applied, low pitch applied. It's probably not going to quit. This is designed for takeoffs.










