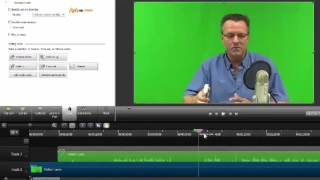
A short tutorial by Kenny Keller showing how to transfer video from a Canon camera to a PC editing workflow and perform basic edits in Camtasia Studio. He demonstrates using the Canon video browser to export video to storage (local or server), importing the file into Camtasia, syncing separately recorded audio from Audacity (using a Blue YETI mic), doing simple cuts and silencing camera audio, then producing an MP4 1080p file for sharing.
Questions this video answers
October 24, 2015.
Around $300.
Blue YETI microphone.
Audacity.
MP4 1080p.
Chapters
Okay, now I want to show you how I take the video, like the video I just shot near the room from the first video I made, and how I download it from the camera and then move it to my editing program. And I'll go more into detail specific on editing and some of the different things in another video. But starting out, I want to just give you an idea of how I get the video from the camera and into the editing program. So what you're seeing right now is a simple video browser that comes with the Canon software. You simply plug your computer with the cord that comes with the camera into the USB port. It automatically picks it up and it downloads it right here. So I download a video, I make sure I click on it and I go up here, click on this, and I'm going here and name the video. And if you're going to do much with video, I'm telling you, when you download it, name what it is, whatever you're going to do as far as number system dates. Because you start getting a bunch of video and pretty soon you're confused. So trust me, make sure you name your videos when you download them. So then I want to get the video out of this browser into a camera. So all I got to do is click on it, click export, it goes down here. I click Next. In this program, I pick for video sharing website because this works best for what I do. I don't like to divide the files, so I don't divide them. And then you just click Next. I've named here where I want my file to go. It's going to go to my server, which we'll talk more about those later. And I have a file for online, which is the training that I'm building right now, how to build your online business. And then I click Start and it converts this video. And when it gets done converting, it will be on my server. So I go right to it and get it. If you're doing this on just your laptop or any computer, you might just go to the storage right on your computer. I'll talk about the server a little bit later too, in case you want to get into more advanced systems like that. So I close out this program and now I'm inside Camtasia Studio, which is the editing program that I use. There are many out there, and depending on whether you're using Mac or PC, there are several options to choose from. But for PC, Camtasia works pretty good. You can get Camtasia as a free trial. I started using it, I liked it, and I ended up purchasing it and I think it was around 300 bucks when I bought it. And I've been using this ever since. And I've dabbled in some others, but this is still my main editing program. So I just go to import media. I go to my storage location, which in this case is my server. I go to the file that I created for this project, open it up online. One is the first video I shot that you just watched. That's the file. Click open it, brings it into the program. I brought in the audio. Let me see if I can bring in the video. And there's my video. So I just pull it down onto the timeline and there we go. We're ready to start editing. So depending on how you're doing this, if you're just starting out and you're doing something simple like record from your phone, your already is going to audio is already going to be with your video. I record it separately on a free program called Audacity. So this Audacity file up here is the file that this audio is on. I drag it down inside the timeline as well. And then all I got to do is line up. All I got to do is line up the audio to match the audio on the video. I check it to make sure it sounds like it's close. If it's off, it'll be noticeable. And you can just slide the audio file or the other file just a little bit to make them line up. But that looks like that's really good. So once I have them lined up where I like it, I'll go here and I'll silence the audio coming out of the camera. The audio that comes with the camera is not very good audio. It's not near as good as the mic that I'm using. So I'm just going to go in here to audio silence that track. So now I have the video that I recorded and the audio that I recorded from my mic on a separate program. And this is really the first step in really making a clean sounding video. I'm using a blue YETI microphone right now, which I'll go into in more detail in a video just on microphones. But this is an awesome video. This is an awesome microphone for the money. I just love this thing. And then the simple functions, you can just go right in, start cutting out the areas where you know it's just time when the camera's rolling. When you're getting ready, I usually go through, take out the big parts first, take out the big gaps, go to the scissors to cut them out. And then another cool little trick. You can see right here, these marks. If I make a mistake, I clap my hands and I'll know that right there's a mistake. So I know this is something I need to investigate. You can see me right there clapping my hands. It's a good way to go in and repair your mistakes. You make a mistake, stop, clap. That way you'll see it on the timeline and know you have to go there to fix something. Then once I make all my edits and I like the video, I go up here to produce and share. I choose the MP4 1080p, click next title my video, whatever it is I want. Click Finish. And the program's rendering looks easy, doesn't it? Don't worry if it looks overwhelming because we'll go in more detail into how I use these programs. But I just wanted to give you an idea in this video how I specifically make my videos. How I download it and get it into the editing program. During hovering flight. Also called tail rotor drift. It's one of the three T's that everybody screws up. Effective translational lift, transverse flow effect. Translate. So you want to learn about an online business selling your information product online? That's what we're here to talk about. I'm going to show you all kinds of cool stuff and I'm going to tell you the story.