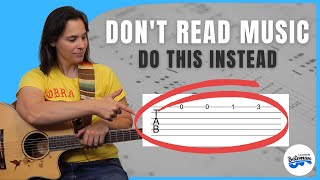
Lauren Bateman presents a short beginner guitar lesson showing an easier alternative to standard music sight-reading: guitar tablature (tab). She explains tab as a six-line coordinate system where numbers indicate fret positions (0 = open string), demonstrates with two short excerpts (Ode to Joy — first eight notes, and an Amazing Grace excerpt), and gives practical tips (use fret marker dots at frets 3,5,7,9,12; suggested fingerings: 1 for fret 1, 2 for fret 2, 3 for fret 3). She emphasizes tab is quicker to learn for most students than traditional sight-reading and points viewers to a free guitar crash course linked in the description.
Questions this video answers
"Ode to Joy" (first eight notes) and an excerpt from "Amazing Grace".
0 (open), 1, and 3.
Dots on the 3rd, 5th, 7th, 9th, and 12th frets.
Use the first finger for fret 1, second finger for fret 2, and third finger for fret 3.
Chapters
Hey, guitar enthusiasts. Lauren Bateman here. I'm going to show you guys an alternative to reading standard music which works really great for guitar players. I do this with my students all the time. Let's get into the guitar lesson.
So I have beginner guitar students ask me all the time, Lauren, do I have to learn how to sight read music? And no. The answer is no, you don't have to. And I know there's going to be a lot of people out there who say, well, you can't become a good guitar player and if you don't read sight read music, I'm not really a great sight reader in music. So if you want to play as well as I do, then you're going to be okay. So that's great. You know, if you want to become a professional musician, you want to go, you know, play in a studio or you're going to go play for like on stage for musical theater type stuff. Yes, sight reading is very, very important. But for most people, this alternative that I'm going to show you in the video works way much better and gets you playing music much F than traditional sight reading. So today, what I'm going to show you is how to read guitar tablature. Tablature is a different way of sight reading music, but I think it's a lot easier because it's more of a coordinate system. It works out more like a map. And for the majority of my students over the years, they're able to pick up tab very quickly versus sight reading, which really, really takes a lot of time to develop. Now all that tab is, it's a bunch of lines and a bunch of numbers. Now the lines, the, there's six of them represent the six strings on your guitar. It is a little confusing because you would think that the top string would be the top of the guitar, but it's actually the opposite. The top string is the skinny string on the bottom and the bottom string is the thick string on the top. And I think the reason they did that is they wanted to mimic regular sheet music where the higher pitched, the higher notes are at the top and the lower pitched notes are at the bottom. So the tab we're going to go over today. Excerpt from a song called Ode to Joy. And we're just going to go over the first eight notes. So you'll see some numbers over there on those strings. And you're going to see the numbers 0, 1 and 3. And all those numbers represent are the fret numbers. Now the frets are these little blocks on your guitar. So fret 1, 2, 3, 4, 5, 6, 7. Okay? And you'll notice on the top of your guitar, some of you will have dots. I have dots on the third fret, the fifth fret, the seventh, ninth, and 12th fret. So you can use those to kind of guide you. Now, when you see a zero, you're like, lauren. Well, there's no zero fret. The zero fret is actually the open string, okay? So if you see zero. So let's take the first note. It's going to be the open E string, the bottom string, and we're going to play open. And look, we're going to do that twice.
Awesome. Now, the good thing about the tab is it tells you what string and what fret to play. The downside is it doesn't tell you what finger to use. So that's where a teacher comes in handy and tells you, for this example, fortunately, it works out. So we're going to be using the first finger for fret number one, and the third finger for fret number three. So if we go to the next finger, two notes in this song, we have open, open one. So the first fret and the third fret, and they're all on the E string. Nice and simple. So it's open, open 1, 3. Now you're going to see there's another three. So let's play that again. Back to 1.
Open. All right, so the first seven notes are all on the first string, and either an open string, the first fret, or the third fret. So open, open, one, three. Three, one, open. Perfect. Right. Now, this last note, you'll notice it changes strings. It's the third fret on the B string. So you're going to take that third finger, and you're just going to move it up to the B string. So we've got open, open, one, three, three. One, open three. Okay. Set the third fret on that B string. So you can see this is just a coordinate system. It's saying, play this string and this fret number. So let's go over another example just to make sure you really understand how this tablature works. Taking a quick, quick excerpt from the song Amazing Grace. Okay? And you can see here there's a lot of zeros, which means open strings. The challenge with this one is that we're actually changing between strings a lot. So this first note is going to be the open D string, the fourth string, okay? So it's open D. The next note is moving down the guitar, even though it's moving up the tab, it's moving down the guitar strings. The next note is going to be your G string open and your B string open. So the first three notes are all zeros, all open strings going D, G, B. Now the next note, the fourth note is also the open B string. And then look, there's a two that pops up. So the two is on the third string, second fret. And we're going to use, fortunately, again, our second finger. Okay, so the first five notes are open D, open G, open, open B, open B. Again, second fret on the G string. Now, if you look at the next note, it's the same string, but it's a zero. Now, so just lift up that second finger, play it, open. And then the next note, I see another two. It's moving up to the D string. All right, and the last note is an open D. So all together, it's D, G, B, all open, open B. Second fret on the G string, Open G string. Second fret on the D string, open D string.
Hopefully you guys found that much easier to read than standard notation. I don't want to knock standard notation. I think rhythm reading is super important, particularly for strumming. If you guys want to learn all about strumming, I have a whole rhythm guitar series up there. But with tab, what you have to do is just keep practicing it, Keep coming to it with these really, really simple songs, and soon you'll be a pro just like me. If you guys found this lesson on how to read guitar tablet, you're super helpful. I do have a free guitar crash course that helps people go from, like, kind of like absolute zero to. To knowing a lot of the basics. I do have some tabs. It comes with a little workbook that you can print out. So I'll put a link in the description below. You guys can go check that out, and you can learn more about reading tab in that crash course. YouTube's going to pop up a couple more videos over there. Go check those out, and I hope to see you guys real soon.