How To Play Your First Chord on Guitar - MUST Know 1st Chord
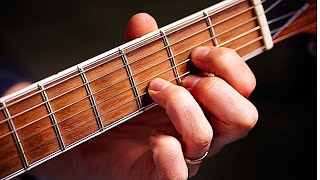
Lauren Bateman teaches the E minor chord, the easiest first chord for beginners. She covers how to hold the guitar, name the strings, and place your fingers on the 2nd fret of the A and D strings. From there you can move into C and G shapes for actual songs.
Chapters
Hey, guitar enthusiasts, maybe you just got a guitar and you're looking for the first chord you should learn on your guitar. I'm going to show you the easiest chord that I teach my beginner guitar students. And the reason why I teach them this chord is it only requires two fingers. I see a lot of guitar teachers out on YouTube showing people like a D chord as their first chord. And a D chord is a very, very hard chord to play, especially if you're a beginner, because it requires three fingers. And let's be honest, it's hard to, to move one finger on the guitar, never mind two. And the reason I teach the E minor chord first is because it makes learning your next chords so much easier. But before we go into learning this first chord, I want to show you one how to hold the guitar, how we're going to put our fingers on the guitar. I'm going to assume your guitar is in tune. If you don't know how to tune your guitar, definitely go watch my video up there to see how we're going to tune it. Come back here and we're going to get started. So you can see here, I've got a guitar strap on. Now, if you do not have a guitar strap, that's okay. We just want to make sure when we're holding our guitar that the neck is not pointing down. Why? That's going to put a lot of pressure on our wrist. The best way to hold the guitar is what we call classical position, which looks like this. You can see how far up my neck looks. Now the great thing about this, especially if you're an older learner, I work primarily with students in their 50s, 60s and 70s. We have arthritis issues. We have to deal with tendon issues. This is going to be the healthiest position. It takes the most pressure off your wrist because you can see my wrist is very, very straight here. I have no kinks in it, no bends. Okay. But some people don't find this very comfortable because what you're doing is, is you're putting this butt end of the guitar in between your thighs. So if you can see on my close up video here a little bit, I've got the butt end of the guitar and I'm going to put it right in between my legs, okay. And it's just going to rest. And my strumming hand, for me, I'm a right handed person, my strumming hand is going to sit here on this bump of the guitar and my fretting hand, which for me is going to be My left hand is going to be over here on the fretboard. Okay. So that's one way. I don't particularly like playing my acoustic guitars this way. Electric, I find it much easier, but acoustic, I'm only 5 5. The acoustic is pretty big for me, so I prefer to play my acoustic by putting it on my knee. And if you'll notice, my knee is a little bit elevated. Okay. So my guitar stool is actually a tripod, and I like to elevate my legs. So some people, you might want to get a guitar stool or foot rest. One of my students use a log. He used to took a log out of the fireplace and he used to put his foot on it. Whatever you do. I find a lot of students like to elevate. Some of my female students, they just like to cross their leg and that provides enough. But you can see I'm maintaining this upward angle of the guitar. Okay. Because that's going to take a lot of pressure off your wrists. And again, your strumming hand is just hanging over this little bump here. And our fretting hand is going to be taking care of playing, playing the notes. So let's talk about that a little bit. So you'll see these blocks here, okay. These are called frets on the guitar, and they're numbered. We got 1, 2, 3, 4, 5, so forth and so on. And you'll notice on the top of your guitar, some guitars have them in the front. My tailor does. My crafter does not have dots, so I try to use this one for my beginner lessons. But you'll see there's dots. And I have dots at 3, 5, 7, 9, and I have a double dot at 12. So that can help you navigate the guitar a little bit. We're going to be working primarily in these first three frets. Okay? So these are called frets. And each of these strings, there's six of them, have a name. Okay. The top string is an E string. The next string down we call the fifth string is A. The fourth string D. The fourth. The third string is G. The second string is B. And the bottom string is another E, but it's higher. That's A. Low E. High E, low E, high E. You can hear a difference in pitch. And if you guys, you know, if you're taking notes, I do have PDFs on this. If you go grab my free guitar Crash course, I do have some PDFs that have all the notes for these videos. I'll put a link in the description below. You guys can go Grab that. So. So those are the string names one more time. It's E, A, D, G, B, E. And people remember it by Eddie Ate Dynamite. Goodbye Eddie. Okay, so when we tune our guitar, that's what we're tuning. We're tuning the strings to their name. Okay? Now let's talk about fretting the guitar. We're going to be using two fingers. We're going to be using our first finger and our second finger. Okay? Going to make it simple for you. Now we're going to be using this fifth string and this fourth string. And we're going to be using them at the second fret. So what you do, I want you to take your first finger and I want you to put it on the A string in the first fret. Okay. And you can see my fingers towards the back of the fret. I want you to slide up to the second fret. And now I want you to slide your finger as close to the front of the fret as possible. Alright? When we are playing notes on the guitar, you have a pick in my right hand. If you don't have a pick, you can just use your thumb, okay. And just play down on that string. Okay. The closer you are to the front of the string, the less pressure you need to push it. So if I use the same amount of pressure back here.
I start getting that. Okay? Now, when we're playing chords, you'll notice when I show you this first chord, sometimes we have to move our fingers back in the frets, depending on how many fingers we're using. But try to stay to the front, to the middle as best you can, because that's going to be the easiest way to play. So we're going to be in the first fret. Second fret, I'm going to put my first finger kind of towards the front middle because I know I have to get a second finger here for this chord. What we're going to do is we're going to put the second finger underneath that A string, second or sorry, D string, second fret. And with your thumb, just strum down. Okay. I'll get rid of the pick in case some of you don't have a pick. But if you had a pick, you would just strum down with the pick. This is an E minor chord. Congratulations, you just learned your first chord. And it probably sounds very beautiful. If not, there could be a couple reasons why, and we'll talk about that shortly. But I like to start with the E minor chord because it's a full chord. You get to play all six strings, it sounds beautiful and it only requires two fingers and they're kind of jammed up in the same frets, so it's easy to remember too. So let's do that again. We're going to take our first finger, we're going to go to the A string and we're going to go first, second fret, and then we're going to take our second finger, put it right below second fret on the D string and strum down. Now, you probably heard on mine, my bottom string was muted. So what that means if you're hearing this on your bottom string, I have bad wrist positioning. The bottom of my hand is touching that bottom string. So you may just need to whoop. Just remind yourself you got to have space underneath this fretboard. You don't want to. We're not trying to choke the fretboard, ok? So we're trying to curl around the fretboard. So just maybe just put a little finger under there. Remind yourself that there needs to be some space and that will fix that problem there. Usually people are, they're doing this with their hand and it chokes up the guitar. Remember, you want a curved hand, not a flat hand. Curved, not flat. Okay? So that will solve that. Now, if you're noticing other strings are getting muted, I'm going to pick up my pick real quick. So say I'm playing this and I go E string, A string, D string, G string. Oh, why is that not sounding well? If I look down, my finger is laying flat. Alright, this finger is touching the string below, so bend the knuckles. Okay. And again, if you're having trouble with this in the beginning, congratulations, you're a beginner. This is totally normal. And as you work through the guitar and play more, your hands become more flexible and they stretch a lot. That's why in my 7 level guitar system, we focus a lot on finger and hand dexterity. Because it is so important in guitar. It's probably one of the biggest things that students don't work on. But it's very, very important because in the beginning, your fingers aren't used to doing this. So we have to do a lot of exercises to help them learn how to do this new thing that we're learning. So if you're hearing some muted strings, understand it's normal and these things will work themselves out over time. All right? So if you've got your fingers in place, first finger, second fret, second finger, second fret, and just even with your thumb, go through one string at a time. And try and get them all to sound very nice. Usually with an E chord, for most students, it's pretty easy. And now why is this the first chord I teach? The reason I teach the chord like this and the reason I teach it with my first and second fingers, because I have a lot of students will say, well, Lauren, I learned the E minor chord with my second and third fingers. That's great. It doesn't change the sound at all. But what it does, the reason I do it this way, is it makes it easier to pivot into your next chords. And I'm going to show you what those two are. If you want to learn more about those chords again, you can go grab the crash course in the link below. And we're going to do this. This is our C chord. This is the easy C chord.
An easy G chord. Now, if we switch to my close up cam, you're going to see all I have to do is move one finger to get to these next chords. One finger, one finger, one finger, one finger. Okay. Call these the easy G chord and the easy C chord. That's what I teach my students to start. Because again, it is much easier to move one finger than it is to move two fingers or three fingers or four fingers. And I think this is a mistake a lot of teachers make. They throw students on these three four finger chords, or they even start students on bar chords way too early. We gotta get that finger dexterity up there. We gotta get some flexibility in our fingers. This is brand new. The fingers aren't used to doing this. And these are totally acceptable chords. They're used, and they can help you start playing music faster. So that's why I teach the E minor chord as my first chord because it allows you to easily pivot into two other chords that you can use in songs right away. Now, if you want to learn a fun and simple song using this E minor chord and another special chord, go check out my horse with no name beginner lesson right over there. I'm going to show you how to play this song with only two chords.










