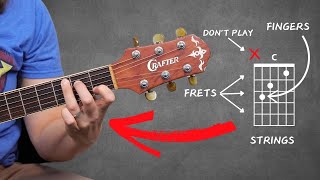
Lauren Bateman (YouTube) teaches beginners how to read guitar chord diagrams—the visual "map" that shows fret and string positions, which fingers to use, which strings to play or mute, and how barre chords are notated. She walks through examples (E minor, C, D) explaining symbols: numbers for fingers, circles for open strings, X for muted strings, and a thick bar for barre chords, noting common fingering variations and recommending beginners postpone barre chords until they build hand strength. The next video will cover the musical alphabet and why chords are named.
Chapters
In this lesson, I'm going to show you the secret map that's going to help you learn any kind of chord you would ever want to play on the guitar, and that is the chord diagram. Learning how to read a chord diagram is an essential skill as a guitar player, especially when you're getting started, because it is the map of what your fingers do on the fretboard of the guitar to actually play a chord, like an E minor chord or a C chord or a G chord or a D chord. Right? And you saw, as I was playing through all those chords, a little diagram popped up on screen. Those are chord diagrams, and like I said, they're just a map to show you what to play and what not to play on your guitar to make a chord sound good. Let's start with a very easy chord, one of the first chords that I teach in my free guitar crash course, which is the E minor chord, okay? And if you're interested in grabbing that, there's a link in the description below. You can grab that absolutely free. And what we're doing here is I have two fingers, all right? So if you look on the chord diagram, you'll see that there's a bunch of lines and a bunch of blocks, okay? So the blocks represent the frets. And at the top of the diagram, we have the first fret, then the second fret, third fret, so forth and so on. Now, you're also going to see some lines on that chord diagram which refer to the strings. So we have the string on the bottom of your guitar, which is the skinny E string. So we have E, B, G, D, A, E. So what this map basically tells you is what string to play and what block. Now, my chord diagrams are nice. I give you the fingers or the common fingers that you might use to play these chords. Not all chord diagrams do that. Sometimes they'll just give you little black dots without any numbers in them. And for beginners especially, that's not very helpful because how do you know what finger to use? Right? So on my chord diagrams, I'm going to tell you what finger to use. And we're going to start with the easy one, which is this E minor chord. Now, you're going to notice at the top there are some circles, okay, on these E, B and G strings. And then on this low E string, there's little circles on the top. What does that mean? That means we're going to play the string open. So the strings are just going to ring. They're not going to have a finger on Them. And if you look at this E minor chord, we're going to have the first finger and the second finger. Now if you've learned an E minor chord before, some people ask me, well, Lauren, I like to use my second and third finger. That's also a very common way to play an E minor chord. For the purpose of this lesson, I'm going to show you my way, which is the first and second finger. Okay, first finger is going to go on the second fret. So we're going to look at the diagram and you'll see it's down two blocks and it's telling us the first finger is on the A string. And then right below that you'll see a number two. And it's going to tell me that the second finger is on the D string. And that's all that this diagram is telling and it's saying you can play all six strings. So E minor is a six string chord and you get to strum all six strings and it will sound good. Now if we go to something like a C chord, you're going to see that this top string has an X. Okay. That's telling us as much as possible. Do not play that string. It's not part of the chord. We don't want to hear it. Okay, so if you have a C chord you, you're going to see this is a full C chord, not the easy C chord I teach in the crash course. All right, you're going to see the third finger on the third fret of the A string. The second finger is going to be on the second fret of the D string. Then we have an open G string, first finger on the B string, first fret. And then we have an open E string. Okay, so you're going to see an X on the top, which means don't play. Then a three, a two, an open symbol at the top, my first finger and then another open symbol on the bottom. So if I were to strum a C chord, I would only want to strum the bottom five strings. If you look at a D chord, you're gonna see there's two X's. So we're gonna try not to hit the top two strings. Alright? Just some things that you need to know on a chord diagram. It's gonna tell you what strings to play, what strings you can't play because if you do.
It might make the chord sound harsh. And I think this is a little bit, I think the acoustic guitar is a little bit more forg guitar. But if you hit Bad notes on a chord, it's going to sound a little off. And we call that dissonance in music. It's just like this little harshness. Things don't sound like they. They blend together, what we call harmony. Things that work really, really well together in music. So you need to make sure, if you see those little X's, try as much as possible to not play those strings. If you see opens little circles on the top, we are going to play the strings. And then when you see the little black dots that indicates where your fingers go. Now, there's one more thing I want to show you that's quite important. Not so much at the beginner level, but as you progress in the guitar, you're going to come across something that is called a bar chord. Now, when you see a bar chord, I'm going to put an F chord over here. You're going to see this big thick black line that goes all the way across the fretboard. And what that's saying is going to take our first finger and we're going to play across multiple strings. So you'll see on this F chord, my first finger is playing the top E string, but it's also playing the E and B strings. And you heard, I muted that on the bottom. That was a bad F chord. And then I have other fingers playing other strings. But whenever you see that big thick line across the top that's indicating a bar chord, they are very hard to play. I usually do not recommend them for, for absolute beginners until you build up enough hand strength to actually play the chords. Now, if you're wondering where all these names come from, A chord, F chord, C chord, D chord, we're going to learn in the next lesson a little bit about the musical Alphabet, which is super important in understanding where some of these names come from and why. So if you want to learn more about the musical Alphabet, go watch my next video right over there.