Learn to build pages in ClickFunnels 2.0 from scratch. The walkthrough covers the editor's hierarchy of sections and rows, styling text and buttons, uploading and positioning images, embedding videos from YouTube or Vimeo, editing navigation menus, and publishing your page live.
Chapters
We go back to here, Sites, and we press on Customize.
Okay, okay.
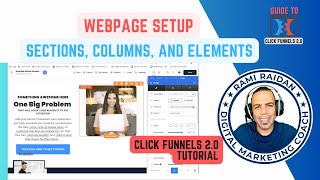
All right, so here's that— here's the main game. First thing we need to understand is with any page on ClickFunnels, any, any web page, there's a section which is highlighted in green.
Okay.
Right, then there is, there is a row which is highlighted in blue.
Okay, this one.
And so there's a section that inside this section there's a row, and inside the row there's elements which is in orange. Okay, okay, you have the green, then the blue, then the orange, right? For any content you want to add. And when I say elements here in orange, it can be a text, it can be a photo, it can be a button, it can be a file, uh, anything. All right, a background. So these are all elements.
Okay, okay.
And in order to make adjustment to any element, it's you select it like this and the menu will pop up here.
Okay.
All right, for example, if I select the text here, I will have the padding. I can move it up and down. All right, uh, left or right. Then I have the style, which size I want— small, big, large. Then I can edit the style or override the style. If I edit the style, is the main styles. You have 3 options here, I'll show you. So you have this style, this this, this, you, you adjust it from here. Okay, for the heading, the font for the subheading, the font for the content, which is the body. All right, so you can update the, the style from here. It will be applied to everything.
Okay.
All right, same thing with the colors. You can change the colors from here. You have Lightest background, lightest background here, light background, colored, dark, and darkest. So you have 5 different options for the colors.
Okay.
All right, same thing, you adjust it from there. Shadows, same thing, you can adjust the shadows how it will display. You have 3 styles for the shadows here: style 2 and style 3. Borders, same thing. Style 2, Style 3, you can change here how do you want the border to be.
All right, discard.
And corners and buttons, same thing. Let me go back to buttons here. So for example, your main color is, uh, purple, right? For example, so you make the style of the default button as purple, while the hover, when, when you move the mouse to change it to, for example, pink.
Okay, okay.
And when it pressed, to change it, for example, to red.
Okay.
All right, so this is the style where you can choose your colors and press update. Corners, the same thing for the corners. You see, I'm gonna adjust the corner for any—
the corner for what?
For the border you put. Okay, you can put border of like around the text, around the photo, or you can adjust the corner from here.
Okay, okay.
So this is for the text. Well, if you press on the photo and do setting, all right, same thing. You upload the, the image from here, image URL. You can select it and here upload image and your image you select it and it will go here.
Okay.
And you have the size and position for each photo. You can adjust it from here. The fit content, where it fill, contain, cover, scale down. So it depends. Um, lazy loading, you don't need to change anything here unless if you want to lower the quality a little so the loading of the image will be better. Padding, you can adjust the padding. Okay, uh, Corner Style. This is what I was asking, telling you, like, you see that border? Yeah. And here, another border option if you want to add a border to the image.
Okay.
All right. And this is the Stroke, you see?
Ah, yeah.
Shadow, if you want to add a shadow. Same thing, there's different style for the shadow. It won't show until— yeah, you see? Can you see the shadow here? Oh yes, yes, yes. So this is the option for the photo. And one more thing, if you notice here it said desktop only.
Uh-huh.
So that means it will show on desktop. On a mobile it won't show. Look, if I press the mobile view I can put this one to show on mobile only or a desktop. So if I put all, it will show on all.
Okay, you got it.
So if I don't want to show this image on the mobile, I put it only on desktop. It will tell me desktop only.
But we wouldn't want that, right?
No, we, we don't want that. Okay, unless if you're making something specially to show on desktop, not on mobile. So on the top, if you see the, the top thing, menu bar, it's a separate block. All right, if you go edit this block, so this is the block, it's the The same thing, if you select the logo, you have the option to replace the logo from here, image URL, and place your logo there. You press this, you press upload, select your logo, and have it here.
Got it.
Okay, okay, uh, let me cancel this.
I can cancel it here. Okay, perfect.
Um, same thing here with the menu. It will open here as navigation links, so you can adjust it from here. And the blog, you can have the blog submenu. It will, it will bring the posts you have if you create a post under the blog. It will show them here. Yeah, and you can still add more menus, submenus from here.
Okay.
All right.
So, and I can, for example, yes, the top item there, um, it could— I could delete it or I could put something else like programs.
This one?
Yeah, yeah, for sure. You can like shop here. Instead of shop, I can come here and do my program. Oh, I thought I was writing. It's not writing for some reason. You can, you can rename it.
Okay, let me try then. Okay.
Oh, all right.
Mm-hmm.
Cool.
Yeah.
Easy.
Okay, let's go back and here, discard changes. All right, because yeah, I don't want to save anything right now. Uh-huh. Uh, like this one, oh, I forgot to tell you about this one. Like, it's an icon. If you don't want it, you just press this and delete.
Okay.
Press and delete. Okay.
Is there a right or wrong way, you know, like in terms of what to have there, what to not have?
It's a matter—
no, but for the easy way to do it is check a website that you like and do the same.
Okay.
Yeah, check a style and do that. Like this bar up there, Like, if you don't need it, you just simply press on the, on the main section of it and delete it. You see this section? Delete. It's gone. You don't need it.
Yeah.
All right, um, all right. If you want to add a new section, okay, what we can do, we can move, add a section here in purple. You press it. So it gives you the green line here. Uh-huh. You have to add— if you have the option to add full page, wide, medium, small, that's the width. Like the one you're using now is a full page. Okay, you want to do it a little bit, um, less in width, it's going to be wide. All right, so if I'll do wide here When I press the section, it gives me what option of row I want to put: a column, 2 columns, 3, 4, 5, 6, or flex container. Okay, or something already done. Okay, all right. So let's do, for example, 2 column. Okay, so if I do 2 column, it gave me the option All right, you see, add an element here and add an element here. So for example, here I want to add a headline, then a subheadline, then a paragraph, then a bullet list. And here I want to add, um, image, and under it a video or a pop-up video, video pop-up, or a button. So, wow, you see, then I come here and choose the image I want. Then I come here and edit the text, edit the color, edit everything.
Wow.
Same thing for the video. If you press here, it asks you for video URL. You can go to YouTube, get your video URL from there, and paste it here, and that's it.
It's done.
And it also do embedding with Vimeo and Woomly. Okay, but you have to pay for this membership.
Yeah, yeah.
Uh, what else? So after you figure out everything you need here, you can always save and preview.
Okay, okay.
When you do preview, you can go to live and see it live.