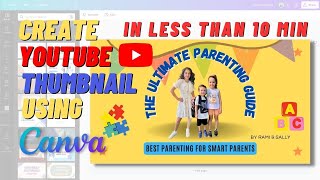
Rami Raidan shows how to design a YouTube thumbnail in Canva in under ten minutes. He walks through creating a 1280 × 720 px canvas, swapping template images with your own photos, removing backgrounds with Canva Pro, and customizing text, colors, and effects. Export as PNG or JPG at 100% quality.
Chapters
Hello everyone, this is Rami Raidan. In this video, I'm going to show you how to create your YouTube thumbnail using Canva in less than 10 minutes. We start by creating a design from the top right corner, and here I'm going to use custom size instead of using the template. So YouTube thumb is 1280 by 720, and it's down there the same, but I'm creating a blank document. From here on the left, you can see so many different templates. The best way to find what you want is by searching the template. So I'm going to search, uh, parenting, a template for parenting. I'm giving you an example for searching templates related to your videos. So let me see, maybe I'll use this one. This is a nice one that match my video. Remember, you can customize anything on a template, so you delete photo, edit text, change colors, and more. So now I'm going to upload my photos here. So you can drag from your desktop the image you want by click and dragging to your upload files here, and you'll see the photo is uploading in seconds. Press on the photo and go directly to the document, and from here you can edit image and use this cool feature, Background Remover. It's with Canva Pro accounts. So I'm going to click this and wait a couple seconds. Here we go, the image is ready, background removed, uh, in a nice way. You still can do some adjustment to the image. I'm going to add another one and do the same. Remove background, and here it is, the same thing. You can adjust the photos here, the size, and right-click, send to back, make this at the front. And from here you can add the text. Same here, the website, can delete it. And now I want to change the design of the tone, so I can change the font by selecting it and choose a different font from the top toolbar. I can change the color of the background by clicking on the background and change the color from the top toolbar. Same thing to the other elements. And now I want to add more elements. I wanna add something related to kids. Something like this will match the design. Can make it bigger, move it to the top, and adjust the transparency a little like this. Maybe this one I'll make it more curved, so I go to Effects and go— you can add more effects from here. You can add echo, different color, and adjust the curve, maybe like this, a circle. Change the color. And here, let me move this. And we can add more elements here. Let's see what we can add. Something related to kids. Maybe this puzzle. And this ABC. Yep, you still can change the color of the stars to Show more. Maybe we can do orange, dark orange. Same thing to the other ones. That's it. Almost done. You still can change the font here by adding effects to this font like this to stand up more. Change the background color. Adjust the spread, roundness. I'm just showing you the features that you can use while creating or crafting your design. Once you're done, press on share, download, and from here you can download PNG or JPG. Adjust the quality to 100 if you have a Pro account and hit download. It will take couple seconds until it's done, and once it's done, you can preview the high-quality thumbnails ready to upload to YouTube. Thank you for watching, and if you have any question, you can write in the comments. Thank you.