S4 ● E110 Making new infrasructure pay 10X it's cost in 1 year
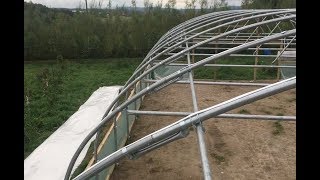
Richard Perkins walks through fitting plastic to a polytunnel and setting it up for dual use. The tunnel will house egg production in winter and tomatoes in summer, with details on anchoring, film choice, internal fittings like feeders from 120 mm pipe, and access for a bobcat.
Chapters
Real blood pudding. Pig blood and pig belly. The same. Pigs oats, spices. Fry that up on the inside. Yep. Make it nice and crispy. And then really it's a nice breakfast. What are you wonderful chefs doing? Bit of tagliatelle, fresh egg tagliatelle, loads of eggs. That's just egg and egg. Egg and flour and sal. So today we're putting the skin on the polytunnel and you put that on first before you put the sides on here. Because you need to attach one side to the wooden framework and lift the other framework up 10cm or so so that you can attach it and then push it down to stretch the skin. And the aim is to have a sort of drum skin tightness on the skin. So we're going to start with one at each end and a couple up on the frame like here. And you want to do this on a still day. There's a little bit of breeze, but I think with enough of this we should be okay. Okay, we're halfway. It's getting heavier. Just having a pause to make a little clip. We get this over and then we hold it in place. Very nice tunnel. A little bit of wind, just lining it up equally and trying to keep it from blowing up and we can start battening it down. So typical polytunnel plastic is very good quality. It's non rip, so if you put a hole in it, it doesn't rip and you can repair it easily with tape. And it's important you use proper, graded polytunnel plastic, because even greenhouse glass cuts out 20% of light, which for a plant is very significant. And polytunnel plastic cuts out even more. So it's important, like commercially, we've always changed it every four years for optimal light transmission. You're mainly keeping a tunnel for its humidity value as opposed to the heat, because that's the limiting factor in photosynthesis usually. But it's quite robust stuff. You can really pull it some, and as long as you have enough people to stop it breezing over, it's all good. So we're just squaring up this whole piece. Now we can use the creases in the actual fabric to square it up to the frame. And then we'll start stretching longitudinally and battening along this framework before we start stretching it out at the other end. Alright, so first step, one temporary batten at each end to give it a bit longitudinal pull. We're going to go and stretch the other end down. At this point, it's not Fully stretched lengthways. And it doesn't need to be. That will all stretch out as we stretch the sides fully. So one peg at each end, that's like a meter long strip. And then we'll do this side and then lift this side, attach it and stretch it down with all of our body weights. So once the sides are on, the ends are tacked on, then you get the centerpiece done. And they recommend working outwards from the middle. We're actually going to tack each end pre stretch and then work back along. And you're just making sure you put a wooden rail tight up against here to hold it in both through the nails in the wood, but also tight against this 90 degree angle. So it's two 90 degree angles that are really holding it in tight there. So getting a horizontal stretch in. And then this flap here will be taken out when we stretch in this, which we'll do with pleats coming in towards the door frame here. Now it's good to get double doors in these tunnels. This gives you room to get something like a bobcat in here if you want to clean it out, especially if you're keeping animals for us. The tunnels need to be multifunctional. We're taking €40,50,000 of eggs out of here in the winter and there's a lot of tomato production in here in the summer. This is being set up in the autumn where it's going to be used initially for eggs in the winter. So we're going to actually put a little deer fencing up against here. This is a roll up screen that we'll be attaching soon. You have these winding mechanisms that you see at the ends here and you wind up the plastic for ventilation and it leaves the screen in place. So this bit is movable and the mesh there stops things getting in. So we'll put a deer net stapled on down from the wood to the wood so the chickens can't get in and mess that up. It'll also help retain the bedding a bit. And then we're going to put down an initial layer of peat moss and see how that goes with the chicken scratching it in. But it's really helpful to be able to come in with a bobcat with the, you know, couple of hundred square meters here. So it's good to be able to use a machine to unload it if you want to. And making sure you've got access will typically access this from the other end. It's definitely good to get this type of door set up. The initial laying down of the tunnel involves putting this pad down and then putting in anchors. These are all concreted in 50cm down and they're all perfectly level. So the whole frame sits level. It's really important that the tunnel sits level. It can slope from one end to the other. Okay. But the structural integrity is compromised if you put it up at any angle. So we first put it up like this. And once the skin is on, we'll do all the ventilation and side pieces put in the bedding. And then we're going to hang some feeders off the roof. We'll just make tube feeders with 120 mil sewage pipe with the ends blocked off. And we'll cut a center hole for feeding and that can be raised up in relation to the bedding. Something we'll do for the chickens this year is put the nest boxes. We're going to actually construct some new nest boxes because we're going to make more egg mobiles during the winter or spring. And we'll set them nearly a meter off the ground. And they'll be up on some posts with no areas to hide behind them. Otherwise chickens will go and lay eggs behind them. And we'll have a few steps leading up to them so they encourage them to lose any bedding stuck to their feet to help you get cleaner eggs. So there will be two of our signature nest boxes and feeders and we might hang a few lights off the roof, just, you know, infrared lights for the ultra cold days in winter. And we'll be setting up an automatic waterer from the barn. That means we have fuss free water throughout the winter. Autumn is coming. It's quite beautiful around. It's very quick here. Autumn, you know, the leaves on the trees. You can just see the birch there in the background. They'll have lost their leaves in a couple of weeks now. So just like spring, Autumn is a very short season. Just looking at the espaliers, I need to come and put some more securing loops down. I'm just using cable ties, but they've put on some good growth this year and soon. This one needs a bit of attention. But they're nearly out to the edges of the wires now. Very nice growth. So this is about to be spread. Spread good. It's on square. These sides are raised up and they will be pushed down now on both sides. You see how it's lifted up in the corner. Same over here. We stretch one side down and then come over and stretch the other side down. Just bolt them on and that tightens the whole thing. Up. You see some marks here and that should give us a tight dumpster. So the ends are tucked in. And now we're just trimming off the plastic where it's been secured in here. And I'm off around the side. And I'll be taking off the excess along the edge here. And then all the stretching begins when both ends are done. So they're just starting at the other end. Now. Jake's here. Jake was an intern in year two, weren't you? Yeah, second year. And he was awesome and still is awesome. And there's a big bus in our drive. We're doing a tour for a group, Swedish group that have. They work together on Facebook. They're all vegetable growers, some meat producers and they're interested to see what we're doing and look around the farm. So big tour today. Okay. Ends of stretch. I didn't get to film it because we're doing a tour. So basically you put a lot of weight down on these and bolt them back in. And now the side screen's going in. That's a permanent fitted screen. And then this is the winder. It's not the best mechanism, like the American style winders, better where you've got it on the outside, but it does keep it out of the weather. So it's just basically a very long bar that wraps up inside the plastic. So you can bring this up and down for ventilation and just putting the doors on there. And then we're ready to put some first layer of deep lither in for the animals for the winter. It's.
More from Richard


A review of short and intensive season on a mixed farm and restaurant/event space in Sweden






Alskade Kyckling Exploring complexities of poultry production in Sweden and what we stand for


