S5 ● E17 Low-cost, low-tech, low-energy seed starts in a cold climate
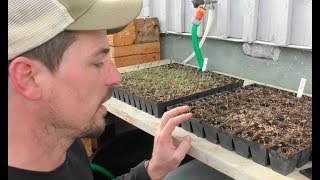
Richard Perkins shows how he starts vegetable seeds in a small lean-to greenhouse at 59°N in Sweden, heated by a single wood stove. He uses 64-cell and 144-cell trays, vermiculite, T5 fluorescents, and salvaged windows and timber to keep costs down. The dedicated germination room beats polytunnels for control and consistency.
Chapters
Today's video is about the curious tale of the peacock and the guinea fowl. Actually, no, it's not. It's about our low cost, energy efficient way to do all our starts in Sweden up here at 59 degrees north. Well, this time last year we were seeding in the greenhouse already. Matt was here and there was no snow on the ground anywhere. It was really beautiful sunny days and we were seeding the first beds outside. Nowhere like that this year. It's going above zero in the daytime now, but it's still very cold at night. So I'll just show you the few little changes I've been making in our seeding space. In a couple of months the gardens are going to look like this. And all of this beautiful veg is started in this tiny space that's less than 24 square meters, built super cheap and heated in a really energy efficient way, I think. So this fire is on for pretty much six months without ever going off. And so we just have a little fan up here that blows excess heat out into here. And I've been doing some of the moving around that I was talking about in the last video. And so I'm just going to show you that one thing we're missing is a door handle from the inside. That's not good, is it, Ragnar? So what I've done, I'm going to put you down, little man. Okay. I'm just going to make a little update of what's going on. I put in a bench here. I put in a permanent bench actually, because that's what I felt like I wanted to do. I might put some shelving up on the wall of the house here, but it might be later on long term. We have this plan to put in a hot water system from the back of the stove to heat the entire house equally. It's just that little stove that heats the entire house for six months of winter. And that's a longer term plan, but it's not a big priority because we have a decent enough system as it is. So it might be that this space becomes a bit of a walkway from the house out to the outside as well as being a bench. We don't know yet. I've set this up so we've got vermiculite here. I like to use quite a fine vermiculite and I will cover the trays quite liberally. I will seed by using. These are our standard 64s. These are from Olson's for anyone in Sweden. They're really good quality. So pretty Much everything we seed is in these 64s. We also seed in these 144s, but that's pretty much only for spinach and lettuce and things like that. Maybe beets. We'll transplant all of those in the start of the season to get a quick start. But pretty much everything we do goes in these 64s. And we'll use this dibber. We'll use this dibber. This is a dibber that makes holes in the compost and then we just drop seeds in. Now I've tested vacuum seeders. I've considered the paper pot transplanter as I've talked about in other videos. And to be honest, I'm happy just doing it by hand. Anything down to cabbage and kale size I can do so quickly by hand singulating the seed pretty well. Here's some kohlrabi and there's a double seed there and a double seed there. But everything else is singled out, even things like lettuce. It's very quick, you know, when you used to doing it all the time, you can whiz through those. So I like this old fashioned way. They sell these nice dibbers. This is for getting the plugs out of the trays when you come to transplant. And one for the 144 and I use that one as the dibber because these are quite expensive. They know you're only going to buy it once so they charge you a fortune for this. We've lost a couple of the fingers so they're sending some more. I've just ordered a whole bunch more of these trays because we're seeding a lot more this year because of Rica. So I've got a much bigger space here like I talked about and I've done the same at the other end. If I go up here, you can see we've done the same up here now, so we have a bit of working space, so I can put some tables there and put microgreens if I want to there. And under this bench. I made a new bench quickly so that we can use sunlight here because the way we use this space is we do a lot of micros in the summer. Obviously most of our seeding is happening now and that's why we wanted this small space. This entire space is 3 and a half by 6.7 meters, so less than 24 square meters and that's nice in such a cold climate up here so that we can keep it warm efficiently. We do have this little heater, but we only use that at Night times. Right now we're at half past three in the afternoon and we're sitting at 24 and I've got the door open there. It's a sunny day, but it's cold outside. It's hovering around zero right now. So we have a nice simple setup. As I said, everything is going in 64s or 14 4s except for micros going. The long trays and leeks and onions go in these 60 by 40 trays. Now we've done that because everything tessellates. All of these hard trays are 40 x 40 cm and these are 60 x 40. So they sit on these racks really nicely. We built all this with free wood. So to build this lean to greenhouse cost us €1500. Secondhand bulletproof windows we got for free from Stockholm police station. All the timber was free from the scrap timber yard. If you look back at our videos from last year, very early, about a year ago, you'll see one of our visits to the timber yard. All this kind of timber is free. We don't use. We don't buy much timber for developing things. So we wanted to make super simple structures that we could then tessellate all the different trays we use in so that we could stack the space up here. Then We've used simple T8s and people asked us why we use the. So these are T5s, not T8s. T8s and the big ones. People ask us why don't we use LEDs? Well, at the time we made these, I mean LEDs to get the equivalent amount of light that we've got on all these levels here, it would have cost a fortune in the initial outlay. And so these were cheap and readily available. I just had to sort of wire them up myself. And it was the cheapest way to go about it. Also they produce a little bit of heat which is nice for us because it can be quite cold in here. Like if it's really cold, like minus 25 outside, it can be hard to keep the temperature, temperature. And if you have these down, right down on the trays, then they will kick out enough heat to keep things going. Well now I've just been testing the lights today because things haven't been germinating so much. But here you see some of the kohlrabbies. And so the lights are about how I'd like them. On top of these I keep them a couple of inches off the plants and they go up on a swimming pool check chain. They've got a hook on the end and I just raise them up as we go. But this is neat. Underneath here we've got halide lights. We got those for free from the spirulina farm. We were helping take apart that you can see in the video from last year. Someone said, why don't you do the starts in the polytunnel with the chickens? Well, to be honest, it would be a nightmare. A. It's hard to get water there and you need to be able to use water here. Because we've dug this greenhouse down below ground, we can use water all year round without it freezing. And because we've got a gravel floor, we can water liberally. And it's, it's really no issue. But the greenhouse is changing temperature too much. It's minus 15 at night and then suddenly up to 20 in the daytime. It's just not ideal. And it's, you know, chickens produce a lot of dust as well. I don't think that would be so much of an issue. But it's just not the right space, like for your germination room. You want to be able to keep. Keep the conditions really nice and reliable. First, tomatoes are popping up now and we keep it like about 17, 18 degrees in here and keep it consistent through the night. It might drop a few degrees at nighttime, but not by much thanks to the heater there and through kicking the heat out here. So we wanted to, you know, the whole intention was like, what's the smallest base we can make that's big enough to meet our needs? And this little rearrangement's happened because we've scaled up and not scaled up in size. We've scaled up our growing season by getting some caterpillar tunnels and also changing our sales model. So we're selling on rico, not just in the veg boxes so we can sell earlier than the veg boxes start. And so we've got more crops going on right now. And if you've missed other videos, we do have our cabin that we've been doing micros in over the winter, so we can take half the stuff in here and put it out there when we need to. Someone said on the last video, why don't you stack the trays up till they've germinated? Well, if you look at the seeding calendar we have, nothing's leaving here for over a month. And so this is, you know, there's a whole bunch more seeds to come. So in reality that wouldn't really save us anything at all. Oh, you banged your head. Yeah, yeah. What are you doing under there. Are you seeding some trays? Yeah, yeah, yeah, yeah. It wouldn't really save anything in reality, because, you know, they would only sit in a stack till they're germinated and then they would go out on trays. But there's always trays coming. So for the first month that it's just adding trays and adding trays, it wouldn't make any difference, if you see what I mean. But I think we're going to be fine. Just a little shuffle around now makes it more organized and we've opened up a whole bunch more space. And, yeah, I'm really happy with it so far. I've just been testing some of the lights. They get adjusted and just check all the bulbs are working. Some things are waiting to germinate. It's mainly the brassicas and the alliums that are coming out now. But we're going to work as much as we can with sunlight and just minimize the electrics there. But I just wanted to show you how I've moved it around. I'm not doing any seeding today, otherwise I would show you the process of using these, but I think you get the idea. And I like to use this quite liberally. And what I will do is poke the holes for the seeds with the dibbers there. And once the seeds are in, I don't ever put potting soil back on, pretty much for now, not for any crop. I'm always using vermiculite, so I'll fill the holes up with that. You can see on the leeks and onions. I'll use it really thick, mainly because it's just fast and easy and it's. It's. You know, I've always done this since I was a teenager, so I like that. I like using the finer stuff. It's. I find it's a better covering and it just keeps a bit of humidity up at the top there where you. Where you want it. But, yeah, very happy with how things are germinating. It's going really fast and ideally and happy to have a bit more space in here. So that's it for today. Just wanted to give you an update with the little changes going on. I've been busy in the background, just compiling a lot of orders. I'm going to the UK to see my mother, who's not feeling so well, and I'm also picking up a bunch of stuff for the farm. So Nicholas and Carla are back this year and they're arriving in about a week and a half. And then it's another couple of weeks until our apprentices come, so I'll make a video soon about the team we've got coming this year. I'm really excited. Much different year, much smaller team, and looking forward to some really nice productions. Thanks as always for watching. If you haven't read our book Making Small Farms Work, find it in the links below. It's a place you can find out a lot more about what we're doing. It's a technical manual of how to do this kind of stuff on a shoestring budget. You know, starting from an abandoned farm turning into a thriving, diverse, profitable, regenerative agriculture. Click subscribe, share the videos, and we'll see you in the next video. Don't.
More from Richard


A review of short and intensive season on a mixed farm and restaurant/event space in Sweden






Alskade Kyckling Exploring complexities of poultry production in Sweden and what we stand for


