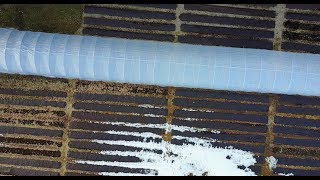
Richard Perkins demonstrates caterpillar tunnels on his market garden in Europe, describing three tunnel sizes (20 m, 30 m, 40 m), their bed coverage, simple componentry, and quick setup. He discusses adaptations made to standard 4.26 m frames to fit 75 cm beds, specific brackets and straps used (Farmers Friend and First Tunnels parts), operational considerations (venting, ridge poles, bracing, irrigation), seasonal handling (packing away for winter), and speculative pricing (~£10–12 per m²) with a view to encouraging local European manufacturing.
Questions this video answers
4.26 meters
20 m (≈85 m²), 30 m (≈12 beds under cover), 40 m (≈170 m²; 16 beds under cover)
75 centimetres (30 inches)
20 m → 8 beds; 30 m → 12 beds; 40 m → 16 beds
About £10–12 per square metre
Chapters
So I'm standing in front of our small caterpillar tunnel. It's 20 meters, about 85 square meters. We've just put up the 40 meter tunnel. It's about 170 square meters. And tomorrow we'll be putting up the 30 meter tunnel. I want to just tell you a bit about them and what you can expect if you're in Europe and you're looking to hopefully have tunnels available later in the year. So the componentry of these tunnels, really simple and it's really quick to put these tunnels up. It's a couple of hours work for even a big tunnel like the 40 meter tunnel. And we made little adaptations, but we built this around standardised sized frames that first tunnels in the UK supply. They're 4.26 meters wide and the reason I wanted to work with those is that they perfectly cover four beds. Working on 75 centimeter beds, extending a little bit into the pathway on each side of the bed. So it really works well in this standardized cropping system, which is what we would advocate people market gardening to be working with, basically because most of the innovative market garden tools are 75 cm wide or 30 inches. Here we've taken basic thermal plastic from first tunnels as well and we've used componentry from farmers friends to test. And we're going to be reporting back to see which bits could be adapted and which bits are working well. Which optional extras would be great in a kit for European climate zone. Something you'll see in this tunnel. This is the small tunnel, only 20 meters long. We're just going with the webbing strap. That's a 25 millimetre webbing strap that you can find easily online. And then we've used a simple bracket that first tunnel supplies as part of the staging kits. They have to support the end post and hopefully you'll be able to catch this on camera. But because we've got our windbreaks and duck fencing so close to the ends of the beds, we wanted to be able to bring the plastic down quite sharply. And so to do that we've put in A post about 30, 40 degrees off vertical to allow us to bring the plastic down very sharply at the end. Now it has cut off the very corners of the beds, but that's not a big deal. It's a small compromise for having eight beds. Now these are 10 meter beds under cover. So this is the 20 meter tunnel with eight beds under cover. Then we have a 30 meter tunnel we haven't put up yet. And that's got 12 beds under cover. And then the 40 meter tunnel we've just put up has got 16 beds under cover. So 36 beds under cover and we can move these very easily. And that's the whole point of caterpillar tunnels is you can basically move it around with your crop rotation and you can put it up again very quickly. You know, you pack it away during the winter so it's very easy to put it up again in the spring. And I was showing yesterday our no dig beds are just uncovering from the snow now. It's beautiful. This no dig setup we have is. It's such a good way to go about market gardening because it's so easy to maintain because of the large inputs of compost. You just have these beautifully clean beds. I showed them a bit yesterday in the video. But these beds are just waking up after winter. We'll uncover them one by one as we start to plant out. But there's very little work, very little weeding to do. It's just raking the bed over, direct seeding or transplanting into it. So I'll show you a bit of the componentry. Here's one of the pieces from Farmer's Friends that we really like. This is a stainless steel bracket and these are about $5 each. But the reason is, is they're machined and they're also very thick and made of stainless steel. And I think they're worth the investment for these tunnels. We spent about a thousand US dollars at Farmers Friend to bring over these things that hold up the plastic. So this is how you vent the tunnel. But also enter, you can see here, it's just designed really nicely to allow you to move the plastic up and down. And you can spin this around and let the plastic back down again. And you'll see the way the plastic just goes down behind the rope in the gap that's created by the carabiner on the clip here between the post and the string. So it's a really nice system and hopefully they can get manufactured more locally. That will be a really nice system for allowing us to have these tunnels made in Europe, which I think makes much more sense. So this is the 40 meter tunnel and you see it's got a solid centre brace to keep it strong as well as end braces. Now we're doing the same kind of end as the previous tunnel to be able to bring down the plastic inside our windbreak and duct fencing. And that works well for us to have that extra protection around the garden. So we've just used a Simple bracket here in order to strengthen this last beam that's at an angle maybe 30 degrees off the vertical. And we've used another strap just down to the post there. And so we're going to lift the plastic on. Now we're just throwing over the plastic and we had quite a few people on hand to do this because there's a little bit of a breeze which is the main problem when you're setting this up and then we go along with the strings and you're starting crisscrossing over the sections. And I think it's a better idea to roll out a bit of loop of string and throw it over. I've heard of people throwing over the whole string, but it's a bit of a heavy weight to be flinging around blind. So we throw the ropes over and we're tightening it later. Once the ends are in, the ends are tied down to the wooden stake. Often when people have more space, the plastic will come down at a much smoother angle. But we wanted these to fit inside our windbreaks without having to disrupt it. So we've just gone for a quite light, simple end assembly. We'll see how that does in the wind in the future. But they seem to be fine. Let's go inside and take a look in here. This is a really big tunnel compared to what Farmers Friends supply because they're supplying a hundred feet kit. So just over 30 meters. This is a 40 meter tunnel. And because of the high winds here, we've put up this center ridge pole and you can see how that is put on here. So it's a very secure setup. And then just for the same end assembly that we put in the other tunnel, we've just used a strap and it feels really solid. I'm really happy with it. Obviously we'll get to update people as the storm winds. We often have very strong storm winds that cause havoc here at the farm in the spring just for a couple of days. But we generally have quite a windy farm. So we've got plenty of opportunity to test. And I think good optional extras will be these ridge poles which I don't think are necessarily needed on a small tunnel, but certainly on the bigger tunnel. I feel happier that they're on. As well as the corner bracing. I think that's really smart to have. Obviously there's irrigation kits that could come with these tunnels. I think we've put our tunnels on the edge of the beds and we're going to just see how it goes with overhead watering by lifting the Sides up. We'll see. There's lots to figure out with like how to operate these really well throughout the season now. But I think it's a really nice thing if we can help support the creation of 20, 30, 40, 50 meter kits that people can have all over Europe. I would anticipate. Now this is purely speculative and I'm making this up. I don't know how first tunnels are going to respond. We're reporting back to them how it goes this year and hoping that they will come forward with a kit for people in Europe. I would anticipate these to come out at about 10 to 12 pounds per square meter. That's British sterling pounds and that's comparable to what's available in the States. But I just think, you know, when you're shipping around stuff like this on across the other side of the world, it doesn't make sense. We need these tunnels made locally and I think just I've really enjoyed the customer service and the quality of the materials that first tunnels use. So we've been contact and I'm hoping that they will take our feedback and create these kits and yeah, we'll see how that goes. I'm going to be letting you know anything that develops on that front. But all in all, these are really good value spaces for those that want to extend their growing season anywhere in Europe. Basically, as I said in the video yesterday, these are not going to be suitable for leaving out winter round in our climate so far north, down in parts of Germany, France, the uk, whatever. I think for sure you could leave these out during the winter and that's where having a center ridge pole is going to be really helpful. But with the high snow load we get, I wouldn't leave these up over the winter myself. We'll pack these away come November, early December and we'll get them out again. March, April weather depending. But yeah, I'm going to be reporting back all throughout the summer with how we manage these and how we adapt and change them, how we deal with big weather events, whatever. But so far I'm very happy with the materials and with the ease of setup. You know, it's taken a couple of hours for a big tunnel like this with people that have never set one up before. So perfect. Really like it. Thanks as always for watching. Just a quick update on the tunnels and I'll keep you updated as I hear developments from the manufacturing side. Thanks as always for watching. You can find out more about the farm on our website, on Facebook, on Instagram and you can read our book Making Small Farms Work in the links below. See you in the next video.