SEEDING 12,000 SEEDS PER HOUR Testing the Paperpot system Drop Seeder; a new year begins...
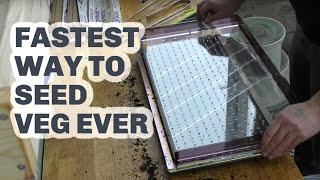
Richard Perkins tests the Paperpot drop seeder on his small farm, which seeds 12,000 seeds per hour. He walks through tray filling, dibbling, and drop-seeding while managing greenhouse renovations, mushroom incubation, and damage from recent logging.
Questions this video answers
2.4 kilos straw + 3.6 kilos water (target ~60–70% moisture).
500 grams of grain spawn.
264 plants per tray (for each chain spacing option).
5 cm, 10 cm and 15 cm spacings.
A 4.5 mm plate (suitable for pelleted and larger seeds).
Chapters
So we're not even finished here in the lean to greenhouse and the house is in total disrepair. We have no kitchen. And right now we can't even move through the house because we've got cement drying under where the new floor is going in the kitchen. But seeding must go on all the leeks and spring onions. So I want to show you a little bit of what I've been up to in here and how we've rearranged things to accommodate the paper pot transplanter system. Here's these low tech mushrooms. They're in incubation, but they're just in our sitting room. You can see if I put the torch on them, they're ripping through this straw. So this is a low tech way of growing mushrooms with no sterilization. You can see on here. I'll just turn this around. You can see there's 2.4 kilos of straw and that's then added to 3.6 kilos of water to hydrate it. Aiming for 60, 70%. And then I've put 500 grams of grain spawn in. And that was a few days ago I posted when I did that. But you can see it's ripping through the pink oyster. And then here we've got yellow oyster. Now we're not giving them ideal conditions at all. They're just sitting in our sitting room with whatever temperature it is. But they seem to all be going fine. And this is just a trial obviously, but very excited for very low tech mushroom growing. Well, Ragnar and I are just coming up to have a look at what's been taking place. And as you can see, there's a very different landscape around here now and it's making quite a bit of a mess in there. Wowza. And it's a few days now of bringing the material down. You can see up on the hill, the wagon has started that job. So I'm up here at the turning circle. That's the view. It's going to be very different. Very different amount of light coming on to the ground there now. And so it's to going, going to be interesting to see what grows up this year. There's a lot of fencing to repair because of the tree work. But all that's been left is a few of the taller birch you can see up there. So we're up at the treehouse and this is the view. The machine is starting the long job of picking up the wood. You want to also talk on the camera. What do you want to say? The toys is gone. So there. So There. So this is the old back line of the forest. And the fence is in remarkably good condition considering. You can see some of the wires here are fine, but it's. They've trashed the wire but not the post. Generally there's a couple of smash posts and a couple of corner assemblies that have been damaged. But it's actually not as bad as it seems. Here for example, it's fine. And because we're not going to have pigs in here for some years now, as this recovers, I might be. I will analyze it once they've cleared all the wood out. But it may be that I just restring it as a two or three line fence. If I can. I'll just replace it with what's there and just have to put a bunch of new insulators on. But essentially I can see a bunch of smashed insulators. But if I can get the original wiring back then I may as well. They've left a few sad, lonely birches. Quite a drastic view. You can see the tree house over here. It's going to be quite some getting used to. So this is the machine that does the damage, as it were. The very impressive machines, but highly destructive in terms of massive compaction and the rate at which they can just take down trees. I mean this thing has to be cutting down a big tree every 40 seconds to be making money. Here in Sweden, if it goes to like 60 seconds a tree, then they're losing money. And where the ground is all frozen up, it's okay. But it's starting to thaw out now. And they've trashed my strawberry patch, which they haven't. You know, they haven't brought in the logging truck yet. And that will be doing much more damage as it brings up super heavy loads of timber. So this is down at the business end and you can see there's a chainsaw blade there and that is kicking out these grabbers are holding the tree. It's cutting it, tilting it to get a directional fall. And then it's all computerized and it spits through a log, taking off all the side branches and cutting it into exact lengths. And that is all recorded on an onboard computer. So there's live data streaming of just how much material is being put through. There's a layer of plaster appeared on the floor. So we are stuck. Can't get in the office, can't leave the living room. But I haven't been making videos. I've been really trying to get this book done. I've got basically three and A half weeks to get this epic tone finished. And I think it's going to be worth the wait. It's. It's a really thorough update of making small farms work, which we no longer sell. But it's also got this comparative analysis piece. So it's kind of two books in one. It's around 700 pages and it's one of the biggest format books you'll have seen. So it's a huge thing. And we're going to announce crowdsourcing to raise the money to print the first batch shortly, hopefully. They're trashing up pastures and forests, collecting all the timber out the forest. We've had all the timber cut. I'm going to make a separate video about that, just, you know, giving some thoughts and perspective. It's. They're making a real mess. But in the contract they need to tidy up our pasture. Here in the seeding room, things are looking a little bit different. Basically, we've done a big overhaul. And because the paper pot trays are. Let's just grab one, they're a lot smaller. Paper pot trays fit perfectly. Two on each of our racks and they fit inside these shoe trays. So we can bottom water or soak them before they go out. In the paper pot transplant, it just makes the whole safety a lot better. You can see we haven't finished wiring up yet, but basically each rack is going to have its own switch. And we've split the lights onto three phases. We've got a new fuse box coming in and we've got a small heater for when the heat from the wood stove is not enough in here. And we also use halide lights, which are a few hundred watts each at times. So this allows us to basically make sure we have enough power and no one's going to get electrocuted. So a bit of tidying up to do and finishing off in here, but seeding must begin. So I'm starting that now. Really like these trays that come with the paper pot system, they're rigid, they're shallow, so they're excellent for microgreens. And they've got really good porosity for drainage. So we're basically moving everything over to that. You can see here we've got our drop seeder. And this is what allows us to. You get different plates that fit in here. This is the four and a half mil one, I think. And then we can shake seeds around in this that you'll see as we get started, and then drop one into each hole made with this dibbler so here we got our paper pot chains. These are the 10 centimeter ones. We're going to do leeks in those today. And These are the 5 centimeter spacing traditionally used for spring onion. So we're seeding leeks and spring onion. But I just want to show you through the system. For the paper pot system, you have three different sized chains. They all have 264 plants per cell per tray, but they come at 5, 10 and 15 centimeter spacings. These are opened up with the spreader bar and then they're put onto this frame so that the last row is supported by these little metal hooks here. So you can put this frame like so. And these are now secured and you can pop that. Either you can turn the tray upside down onto it and pop it over, or you can turn the whole thing over. Doesn't really make any difference. And there we've got our flat made up. We're going to fill that with a fine potting compost. Then we have a dibbler that lines up with each of these holes. And then we have a drop seeder here. Now I'm doing spring onion and I'll be shaking this around to get three or four seeds in every single hole. Because we multi sow spring onion. So you can see this is going to drop seed really precisely into the holes I dibble, like so. But first we must fill with compost. I want to sow single leeks in each cell. And so you can get different drop seeder plates. This is a 4 1/2 mil one, which is good for pelleted seeds and larger things like spinach, etc. And there are different plates and there's also alternate plates. For example, if you have crops that you want to put at a 30 centimeter spacing, like brassicas, for example, you can use an alternate drop seeder on the 15 centimeter spacings. And that way you're only putting a seed in every second hole. That's pretty neat. But right now we only have the single seed plate. So I've got to work with the spacing I've got. I'm using quite a fine potting mix. You can see here, it's quite fine. It has some lumps that are easy to knock out. So I'm putting a measured amount to fill each one. And I want to fill the tray really consistently to the edges, particularly because I don't want the tray to. Because it's a bit like a concertina. It's got a bit of a Spring in the paper chains. I don't want it to spring shrink down when I take the spreader frame off. So I'm filling this really consistently. Some people like to use a brush. I like to use my hands and just making sure that this is totally full and I'm dropping this down. I'll remove excess, like so. I'm gonna have to really start making a production after I've shown you this example because I've got quite a bunch to do. So you can see that's sitting nicely. And then I can take the dibbler, line it up with each of these cells and I give it a good press down. You can see we've got a hole there. And then I can put my drop seeder over the top. And I'm lining up the hole that they're all going to drop out of. Once it's lined up, I just give it a press. I can tap any seeds that are stuck in any of them and there we go. So you can see we've got three to five seeds in each hole. And then I will be covering that up. I've got another box of vermiculite here. I quite libel with applying vermiculite. It just holds nutrient and moisture right up at the surface for good germination. And then this will get watered and then a new. There will be two of these trays for each bed. So it'll have a seed label marking which bed it goes into. I can now lift the spreader frame off. You see, it stays nice and stable. I'll water this, put a plant label in denoting the bed, and I'll clean the bench up, ready to start the next seating. So what do we think of it? Well, I've only done about 20 trays so far, but it's very fast and very accurate. Now, it's not very slow to do leeks and onions anyway because I usually broadcast them in a tray. But with the amount of transplanting we do, which is nearly all our crops except a few that we direct seed, this is obviously going to save us a whole lot of time throughout the season. Now, I think that, you know, the saving with transplanting is going to be huge, but I reckon you can do a tray in less than a couple of minutes. In fact, we should time it, shouldn't we? And see, because I'll start the timer now. Let's just see what it takes to do a flat because it's gonna add up to a lot of hours during the season. And I'm a novice still. I'VE only just started doing it. So I'm sure I'll get quicker when I've got everything set up nicely. I've just been moving in here today. Just because seeding begins on our calendar. We always follow our garden calendar and make sure we see that the right date because the whole year has been mapped out to make sure we have everything when we want it for sales. So you always follow the calendar. Yeah. This is going to save us a bunch of time this season. Which was the aim. We were trying to cut out a lot of time from the market gardens. That's basically a tray done. So that's a minute 20. But to accurately seed that many seeds. Nearly a thousand in these trays. That's awesome. We love it. It's a really cool tool. I think having different seed plates gonna help a lot. And this is great for with the spring onion. It's able to take three or four per hole. Obviously with pelleted seeds and bigger seeds, that's gonna be fine. But just having these different seed plates. There's a little pin here that I don't know if you can make it out, but that's what holds this plate in. And this plate just slides out and you can replace it. So they do everything from like 2mil up to 8mil, which would be great for micros and things like that. And then they do an alternate hole spacing as well. Which is really cool. So we'll see. We're gonna have a bunch of those new plates soon. But I think this is a tool that we will learn a lot about this year and get a lot of time savings with as well. Well, it's pretty sweet. I mean, I'm a novice. This is the first day I've used this. So I reckon I could probably get it down to a minute a tray if I'm all set up and organized. But that's what, 264 plants. That's a thousand seeds accurately in four or five minutes. So in an hour. Wow. There you go. It's definitely a major time saving. I'm going to experiment using the brush to see if it fills these holes better. But I feel like my hands are more sensitive to the job. So I probably will keep working with my hands. That's the way I like to do things. So I feel a bit more connected to the process. And I'm not sure I'll keep putting this up on the wall each time I think I store it there. But I'm going to work out how to use this workbench. In the best way, but very happy with Japanese quality thinking and the build. Even these acrylic cedars, you know, they're really well built, they're very strong. A little bit of a bigger workbench would be good for us, but this space is obviously limited and so we, you know, we have to make do with the. I'd rather have a small heating bill than worry about having a little bit more space. You can always find clever ways to use the space. But the thing is, this whole greenhouse is essentially heated by fan coming out from the wood stove over there. And then we have a small heater, electric heater, I'll show you here, that we put on at nighttime just to make sure it doesn't drop too low. Trying to keep it about 18 in here. But then one part of the big house renovation that's going on is we're going to put a hot water system off the wood stove that is just through the door here. That's going to heat the house more evenly with radiators. You know, it's minus 30 in the winter here and we have one little wood stove that heats the whole house, but it doesn't get to the extremities that well. So we're putting in a hot water system. We're swapping our old monoculture spruce basically for a nice hot water system around the house. And it will have a separate branch that comes from our cellar with a glycol loop that comes out here. So we can actually heat this space a lot more effectively. And then we won't need to use electric at all. But even using that electric heater that's only on for some hours of the nighttime and for a couple of months at the most. And then it's naturally getting warmer outside that it warms up in here quickly. Even when the sun is out on a minus 20 day, it gets up to temperature in here really quickly. So it's, you know, it's a very low energy setup for our cold climate. We do use a lot of lights, but we have to because the way we're starting sea, there's just not enough light. Light, naturally. You can see I've changed this around now. All the lights have two. All the racks have two bulbs above each tray. That's because the paper pot trays are a lot thinner. So you can see when they go under there. It's very nice that they sit in these trays. It's going to make watering a lot nicer. And then it's good to soak these before they go out with the paper pot transplanter. So we'll probably top water always and keep tight observation on the plants. But then we'll really soak them before they go out in the ground to help loosen up the paper pots. But only two lights per rack now, so we've just had a bit of a change around in here, but I'm excited. So all the trays are done now. Just got to stick labels on everything and get them watered nicely. And that's it for the ceiling for the day. Okay. The floor is drying off in here. It's very echoey. This is what our kitchen looks like. We've got no way to cook, and he's not coming back till Wednesday to put down new floor. So this is the beginning of the renovation for us. We're putting some time and investing a bunch of money into doing up the house at last, because we've been just working full tilt on the land for five years, and now it's time to really make this house a home, because we've, you know, we need to enjoy where we're living at the same time. And we've just been so focused on work and the farm that we never got around to doing the house up. So the house is in a mess. Everything's in a pickle, and I was basically stuck in the greenhouse. It was good that I had seeding to do because I couldn't get out the house except for out the front because the cement is drying in both these rooms. So I couldn't get out of here. But super excited. We're going to redo everything. We've got some beautiful ideas for the house. And then we'll be doing the hot water system off the back of the stove that's down in here. That will come later in the summer when we don't need the stove on, and that will distribute hot water around the whole house and give us a much bigger system because Johanna wants a bathtub, and I think that's a great idea. So, yeah, that's it. Busy days. I've got three weeks to finish the book now. It's going really well, and I'm super excited to include some of our past students in there and just demonstrate what people have been going away and doing and how it goes for them. So it's really exciting. And, yeah, I'm gonna start a crowdsourcing campaign. Thank you so much everyone that's commented on Facebook and sent messages of support. I really appreciate that. It's been a mammoth task and a very frustrating task at times like I said I put the book down last year but I think it's you know despite the complexities of trying to create this comparative analysis I think there's a lot that people can benefit from and it's a really beautiful looking book. It's going to be epic. So thanks for supporting that and I will obviously make announcements once we put that out more publicly to raise the funds to get the first print run of that book so there won't be too many videos for me. I'm going to make a video about the forestry a few people curious about that and it's quite a big process that's been going on but I will make a few videos of the seeding room and what's going on with that and keep you updated with mushrooms and the forest as we go and I'll be announcing in the coming weeks hopefully when the book is done. So thanks so much for watching and we'll see you in the next video. SAM.
More from Richard


A review of short and intensive season on a mixed farm and restaurant/event space in Sweden






Alskade Kyckling Exploring complexities of poultry production in Sweden and what we stand for


