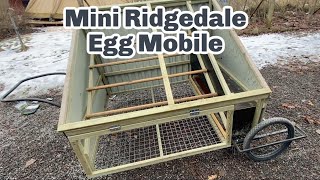
Richard Perkins demonstrates part one of building a small Ridgedale "Mini eggmobile": a mobile, automated 25-bird nesting unit with a lift-up roof, rear egg-collection panel, solar-ready top, and bicycle wheels. The video narrates design choices, materials repurposed (20" wheels, metal sheeting), construction steps (frame, roosts, nesting boxes, skinning) and a brief progress wrap-up estimating four-to-five hours of work so far.
Chapters
Welcome back to another video, folks. In this video, I'm just going to show you part one of making the new Ridgedale Mini eggmobile, which has been super fun. Okay. Nothing like a little building project to get a spring feeling. So this is the very start of a min Ridgedale eggmobile. Having designed this and seen it copied all over the world, I figured now I'm making one for a homestead. I may as well keep it in the same style. It's going to be automated, same sort of metal sheeting. But this version is going to be a little bit different. It's going to have a whole opening hatch, but this whole top is going to open. It's going to have a solar panel on top and the nests are going to come out the back. It's to going going to have bicycle wheels here and egg collection at the back. So there's actually going to be a panel blocking off this side with the electrics on top of the nest. And then roosts up into the roof just like with the larger scale eggmobile. Exciting. It's really fun to be out building. Okay, next step, I'm putting in this frame. So the nest box is going to be in here. There's a dividing wall. Just open that up. So dividing wall here that opens into the nest and the eggs will roll away this way. And then the perches will go about here and go across like this. Pretty cool. Nicely done. Good job. Right now, so we got some metal plate that fits perfectly. Now we've got to put in some roosts, build a door, build a lifting top. It might end up being quite heavy on the top, but I want to be able to lift this up. A, so you can see in there. But B, all the electronics and controls will sit in here on top of the battery. Sorry. On top of the nest. So the nests are going to roll out this way. Battery and controls in here could also just be a door on this end. But I like the idea of just being able to lift up the whole top to be able to clean and inspect and. Yeah, sounds fun. So fun. Okay. Pretty good progress. We're working off the back of a napkin. I've got the basic dimensions for the roosts and the nests needed for 25 birds. But then we're just kind of making it up. And I love this kind of project. It's very simple because it's so small. But this is a little door. So this will be on an actuator so it opens up in the morning. Now we're going to build the whole roof. And I want the whole roof to be able to be propped up and lifted up. So I'm going to construct that now. Okay. New day, new solutions. So I've got these old 20 inch wheels and I've cut the axle off an old cart. I was figuring I can bolt these on here and that will give me. I want enough room that the chickens can hide underneath the structure. And this won't interfere with the door mechanism. Reckon that's a pretty good solution. So I finished up last night with getting the box installed. So once the wheels are on, it's a case of skinning with the metal and then just putting the electrics on and then it's pretty much done. I reckon this is a one day build if you took the whole day. Pretty cool. Okay. Rinky dink. That works out quite nice. Seems strong enough because the structure is not so heavy at all. I can just pick it up enough. We go pretty cool. All right. We need a good handle trim some sharp edges off. Then we can start skinning this. Probably just cut that down a bit so it's not sticking out for kids. But that should give enough room for the beds to hide under there, which is an integral part of the. The overall design to be able to get away from raptors or anything coming along. Okay. So I've repurposed this handle and essentially that will sit. I had to do this with one hand. Essentially that will sit on the frame. It's a little bit low, but it's sinking in the gravel. And then I can bolt this hopefully through the wood through the metal sheet to make it pretty robust. Bolt it down the bottom too. And that's like a nice ergonomic height to pull it along with. Okay. So I found some old flat sheeting that was used for packaging for other roof panels. And that makes a flatter surface for the front and back for attaching handles and nests. So I've got the back done. Now you can see how the eggs will come out the back here. So just got the roof and door. It's getting heavy now, but you can see pretty easy to move it around. Just maybe have to put a bracing because I've bolted this in here. It's leveraging against this bit of wood, which is obviously not very strong. So either I put another piece across to brace it out or come up with some other solution for that. But it's flexing, but it's fine. But yeah, check if the wheels are strong enough as well. It's so cute. It's so Fun building just from scratch and kind of making stuff up as you go. I've been really enjoying it. I haven't built anything since I built the platforms in the forest this William last January. Okay, little progress reports. It's lunchtime and I'll have to stop work soon to pick up the kids. But now I've put the nest mats cover on so this just goes up hooks on like that and that will keep the eggs waterproof. I've just put the roof on so that allows us to access in here. So basically all I've got to do now skin the door and this back panel and then it's time to put the electronics in. It's getting heavier that's for sure but it's still movable. Pretty cool. Okay, so I think that's where we're going to leave it today. Still got the automations to put in but that is basically. I don't know what. That's taken about four or five hours to build a certified 25 paired egg mobile and it's working good. It's quite heavy to go uphill but I'll do some improvements and tweaks. I want to reinforce the wheels a bit maybe and reinforce this handle here but other than that I think it's probably going to work pretty sweet. There's room under there for the birds to get in and hide away which is perfect and it's fully accessible which is very nice. Eggs should be waterproofed under that flap there. Pretty cool. The mini Ridge Dell 25. That's it for this video folks. Don't forget you can find out a whole bunch more in the links below. Both my books for sale direct from the farm. I'll see you in the update video soon.