TESTING TILTHERS a look at the Paperpot Australia's Ellia 3000
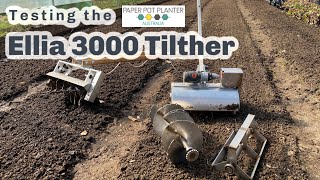
A hands-on YouTube review and field test by Richard Perkins of the Paperpot Australia Ellia 3000 drill-powered tilther, compared side-by-side with a Johnny's 18V drill-powered tilther. The speaker demonstrates use in heavy, waterlogged clay and lighter composty beds, notes battery/torque considerations, handle and wheel adjustments, tooth design differences, and practical seeding steps after tilling. Conclusions: the Ellia 3000 is robust and effective with minor improvement suggestions (curved tines, adjustable back plate, better drill-retention and handle fixings); Johnny's has favorable tine shape and a simpler frame.
Questions this video answers
March 31, 2020.
18-volt drill (battery-powered drill).
Chapters
So today's video I'm going to be giving the paper pot Australia tilther that Curly sent over a try. I've also got the one from Johnny's. These are 18 volt drill powered tilthers. This one actually comes with different attachments but I think they are changing the mechanism on that currently. So we're going to give it a test and see what we think of this. Now I just want to make absolutely clear I'm in no way affiliated with this product. I don't get paid to do the review. I did get a free sample to test out and that's the benefit I guess. But I'm up for reviewing tools that I would use on the farm and I'll do so honestly and openly and I'll say what I like, what I don't like about it. And I'm not here to try and sell things. And as a disclosure, I don't actually sell any tools anymore. We basically had to pack that in because I'm just far too busy as it is. But I'm excited to try this, especially in our tunnel. It's a bit of a mess now. This is just on soil, so we get a lot of weeds in here and I'm not actually used to weeding so I'm going to go through here today and just clean it out. These were support posts that we had in for snow load while we were away, but it didn't really snow this year. But I want to. We've got all our nursery stock over here on this side and I want to get these five beds into production. So it's a good time to test the tiltha because this ground is heavy clay and it's quite tough and compacted. So first process is going to be digging out some of the grasses. You see it's couch grass and sedges. It's very wet in this tunnel. I'll go along the edges here and take up this plastic and then I'm just going to hit it with the tilther. And I expect this to be a weedy tunnel because it's just bare ground and it always has been. And that's the thing with tillage, you wake up weed seeds. But I'd like to get in a mescaline crop, some mustard greens, some salads of different kinds, baby leaves, spinach to get some early crops for the year. So let's get into that. For spot weeding like this, I like to use a Korean hoe. These are very superficially rooted grasses that I'll just go through and Pick out before I till this over. It's quick work with a tool like this and the sharp point really helps. I'm super glad we don't have to do all this kind of weeding on our main plots. And it's a choice. If you do tilling on a big scale, you're going to spend a lot of time weeding and better things to do in life. Well, that didn't take very long. Highly recommend Korean Hoes. This an epic tool. I love it. That isn't a lot of space to weed and to be honest, I haven't done the edges because my intention is just to get crops in here as soon as we can now. But that is more weeds than we have in the entire 200 beds that we have outdoors here. If you are spending any time weeding as a grower, I highly recommend you change your tact or at least consider it very seriously, because the benefits of no dig are just phenomenal. Way less weed pressure. We literally spend less time weeding the entire market gardens here than this place. Much better soil fertility, soil care. Soil is covered and protected all the time with the fertility as the mulch. Why are you not making this no dig? I hear someone ask. Well, good question. But this is a space that is used in very different ways at different times. We've used it for housing livestock in the winter, which is possibility always due to the way things change and animal numbers change. Last year we used it for some cropping, but it's also been used as a nursery for putting in tree stock in root trainers. This year I want to crop it early and I might cover it up again later. We had an idea to build outdoor heated racks as a secondary hardening off space or outdoor space for potting on, which would allow us to pod on a lot more crops and have a lot of bigger plants to put out first thing in the season. Who knows? Not sure. I wasn't even planning to be at the farm much this year, but because we're changing the use of this space all the time, we haven't ever made it permanently. No dig. Now, I think the two beds here are pretty similar in composition and the two beds here are similar. So that's a good comparative test. Let's give this a whirl. Never used it before, but we'll see how we think it works. It's important with these tools that your drill setting is on number one, the slower, more torquey aspect of the drill because there's a lot of power needed to turn over heavy soil. My Battery went flat, so got to give it a change over. So on first glimpse, this seems to be working great. Now, to give it benefit of the doubt, I think the other tilther will suffer because this is such heavy, wet clay that's just been warped on a lot. It's going to need a couple of passes over, but that's fine. I would expect that with any small scale tilther like this, like any teother, it's pulling away from you, so you've got to learn how to keep it in the place for the length of time you want. But there's nothing wrong with just going over with a couple of passes. So we'll go over that again. I like that you can move this handle very easily. You can also adjust quickly the angle of the handle to the tool to allow you to work from the edge of the path. That's a great touch. And we'll put that into effect. Now, when you hear it stop like that, it's basically when it hits a rock or something like that, it just doesn't have the power to turn anymore, so it just stops. You can just lift it up or move it back slightly, remove the rock and away you go. Now it seems like my batteries are just low. It's very cold. It's been in minus degrees. Let's go and have a look along the bed. Now, it's much wetter up this end and you can see it leaves bigger chunks. But as we get further down, you can see it's tilting well. Now, I would have expected it to take at least two passes, but down here it's getting pretty sweet. That's fine for me to seed into. I'll give it a rake over and add chicken manure. I think on the bed like this, it's gonna fluff that up perfectly. This bed, again is heavily compacted because we were using this and walking on these a lot last year. So batteries are a bit low, but it seems pretty impressive so far. So for comparison, Johnny's unit has a little bolt that holds the drill in. I think that's a nice touch. But I don't like this gami string. It's not the best design in my mind. This is a smaller teal, so it won't go so deep, so I'd expect it to go through a bit easier. But let's give it a test, see how it works. Well, it seems like both of them struggle with the really wet bit here. That's really heavily compacted. But I think actually what I'm seeing from the Johnny's model is that the actual tooth design is more optimal in my mind. With the Elia, you've got straight blades with hooks, whereas these have got more of a curve to them and they're closer together and smaller. And I think for surface cultivation, the design of the teeth here is actually more optimal. Now, just for comparative sake, I was telling you about having to put the handle right down to the ground to get the flat surface with this tool. I'll show you what that looks like on my second pass. So in my mind, that does leave a nicer flat surface. But you do have to hold it a little bit lower. It would be really nice if the Johnny's tool had adjustable angled handles. That would help. I suspect, as I said before, that these holes are indicative of a plate being able to be attached here. And I think that would be a good trick. But I like this tool. The functionality of it is much better in terms of being able to angle the handle, move the handle. And the mechanism for the drill is much better. That rope, you can see I have to hold it off to the side on the Johnny's model. And that's just a bit. Bit flunky. So I think they are both looking pretty good. But I do like the teeth design of the cultivator on the actual Johnny's unit. I'm going to go over this one again and see if we can get a nice finish with the Elia 3000. Okay. So after the third pass, I'm really happy with that. It does a very neat job. Now, I suspect the very ends of these beds, I'm going to have to go over one more time with both the tools because it's just so compact up the other end, it's much nicer and I'm very happy with the result. It seems to work great. And with the flattening plate on the back and possibly a slight arc in the tines, I think this tool is up to the job. It seems very well built, robust, and it's way more easy to handle with that wheel from moving it around. As well as the mechanism for engaging it, it's much comfier to use in my mind. I'm going to get on with the other beds now. It. For the first time I've used the tool and still getting to understand its little quirks. It's powerful. It does what it needs to do. I would expect any tilfer to struggle with this clay here, but it seems to do perfect job. One thing that's having problems with there is that this handle, the Quick hand coupling that changes the. The angle of the handle seems to vibrate loose. It's a bit of an issue because you can't do it up much tighter. It's not like the strength of a bolt or something. It's handy that it's quick release, but it's giving me issues on that bed. I'm going to take the drill off and tighten it up and try that again because that's a bit of feedback that could be useful for any adaptations that happen in future models. I want it slightly offset so I can work on the pathway, but it's basically impossible to get this tighter. And I think the vibrations are such that it just works itself loose. What I'm going to go do is take that to the workshop, see if I can change that up a bit. Okay. Tighten up the bolt there. And it occurred to me that I might not be using this correctly. And it. The. The back wheel is not just for transporting it around but to. To measure the depth. So I'm gonna just test it out, see what we. That definitely controls the depth more. But I can get the feeling that that's not how this tool is meant to be used. I don't want those marks left in my bed, so I'm just going to abort that until the bed over. So now I've fixed that handle up, I'm much happier. I'm going to go over this bed again, but I can really feel a lot more power going straight into the ground. And it's an aggressive tool. It definitely tills a couple of inches if you want it to. I suspect you could use the wheels to limit the depth, but it feels aggressive and on point. And now the handle's secure. It's a lot more controllable. I'm definitely getting happier with the tool as we go on. It's really got the power and this is pretty good considering how this soil started out. Even if it takes three passes over a bed, not a big deal. We'll test it outside in a minute and it'll, you know, it'll be first time that it gets that ready for the six row seeder. I'm going to go over the ends of these two beds again because they're so wet and then we'll try it on the dryer mulchier bed over here. So as I said, this bed is a lot mulchier down. This end is heavy clay and it's very waterlogged. But the other end is light compost. So I expect this to do a great job. First Time. This is where it starts getting harder again. But it's done a fantastic job up there. That smashed it through there. I mean, that's as good as any. It's one of our kitchen knives here. Don't know how that ended up there. You find all sorts left in funny places on the farm like this. But this end where it's wet and needs to go over again. But it smashed it through the compost layer, which is going to be what it's like outside. I'm happy the seed straight into that. So it really did turn out to make very light work of this. And especially on this bed on the left. There's a lot more compost on here which is much more how most of our beds are. It's done a really good job and that's a surface that you could immediately seed into. It's a very nice finish. I'm going to use chicken pellets. This is organic pelletized chicken manure, so it's easy to handle. I'm going to put a bucket of this on each bed. These are about 1.8 times the normal length of our beds. Then I'll rake it over and use the six row seeder to put in a variety of crops. So chicken manure down. And I've raked this over just to help get some of that manure in. It breaks up very easily when it's irrigated. But very happy. That machine has made the bed flip. Very easeful. Time to get six row cedar out. So radish, we're doing alternate rows. So six rows per bed and I'm doing about 12 grams in each hopper. That will go forwards and backwards, couple tops. And they're going to be taken young, so they're still small. Mescaline mix, that's baby lettuce mix. That's a 12 row on a bed. We just use a little micro scale to weigh out what should be in the bed. And if the brushes on this tool are not dropping as they should, you can just pass over the bed again. That's how we roll. Next up is spinach as baby le. Last bed is going to be baby carrots. We'll do 12 rows. We can always thin them out and then we will have a bigger harvest later on. Okay. All seeded up. That's nice for a couple of hours work. And what I want to do is take an airbrush to this, just clean it up and get it all ready for the next use. Okay, so let's do review of the tool because I tried to take it Outside, but the ground is frozen about a centimeter underneath the surface, which is quite dry and compact. We've had a lot of these windy, sunny days, but it's actually really cold still minus 4, minus 5 at night time. So I can't actually test this outside right now. That's fine because I don't actually have any more planning to do till later next week. And so we'll test it again on the. On the mulch beds. Because I think this will do just as good a job as this tool. Now, I don't know anything about the pricing of this tool. I haven't actually seen that. But what I would say is that I think there are some pros to both tools. And this tool has the added benefit that it's got these other attachments. Now, I do know that the way that these are interchangeable, the actual precise mechanism may be changed in later models, but it's very simple to turn these over. This is actually a hiller attachment that I would personally never use here. And this is a mulching attachment for putting things under, which again, I would never use here. So I'm not going to bother reviewing these because I don't have anything to hill or mulch. But as far as the tiller goes, this is definitely a great bit of kit. I've been really impressed. It made pretty light work of some pretty horrible soil here. Just wet, soppy, waterlogged clay. And as you saw, it made really light work of the light multi bed. The things I like about this tool are the fact that you can adjust the handle. The wheel certainly seems useful for moving it around, although to be fair, this is a heavier unit than the tilt that comes from Johnny's. I like that the handle is adjustable at the top, and I especially like the mechanism for powering the drill. I think that's a big advancement on the rope version from Johnny's. The down points, as far as I see, pretty simple things. I think the tilther could actually be a better dynamic in the soil by curving out the blade somewhat. As you see here, it's not a big deal. It gets the job done. But I think this will get the job done slightly quicker, more effectively. And I would like to see an adjustable back plate here that can really help to shape the bed so that you wouldn't even need to run a rake over necessarily. And I'm not saying you would always. It's just I like to have the beds dead level because it helps with using the seeders. The only other thing I would add is Some mechanism for really holding the drill solid, like a little Velcro strap or something that just holds the drill down. On the Johnny's version, they have a rubber pad that it kicks up against and that's useful. I think, to be fair, the Johnny's frame is a bit more robust, it's aluminum. But in terms of the drive gear and the overall build, I think they're very similar. And the Elia 3000 actually has a thicker metal jacket. Now, I have heard of people having these split out the Johnny's version when they've hit rocks and it's been chucked up into the mechanism. And so you get a much thicker, stronger case. On the Elia 3000, the down points of this one, as I said, are the string mechanism. I just don't think it's brilliant. It works, but it could be better. And the fact you can't angle these handles, that's a shame. I do like the blades. It might be the spacing between them and the actual tip dynamics, but I think this does a slightly better job. But for those of you that have things, crops that are going to be mulched down or hilling when you're actually making beds, I think this could be a better option for you. And so that's as far as I can review this for now. You've seen the results. It does a great job. I think it's a brilliant bit of kit. It's been really well thought out and a few minor improvements, if they're possible, would make it exceptional. And yeah, I'll leave it at that. We'll test it out on the beds when we get into planting outside and I'll talk it through and show you the results I get from it there. So that's it for today. Thanks so much for watching, folks. I've got to get the watering on now and it's time to get organized with putting up the rest of the windbreak around the south beds here. And then we've got a whole bunch more seeding and things to take care of in the greenhouse. Thanks so much for watching, folks. Hope you found that interesting. I'll put links to Paper Pot Australia in the show notes below. Don't forget, you can find out a whole bunch more in our online trainings in our book. Stay tuned. Don't forget to subscribe, share the video. We'll see you in the video soon. Bye for now.
More from Richard


A review of short and intensive season on a mixed farm and restaurant/event space in Sweden






Alskade Kyckling Exploring complexities of poultry production in Sweden and what we stand for


