FB Setting
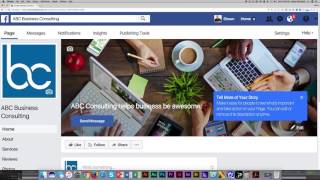
Shaun Whynacht walks through Facebook Page settings for administrators. Enable Visitor Posts and Messaging for engagement, set up profanity filters and automatic translation, and use country or age restrictions to target your audience. You need 30 likes before you can create a custom URL for your page.
Chapters
Now that we've created our Facebook page, we're now going to look at some of the settings that are behind the front page of your Facebook page. So because you are the administrator, every time you come to the page, you're going to see these menus across the top, and you're also going to be able to go into the settings. So let's go ahead and click on the settings, and in here we're going to see The area where we can control how we would like our page to be viewed, what people can do, and different things of that nature. Under the general settings, we've got some different things in here. Now, we're not going to go through every one of these because there's literally a couple hundred different setting options and varieties we can have in here. I'm going to point out some of the key things that you would need to know. One of the first ones under General is Visitor Posts. So anyone can publish to the page, anyone can add photos or video to the page. So if we clicked on this, we can turn off some things. We could disable people from being able to post to your business page. Now keeping in mind, the purpose of social media is to be social. So if you try to create a page and say, hey, come check out my page, it's a great place, it's awesome, and then people get there and they can't engage and they can't interact and they can't post and give suggestions, you've really kind of limited the social ability of it. So my professional suggestion here is to leave this on, and if somebody abuses that, right, you can either ban them from the page, or if it's an ongoing thing for everybody, then you can disable it. So this is where you do that. Next is messages. So remember how we chose the button of send message? 'People can contact my page privately.' That's what you want. You want to have that on. Now, if you don't want that ability, you can go ahead and turn it off, but again, I suggest you leave it on. Tagging ability— so you'll probably hear people say, 'Hey, I tagged you in a photo,' or 'I tagged you in a post.' This is where you can allow others to take photos and videos published by the company. By default, it is turned off. So if you want that ability, check the box, hit Save Settings, and then you're able to do that. Others tagging this page. So if people are writing their own post, maybe they want to say, hey, I had a great experience at— and when they type in your page name because they've liked it, it'll come up and allow them to tag it. This is turned on. If you want it turned off, again, check that box. Now depending on your business and who your demographic is, you may want to be able to restrict different countries, or maybe you have boundary restrictions that you can only sell in Canada or in the US or in the UK. You can go in and create country restrictions. So keeping in mind that, let's say you do sell to the US and maybe you sell different products, you might want to create two different pages. And have a country restriction for one that says, hey, you know, I want to hide my page from view visitors in this country, or only show to people in— and let's just say Canada, right? So you can say only show to people in Canada, and that's your Canadian page. And then you do another one for the US, and that's your US page. So there's no chance of somebody getting on the wrong page. And I know from using the internet, and you've probably had this where you've been on an online site and you thought it was great, and you're like, oh poop, it's an American page and they don't ship to Canada, and I spent all that time. So this would eliminate people from coming across the wrong page based on where they're at. So I'm going to save that. Same thing with age restrictions. Let's say you sell a product that can't be sold or promoted to people, you know, at a certain age. You can go ahead and say, okay, only show this to people 19 and over, and so forth, and you can save that page. You can turn on profanity filters, so if you feel that people are going to say profanity on your page in some of the comments, you can turn that off, on moderate, or sorry, medium, or strong. And some of the other options down here are automatic translation, allowing to post in multiple language, And the other one here, let me just find it here, uh, is similar page suggestions. So choose whether your page is recommended to others. So people are looking for stuff, Facebook will do its best to try to recommend your page, especially if you're doing a search, it'll come up. So if you want that, it's by default turned on. In the general settings, this is where you can also remove your page, delete it, So if, for example, you wanted to actually delete this page down the road, you would go ahead and be able to go in and edit and mark it to be deleted. And it takes 14 days to make sure there's no more activity. So if you hit mark it deleted and then you go in, you do an update, then it's going to delay that and move it to another 14 days. So it has to be 14 days of no activity for you to be able to go in and delete this. Merge Pages. This is where commonly you would have, you know, an experience where maybe there is somebody in your company that's created a page and it wasn't your official page, and then you decide to go and you're going to actually do this Facebook thing for real and you wanted to create your own page. Now there's two floating out there, so somebody goes and searches, two pages are coming up. What you can do is you can come in here and click Edit, and you can say Merge Duplicate Pages, and it's gonna ask you for your password. So I'm gonna use my password here. And now it's gonna ask you to request to merge duplicate pages. So it's gonna ask you to choose which page you have and then the other page. So if you got two that you're administering, you can go ahead and do that. And then you can submit this to Facebook, and it does take some time, takes several days, and they're gonna look at both, they're gonna compare your content and information and either approve it or come back and ask you for more information. Now, some of the things to consider when you're doing this is, let's say— I'm just going to go back here to the page settings— let's say one page has like 500 followers or fans and the other one has 10. When they merge, it's going to be 510 unless there's somebody that liked both of them, then they're gonna show up on both. So let me just bring up the page again. So it's gonna combine the, the amount of likes together. So it's a common thing people want to do. I'm gonna go back to settings. Now some of the other spots that you might want to get into, some of the settings, and we're gonna go through some of this information here shortly, is would be editing the page. When you edit the page, this is where you're going to be able to edit the tabs. And by tabs, if I click on here under this template, there's different types of templates that Facebook has put into play. And the only real difference between it is the buttons that are going to be on the left-hand side of the page.. For example, if you're a service business, I would choose this one. If you're a, like a business that sells products, I would choose this one. So I'm gonna click view. And what it means is buttons across here and links across here. That's the difference between the two. And these are the different types of buttons and options that show up. So if I choose that one, which is what I already have, and I come down to tabs, Here's where they are. So I've got Services, I've got Reviews, I've got Shop so I can put in products, Photos, Videos, Posts, Events, About, and Likes. Now if I wanna have my About section a little higher, I can click this little menu option on the left side and I can drag it up the list, right? Put it up top, up here. Services, I'm gonna have that second. I can either turn that off or on. So I'm going to turn it off right now and it's going to be gone. Say shopping, same type of thing, I want to turn that off. Now I want to put one back, I can click add a tab, then come back here and I can turn services back on. It puts it back in on the list, drag it up here under the about. And everything's good. Let's go ahead now and look at the actual page information for the About section. This is where you can change a lot of the information regarding your business and Facebook. So to do that, it's not actually in the settings, so it's a bit confusing that you have to come out to the main page. But if you go to the left-hand side, here are those buttons that are in place. So I'm gonna click on About, and now I can click Edit Page Information. In here is where I can put more of a description about the business. I can change the phone number, I can put in the website address if I have one, put in my email address that I'd like people to be able to send email to. I can actually put in my street address and And the key with this is it's gonna do its best job to actually find your location. So even though I put in when I set it up Kentville and I live in Colebrook, it did find my address in the actual physical location of where I'm at. In some cases, the pin drop here is not gonna be as accurate as you would like it to be. Sometimes it might put you on the wrong side of the road, but if you wanted to fix it, you can just drag the map to set that actual spot and hit save. But I'm going to put it back to where it actually is because it's pretty bang on. Your next section here is your hours. So open on selected hours— this is key because if people are using Facebook to come and check you out and see, you know, when are they open, this is where they can see that. And it'll do a great job at trying to make that experience specific to your open hours. So if you're open in the time from 9 to 5 and somebody messages you at like 3 in the afternoon, it's gonna come through and give them a different experience. Or if it's like 4:55, it's gonna tell them in the top that you're closing in 5 minutes so they don't get in their car and try to drive to your location. So you can go in here and actually put in some information. So 9 to 5, Monday, Tuesday, Wednesday, Thursday, Friday. But if you do a split time, maybe you, you're open till, let's say, 12 PM, and then you close for lunch every time, you don't open till 1, you come back till 5, right, you can have two sets of hours so it knows that you're closed during that lunch break. So that's a really great option here in Facebook. So I'm gonna, can't see the button here, I'm gonna zoom out for a second just so you can see it. So I'm gonna click Save Settings., and then that's done. This here across the top is just basically links to different sections of that, that information. So I'm going to hit this. I'm going to actually continue and hit save just so everything is saved and in place. And now I can close this. So as you scroll down, you've got more information here. You can edit your start date, your mission. There's those emails. You can enter the website again. You can add other accounts. In here, like Instagram, Twitter, Snapchat, YouTube, WeChat, Pinterest, all kinds of different social media network links so people can find out more about where you're at. You can add a founding date, you can edit products. So if you do offer different products and services, you can put them in here, and you can enter a privacy policy. One key area that I want to point out that I see all the time in new businesses— now this doesn't always come up for different types of business pages you create, but because I picked consultant agency and there's a couple other ones that are out there, you may see this option for username. You see it right here. Now what is a page username? Now if you take a look at the very top here in the URL of the browser, we're going to see that we got facebook.com/pg/abc-business-consulting and a big old number, right? This here, if we wanted to give a link out to our page outside of Facebook to somebody come directly to it, this is all the information we'd have to send them. Pretty ugly, pretty nasty, not that great, really long to put on a business card. But we can create a page username. By clicking on this. It's going to come up here, it's going to ask us for the username. So I'm going to type in here, I'm going to try ABC Business Consulting. It's going to do a search and says, uh-oh, that page isn't eligible to have a username. My page isn't available to create a username. And the reason for that is because I don't have enough likes on my page. It's a brand new page. So I need at least 30 likes to be able to do this. So keep that in mind. Once you create your page, send it out to some friends, some family, colleagues, co-workers. Get them to like the page. Once you hit that, hit that 30 threshold, you can come back and create that page username. The last part of the page here is Edit Your Story. Now it's all about telling a story, so this is where you can actually edit more details about your page and your story and what you've done. It's going to put in that, that simple description that it gave you, but you can go ahead and put more details in here. Once you have all that done, your page is set up from a settings standpoint. Next, I'm going to talk more specifically about the messaging side of Facebook Pages.
More from Shaun


Julie Vanexan recognizes Shaun Whynacht from Blue Cow Marketing at the Nova Scotia House of Assembly








