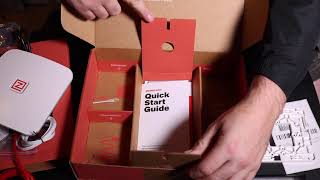
In this instructional video Shaun Whynacht of Blue Cow Marketing walks viewers through the complete setup of a Zenreach guest‑Wi‑Fi access point. He begins by unboxing the kit, identifying each component—including the white access point, mounting plate, power transformer, PoE (red) and LAN (white) cables, and assorted marketing materials. Shaun explains placement best practices, recommending a visible location on each floor of a business and describing how to mount the plate to a solid surface. He then details the wiring process: connecting the transformer’s grounded plug to power, routing the red PoE cable into the access point’s PoE port, and the white cable into the LAN port that links to the existing high‑speed modem. He demonstrates how to feed the Ethernet cable through a rubber seal on the device and secure the mounting plate. After power is applied, Shaun walks through the boot‑up LED sequence—purple, yellow, white, solid blue (active), solid red (firmware update), and flashing red (network error)—explaining what each color indicates. He also highlights the quick‑start guide, the included Wi‑Fi window decals and tabletop tent cards, and advises where to store documentation for staff. The video concludes with a live demo of the access point connecting to a phone, confirming successful installation and firmware update handling.
Chapters
Hi, Shaun Whynacht here with Blue Cow Marketing. By now you should have received one of these, and if you haven't, it should be arriving shortly at your business. Inside this box right here contains the access point that you will be plugging into your high-speed internet in your place of business. Now, this access point has already been pre-programmed with your Zenreach Wi-Fi marketing account, so once it plugs in, everything will be up and running. What we're gonna do in this video is we're gonna unbox the contents of this box right here, and I'll show you what it is inside that you need to look for and how you connect it all together. So if that sounds good, we're just going to get started and dive right in. All right. So now what we're going to do is we're going to open up our Zenreach access point box that contains all the goodies and the bits we need to plug into our high-speed connection. We're going to go over everything that's contained in the box. So first thing you're going to do is you're going to open it up once you receive it just like this. Everything is laid out inside. The first thing you're going to probably see is the packing list sticker here. You don't really need that, so we're just going to move that to the side. Next, you're going to see your white access point. Now, this is the key item that's providing all the Wi-Fi access to your customers. This is something that you're going to need to locate in a very, very visible area. I mean, it doesn't need to be standing out that everybody can see it. What I mean by a visible area is that it's not going to be hidden in your basement. It's not going to be hidden in your utility room. Room. It has to be really on the main floor where the customers are. Now, if you've got a multiple location or multiple floor business, what we recommend is that you get an access point for every floor level. And by now we should have already had that conversation, and you probably got two of these coming your way. So all you really need for this is power and a Cat5 network cable connection to your high-speed internet modem. So we're going to go through that in a second. So we're just going to pull that out and set this aside. Now, below this is all the mounting hardware. So you got your main mounting plate here that can be screwed to any hard surface. So I've, I've installed these below cash registers, I've installed these on bars, things of that nature. You can also install these on the ceiling, wherever you can get that power and that network cable to. But this is a key piece to actually connect this to something of a hard surface. And then in here we've got other little bits and pieces. These are things that You know, I've never really utilized these bits and pieces on any installs that I've done, but there may be a variation on yours that these may come into play. 99% of the time, just being able to screw these to a surface has been key for getting it mounted. So we're just going to keep track of this. We're not even actually going to pull this part out. We're just going to pull the top tray out here and we'll just set this aside. Now, containing within this are all the different cables and power connections that you need to give your access point the power. So the first thing that's in here you're going to notice is your main power cable. So pretty straightforward, the Ziploc bag. I'm just going to open it up. You've seen these before. I'll put the bag over here. Standard 3-prong grounded plug with the 3-prong connection in here. What this is utilized for is to connect to this which is your transformer. So this is what not only gives the access point power, but also then will feed, um, the internet cable power to the actual access point. Okay. Cause it does run through a Cat5 cable here. The other key thing that you're going to see here is there's little screw grommets here. This is because wherever you mount your access point, you can actually screw this to that wall as well. So it's not dangling around and hanging there. So what you're going to do is you're just going to plug this into here. Really, there's no place that you're going to be able to plug this that is not going to be obvious that you're going to fit it in there. Okay. So it plugs in, obviously this would have power. So pretty straightforward. And what you can see here, if you look in the box, Zenreach has done a fantastic job. I don't know if you can see it, of documenting on the bottom of the box where the actual cables go. So you see a red cable and you see a white cable. Now, this is pretty straightforward because when you look over on this side, you've got a red cable and you've got a white cable. Okay. So it shows right on here that the PoE, that's Power over Ethernet, that's going to match what's written on here. So the red cable goes into the PoE connection here. So we take the red cable, right? We can open it up. Throw that plastic on the ground for now. And we would plug any end of it into the one that says PoE. Okay, you're not gonna be able to see it on the video, but it's engraved right on the box and it says PoE. Connect it in there. There we go. Next, the white one goes into the LAN, L-A-N. So we're gonna pull that out. And they're zip-tied together. I'm not gonna unzip tie them for the sake of this demonstration, but it goes into the LAN connection. Push till you hear click. Now it's clicked in. Excellent. Now on this side, what it's gonna show here is it says the white cable goes from the LAN port, which we plugged in here, into the existing modem. So this part goes into your high-speed internet modem, whether it's from your cable company or your internet provider. But this goes into the modem that you currently have. Okay, so this is where it's going to feed the internet. This one goes from the PoE into the Zenreach access point. Now let's take a look at your Zenreach access point. So we're going to take it over the bag. And what we're gonna see here is underneath you've got this little protective plate, but in here, actually, let's see if I show you this way here. You're gonna see that there's two ports in here and they're labeled Ethernet 1, Ethernet 2. We're only gonna worry about the Ethernet 1 connection. So I'm just gonna unzip tie this just to show you this little trick. If you were to just by default take this and plug this in and click it in, you're not going to be able to close this plate on here, right? It's not going to close. That's because there's a little rubber seal around here that you need to just pop out shortly. And you're going to see— I don't know if you can see in the video— there's one hole on the side. There's a little slit on the side of it. The reason for this is so that you can actually lift it up, feed the cable under, and run that Ethernet cable through there so that when you plug it into your InternetOne or EthernetOne, click it in like this, you're able to then put this back in place. And just takes a little finessing to get that cable to go in there. There we go. Make sure the seal is down. And now we can take our plate and we can click it in. Let's see which way it clicks in easier. Click it in until it snaps. And now you've got a clean connection where that cable's coming out. Now, if you've done everything and you've plugged this into your high-speed internet and you plug this into the power, this is going to start to boot up. Okay, so what it's going to do is it's going to turn on. You're going to see some different colors that show up on here. Now let's take a look at the mounting plate. Pull this out here. If we look at the back of the access point, we're going to notice there's little notches and clips in here. Okay. And if we look at the side of right here, so if we look at this plate here, we're gonna notice that there's little clips here as well. Okay. So the idea behind this is that it would technically go in like that and then slide up. Okay. So the flat surface, there's a flat surface here, and then there's a spot that has all the little issues. That are on there. This flat surface needs to be facing towards the wall. Okay? So this is gonna mount against the wall. And what they've done on the backside is they've put little arrows here that show you the top. So what you're gonna do is let's say this is the wall. Let's see if we can see this here. Let's just say that this cardboard is the wall. We're gonna mount the smooth side against the wall like this. Move that a little further. We're going to put screws in. Make sure you're into, you know, some solid surfaces, locate a stud and so forth. And you're going to make sure that that's in there like that and secured. And then once you're, you're good, you're basically going to push this in and click it down. Okay, now I can't do it in the demo here because it's not secured to a wall, but that's how you're going to mount that to the wall. Pretty straightforward on how to install that. So I'm just going to set all this over here for a minute. Let me show you what's in the middle of your box. So we open this up. I'm going to grab the first thing that's in the list here. We've got our Zenreach quick start guide. Now in here they stuck the, the labels. We'll get to this in a second, but in here it outlines exactly everything you need to do to connect the modem. Everything that I showed you right here, it's very well laid out and diagrammed. But one of the key things that comes in handy is the indicator lights. Now, when we plug this in, and what we're going to do is once we finish this unboxing, I'm going to hook it up here to our internet in our office, and I'll show you about the different lights and how that all comes into play. But it's going to outline what is happening because the lights on the top of the access point will change color, and that will indicate the steps within the boot-up sequence. So this is going to be a great resource for you to be able to see what's happening. In addition to this, you've got some free Wi-Fi vinyl decals that you can install to your windows. One of the key things that I always suggest is if you've got a main entry with a glass door, try to put this somewhere people are always going to look. So if they're grabbing for a handle to grab and open the door, that's a great spot to install that on the window. So there's several of these that you can install because you always want to tell your customers that there is free Wi-Fi. You don't want them to assume, because if they don't think there is, they're probably not gonna pull out their phone or open up their computer to connect. So we always need to tell them that as well. The other thing you're gonna notice here is there's several different— not different, there's several of these tabletop tent cards. And depending on your business, what we try to do is we try to send you as many as the tables that are in there. So these are pretty straightforward. Fold them in half, fold the little bottoms like this. Got a little notch, slide it in. And now you can see it says free Wi-Fi, connect quickly and surf securely with our free guest Wi-Fi. It's on here. These are not branded with Zenreach or anything. They're very generic and very basic. So you can set these on your table so that people again know that there's free Wi-Fi there. So that is, that is the contents of your access point box. Now if you got multiple access points, the exact same thing is gonna be in each of them. So that is the key thing, making sure that you plug the right color cables into the right spot and give it power and install it. So what we're going to do now in the next part of the video is I'm going to go ahead and I'm going to get it connected to our internet here in our office, and then we'll come back and show you what it looks like when it starts to boot up. Okay, so now I've gone ahead and I've ran the white cable that was on the, the power transformer into our existing internet connection here in our office, and I'm just about to go plug the power cable in so that we can provide some power to the access point, and then we can go through looking at what it is that's going to happen during the boot up. So I'm just going to go plug that in right now and then we'll see what happens. Okay, so we've got power and we're going to see— I'm not sure if you're able to see in the video, but we've got a purple color that's showing up here and showing us that's booting part 1. When it goes to purple. So we're gonna go through the boot-up process here. And so it goes from purple to yellow to white. Those are the boot-up processes. And so I'm gonna actually skip ahead in the video as these colors change. So now it's turned to yellow. So it's in booting process step 2. And this really can take anywhere from a couple seconds to flip between colors It can take several minutes for it to go through the entire boot-up process, and depending on, on what upgrade is available for the firmware, there may be a time where it's actually updating the system hardware within the access point, and we'll see that here as well. That's going to be a solid red color, and that comes after the boot. So we're going to see if it goes on solid red, that's okay. It's just gonna update the firmware within your access point. Okay, so now it's flashing yellow, so now it's searching for the network. So it's connecting to our existing internet connection. It's grabbing an IP address. Okay, so now we see that the color on there is solid blue. That means that it's active. It's connected. So if we were to pull out our phone, we're going to see— now in this case, this one is just labeled. It's a demo unit. It shows up on our phone I don't know if you can see it there, but it shows up as Public Wi-Fi Full Strength. So yours will most likely say the name of your business. So ABC Cafe Free Wi-Fi, whatever your business name will show up there. So that's what's happening there. So as we're seeing now, the color has changed to solid red, which means that it's actually updating the firmware. So we can still access the Wi-Fi while it's updating that firmware. But that's the two colors that we're looking at. Blue means everything is active, it's good, there's no updating happening. Solid red means that it's updating the firmware. So if we see that, don't be alerted that it's red. If it is flashing red, then it means there's a network error, there's no internet connection. So if we were to unplug the network, the internet's down, so it's not getting a feed in that regard. But all this information is located in this quick start guide. I highly recommend you keep this somewhere. If you've got staff that are in there, you got your managers, make sure they have access to this because they probably won't remember all these off the top of their head. It's good to have this. Uh, one good thing is just to store this probably near the access points so they can always reference that and look at it. So hopefully that setup went very well for you and you have everything you need to get up and running with your Zenreach access point.