Complete Guide to PERFECT Archery Form
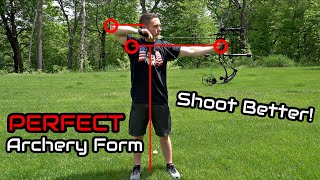
YouTube instructional video ('Complete Guide to PERFECT Archery Form') by Pro Archer Shot-Coach teaching fundamental archery technique. The speaker (SPEAKER B) covers stance (square/neutral/open/closed), foot placement and knees, T-position torso, draw length (wingspan/2.5 guideline; horizontal line between ear and elbow at full draw), using back muscles and elbow height when drawing, bow grip (45° knuckle angle, rest on pad of thumb, relaxed/loose fingers), anchor points (knuckle under earlobe, string at corner of mouth, nose lightly touching string), and avoiding torque and excessive base pressure. The video also briefly mentions shot sequence and surprise release/back-tension training as a follow-up topic.
Chapters
Sam.
Alright guys, it is officially summertime, as you can probably tell by all the bugs swarming my face. Hopefully this video goes alright, but in this video I'm going to be showing you guys a guide to perfect archery form. And I guess I don't have that many credentials. I'm a pretty decent shot. You can check out the channel. And I've also gotten to help my dad and brother, my family, try to help them become the best archers that they can be and tune their bows. That's one thing that having good form helps a lot. I can really tell the difference between when I have to tune Trevor's bow and when I have to tune dad's bow. Trevor, I've been working with him for like years now and he's got awesome form. His draw length is just dialed in and I can tune his bow in like literally from nothing to bear shaft tune in probably an hour or so, really easy when I go to tune Dad's bow. On the other hand, he's been shooting a long time and it's not worth.
It to change his form now, but.
He'S got a little bit, I won't say bad form because he shoots awesome, he shoots lights out. So I won't critique it, but it's just a little bit harder to tune. It's a little bit of an unorthodox form. And just starting from the basics and you know, basically the widely accepted good T shooting form where you're completely upright, good grip, solid base, that's going to really help you become the best archer.
That you can be.
Shoot the best you can, make you more consistent and having those basics will help you in the field hunting this fall as well. And it's also going to make your bow easier to tune, like I said. So I know a lot of you guys maybe haven't been shooting that much the past couple of months in the off season. I'll be honest, I haven't. So it's time to knock off the rust and get back out in the yard and start flinging some arrows. Now, before we get into the guide to perfect archery form, I want to point out that you have to have the right draw length for this to work. You're not going to be able to achieve this perfect good posture archery form if your draw length is too long or too short. If you're too long, you're going to basically be overdrawing the bow. And I'll give you some indicators that.
We can use to basically make sure.
That your draw length is correct throughout the Video, I'll be giving some indicators. A good starting point is usually your wingspan from tip to tip divided by two and a half, and that should get you in the ballpark. And then you'll just have to look at your form and tweak it from there. If your draw length is too long, you're going to always be dealing with a lot of pin float and it's going to be hard to get steady. And same for too short.
If it's too short, it might be a little bit more choppy.
So that's another indicator that you can use. But without further ado, I'll reframe the video here and show my whole body so that you can see this guide to perfect archery form.
We'll start from the bottom up and the feet. So first of all, you want to have basically shoulder width stance. And then there's basically three things you can do. You can have a square stance or a neutral stance, I like to call it. And you're basically, your feet are going to be perpendicular to your target and your torso is going to be perpendicular to the target. Everything's going to be in line. There's an open stance to where your lead foot, one closest to your bow, is going to be slightly back, so your body is a little bit open to the target. Or there's a closed stance where you're slightly closed off the target. I recommend basically neutral or slightly open, because in a hunting scenario, if you're having a closed stance and you keep your torso in line, if you're cranked back, I mean, that's, you're not going to want to be cranked back anyway. So your torso is going to be aligned with your feet and that's going to cause your bow arm to have to wrap around you a little bit.
More to get to your target, which.
Will in turn put your bow arm in the path of the string a little bit more. And with hunting clothes on, that can be a little bit of a problem. You can get some string slap, which can cause your arrow flight to be not as good, especially with broadheads. So I recommend you keep it pretty neutral or slightly open. And an easy way to determine what your stance should be. Just to draw it back and get in your anchoring position. And then close your eyes for 10 or 15 seconds after you aim at the dot and just try to relax, see where everything ends up. So after 10 or 15 seconds you'll see whether your pin is to the left or right of your target.
And then from there you can adjust.
Your stance to where you're in your natural shooting position. So. So that's an easy way to determine that. Moving up. Don't lock out. I guess I won't skip the knees. Don't lock out your knees for too long because you'll probably pass out. I think it restricts blood flow. Just stand normal and your hips should be in line so you're not rotating with your feet. And then they should be directly over your feet. None of this action where you're leaning back. I mean, I guess if you're on a hill, you should probably bend at the waist, but your hips should probably still pretty much always remain directly over your feet. Moving up to your torso, you want to stand basically in a T position. I guess this form, most people would call it like a T position form, I don't really know. But your body should form a T, especially your bow arm and your torso. You're going to be standing straight up and none of this actually leaning back. A lot of people. This is probably the biggest mistake is people are going to lean back. I think a lot of it's due to the draw length that's a little bit too long and maybe they just get tired over their sessions. I even have to constantly remind myself to stand straight up because I'll start to go like this and perhaps maybe I shoot a little bit better if I'm leaning back a little bit. But it's best to just stay in the T position. And then after you shoot thousands of arrows, your body will eventually go into your best shooting position anyway. If you're trying to constantly get better throughout your practice sessions, A lot of people will see Rio Wild. He's a target archer and he's just got just a super wide lean. Obviously he's the exception to the rule. Try to keep your torso straight up and down. Want to talk about drawing the bow a little bit? This is going to help you draw your bow safer and recruit the better muscles. You want to be using the big muscles in your back, not the muscles in your arms. And that's going to help you basically draw more weight easier, safer on your shoulders. And also if you use your arms and a lot of these small shoulder muscles to draw your bow, it's going to be hard to turn them off and transfer the weight to your back muscles when you're holding it, so you're not going to be able to hold as steady. And the other thing is you want to try to keep your bow arm, your bow shoulder down kind of in the socket. You want to basically have everything be bone on bone, skeletal structure supporting the draw. That way you're not relying on small muscles to be aiming. And that's what's going to cause your shakiness. The elbow is going to be not hyperextended, but just neutral. You don't want it bent. So where you're lying on your tricep, just neutral elbow. So in order to use the big muscles of your back, like I was talking about, you want to keep your elbow high. You can even kind of lean into it a little bit and kind of extend your lat muscle, this muscle right here, out a little bit, and then pull back with your back muscles. If you keep your elbow low, you're going to be relying on your rear delts and it's going to be really uncomfortable. Actually just did it, and it doesn't even feel good. Not good on your shoulders. So you want to keep your elbow relatively high. And I like to extend my bow all the way out, pack my shoulder, neutral elbow and then elbow high. Just draw right back.
Let me back up.
Before you touch your bow, here's how you need to hold it. The bow grip is one of the most important things about your archery form. You do not want to be torquing your bow. It's going to make it way harder to tune. It's going to affect your accuracy a lot. You're not going to shoot broadheads with the field points. So the best tip I've ever seen is to basically hold out your hand as if you're saying stop to someone. Stop sign. Okay? Your knuckles are basically horizontal at that point. You can see them like that. Rotate them to 45 degrees, not 90 degrees, 45 degrees. And then you're going to basically put the deepest part of this curve here in the throat. And then just keep it at that angle. And you're basically going to have the entire bow grip resting on the pad of your thumb. This might be a little uncomfortable if a lot of you guys have been using your whole hand and kind of really getting your hand in there. It might be uncomfortable to have it just on the pad of your hand. Basically, you want to think about 45 degree angle and right on the pad of your thumb. And then from there, you don't want to be gripping the bow because you can still torque it. But you also don't want to be doing like this because when the bow shoots, eventually your body will learn to try to catch it. Okay? So that's going to throw you off. What you want to do is just lightly rest Your fingers on the front of the riser just like that. So you just. I'll just aim right at the target so you can see it. Right. So 45 degrees in the throat pad of the grip, loose fingers, then draw. And then you can even just kind of go like that and relax your hand. Next thing to talk about is going to be your anchor point. And you should be able to consistently shoot your bow without a peep sight. And the way you do that is just by having multiple points of anchor. Now, this can be different between an index finger and a thumb release. But what I like to do for an index finger is put my knuckle right underneath my jaw line. I'll actually slide down here. There's a deer back there. I like to put my knuckle right underneath my earlobe and kind of run my finger along my jaw line. So that's a very solid anchor point.
For.
Getting a consistent anchor. My next point of contact is going to be the string touching the corner of my mouth. And the next point of contact is going to be my nose just very lightly touching the string. And one thing to keep in mind is you don't want a lot of base pressure on the string. It can really affect your tuning. You want to keep really light pressure, have multiple points of contact. If you're shooting with a thumb release, you're going to want to hold the thumb release or a hinge. You're going to want to line up your knuckles to the draw line. That will give you a really solid anchor point. But then your jaw does affect where you anchor. So you'll have to remember to either shoot with your mouth relaxed or closed or whatever.
So you just want to pick out.
Three or four points of contact. Contact like that to where you can get them really consistent every time. Some people like going on top of their earlobe like this. I like going underneath. It's a little bit more consistent for me. You'll just have to play around with it.
Hopefully.
I haven't been leaning back at all. I'm guessing I have. Usually throughout my shooting sessions, I start to lean back. So just be gentle with me. I know maybe I've been leaning back. And I know I told you to stand straight up, but just be gentle. I'm not perfect. So a good indicator of your draw length is when you're at full draw and in your anchor point. With good form, your elbow should basically be horizontal. If you make a line, you can even edit this, like with a photo editor. Take a video of yourself and then edit it should form a horizontal line between the top of your elbow and the top of your ear. That's a pretty good indicator of your draw length. If it's like that and your bow arm's neutral, you should be pretty good to go. So that's pretty much everything with form. From there you need to develop a good shot sequence to where you're not punching the trigger. And that's kind of a topic for another day. It goes a little bit beyond shooting form I guess, but you just want to try to focus on getting a surprise release, whether it be an index finger, thumb, trigger or a hinge. A hinge is almost always going to be a surprise release, but that's going to eliminate target panic for me. I've found that index finger has worked well, but it's taken a long time shooting back tension to get to the point where I don't punch an index finger release. So it's good if you can train with like a back tension release or a back tension style of shooting. You can even do that with an index finger. You just draw back and then you're going to put pressure, fixed amount of pressure on the trigger and then pull through with your back muscles through the trigger and that'll make a surprise release. It takes a lot of getting used to. But with this I can just go ahead and squeeze the trigger or use my back muscles and I don't have any target panic and I get a good shot sequence. Like I said, kind of a video for another day and that goes a little bit beyond shooting form. So that's going to wrap up this video. Hopefully it was helpful. If you liked it, make sure you hit the thumbs up button. If you have anything that you would like to add, definitely drop in the comments down below. Love to hear your guys feedback and you respond to every single question. So hopefully this was helpful. I'll see you guys all in the next video. Thanks for watching.
More from Pro







Choosing a Traditional Bow for Beginners | Custom or Amazon? | Which is Right for you?


Vintage Bow Restoration | Ben Pearson BP-H52 | Very Twisted Limb, Bad Finish, Holes in Riser
