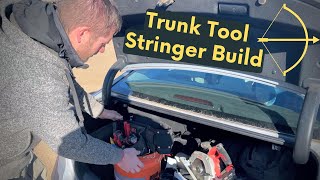
Build a portable bow stringer from a 2x4 using basic tools. Cut a 36-inch base, add 40-inch uprights, drill holes at 15.25 and 21 inches for conduit pegs, and wrap the peg ends. The finished jig holds your bow steady while stringing.
Questions this video answers
36 inches
40 inches
21 inches (with a 15.25" reference to center placement)
Heavy-wall conduit, approximately 1 inch ID (od just under 1-3/16")
Chapters
So we're fixing to build a 2x4 bowstringer just for the average guy to build with the tools you have. And we kind of laid out what we were gonna do and we talked about it and Josh was like, hey, I got some tools in my trunk. Maybe we should just use those. And just so that we could show we just used basic tools. So we said, oh, let's go see what you got. And this was not planned, not staged or anything. He was actually working on a foosball table for his church. So we're just gonna look in his trunk, see what he has, see if we can build it. Build the stringer with what he's got. He's got a bucket with his tool belt in it. There's an impact in there. Screwdrivers. Oh, here we got a drill. Can use this. That'll work. Sawzall probably could use that and a circular saw. So this is what he had in his trunk. See if we can build this stringer with the tools a guy will have in his trunk. Not that everybody will have tools in their trunk, but. But this is what Josh had in his. So let's see if we can build it with this. We are going to build this. We're going to have a foot plate here. This is not how it's going to be. This is going to be lower in here, but basically this is how it's going to look. And then we'll have conduit here and here. He didn't have a size of bits we need, but that's simple. You can go grab that at Home Depot or somewhere. And we're just going to build it with basic tools and make a stringer that is safer for your bows, safer for you, but also much easier to use than your traditional portable stringer that you string. By standing on the string and pulling up. We don't support the step through method. It twists limbs. It's not good to do. This is going to be much easier for everybody out there. So let's get started straight. So what we got here is we got a 2x6 and a 2x4. I think you could do it with one 2x4. The only reason we're using a 2x6 is it gives more stability for the base plate to stand on so it doesn't get twisty on you. So let's cut our base plate, see kind of what we want. I'm thinking we stand on it. We'll give ourselves about six inches beyond for support. We'll start with three foot. We can always cut it shorter. But I think 3 foot is going to be a pretty good starting point. Simple speed square you can pick up at any hardware store. Just going to measure this to 36 inches. Where'd my pin go? You got my pin, Nick? All right, we'll put our blade on that side of it. This isn't a traditional workbench here. Never want to put your lumber in a bind. So you want the side that you're cutting off to be hanging over so that it doesn't get in a bind and the saw kicks back on you. All right, that'll be our base plate. I'm just winging this. We haven't built one of these beforehand, so who knows how it's going to turn out. Exactly. We're going to give ourselves six inches for this piece. And that will give us enough leverage when we put the opposing force on it. Then we'll measure three inches over because we're putting two side by side like that. The first thing let's do is go ahead, cut our six inch pieces here. Make sure it's not split or cracked up on the end. Everything has to have structural integrity on this project. Okay, we'll nip that off. That's gonna go right here. Right up against the edge here. You'll see this doesn't quite line up. And that's on purpose because we want a bigger base plate for your foot so it doesn't twist as much. We've got that piece for our uprights. Go major. This one is made out of steel. We use this one quite a bit. However, it's super, super heavy. It's really nice. It works great. We wanted to make one that was lightweight and out of a material that is easily accessible for guys. Not everybody has a welder. So you can see the clearance down here on this bottom peg is quite substantial. Now, that's. That's for longer longbows. We really need that clearance. So we're going to go ahead and make it that high above the ground. So let's just measure that fifteen and a quarter to the center. This here is going to be 21 inches. We're going to go ahead and make it 21 inches. That's going to fit most bows. If you shoot longer longbows, I would go for 24 because that gives you more leverage between pegs. Now, because we're building out of wood, we have to go higher than this because wood needs strength on top of that. That's only 36 inches there. We can always chop it off. So let's just go 40 inches and we'll work from there. So we'll measure 40 inches. Now we need two of these. We're gonna go side by side on these. Now, in theory, you could just set this on here and measure another one. However, it'll be uneven by the width of a ballpoint pen or a pencil head. Whatever you're using. If you're using a pencil, it'd probably work. But to get them exactly the same, we'll go ahead and measure it out again and we're going to put these two together. You want to go opposing grain anytime you're putting two pieces of wood together. So if you can see here on these boards, both of them are going like that. That's a bad idea to put those together. There's a high potential of that warping over time because the grain is running both ways. If you put them opposing, the grain will be fighting against itself and it should stay straight for its lifetime or at least a lot longer. And now you've got grain fighting each other. However, I don't like that fit, so let's try the backside. Okay, that's much better. There's a little bit of cup in the center, but I want those edges tight. I don't want that to be rocking. Let's go ahead and get us some 3 inch screws and a Torx bit. You could use Phillips head screws. Torx. Torx bits a lot better, in my opinion. But if you just have Phillips head, go for it. I had a box of them. Wonder where I put those. I guess we're going to use these. All right. So upon further examination, I can't find my Torx screws, so I'm going to use Phillips. I don't really like Phillips, but if this is all you've got, this is all you've got. Of course, Josh will have what we need because he always does. I'm going to show you something just real quick. Make sure that you have the exact right bit for the head, because that's where most people fail. They're like, oh, a Phillips is a Phillips. No, it's not the case. You got to have that fit super tight in there or you'll strip out. And then you got to make sure that you use a conscious effort to keep your drill straight and a steady pressure to make a Phillips work for you. They don't drive as well as Torx head, so let's. Let's use them. That'd be a negative ghost rider. I hate impacts. What I'm going to do. I'm just going to flush this up. This doesn't have to be exactly perfect. The better you get it, of course, the better. We did a fantastic job on cutting these so they're perfectly even. We're just going to flush these up all pretty. And then sometimes, like when you have soft wood like fir or pine, it wants to squirrel around on you. So we're gonna just put some quick clamps on there so it don't move. You do have one. Oh, that'll work perfect. So we'll just go down here. I'm gonna keep in mind where we're gonna bore our holes. So we don't want to put a screw there because we'll just end up having to take it back out. So once you have that clamped and flushed up, we're going to just quick measure that number that you guys all remember was 15 and a quarter. So we don't want to put a screw there. And then 21 up from that. We don't want to put a screw there. So about right here, we don't want to put a screw. I contemplated gluing this together and you can do it if you want to, just for efficiency and time. We're not going to do it today. We're just gonna screw it. But if you want it to be a little bit better, more weather impervious, go ahead and glue it. We'll probably have to grind these off when they come out. These are a little bit long, but that's not a big deal. Want to stay away from the end just a little bit because you don't want to split it out. Those drive surprisingly well. Never put screws in a line. You do that, you're creating a weak spot. I'm sinking those a little bit too deep. Now we can unclamp it. And let's go ahead and put enough screws in here because we want this to be pretty strong. We're just going to beef this thing up about every six to eight inches. We do want plenty of strength right around where we put the peg bin. There's going to be a peg there. So I'm going to go on either side of that. Take a look at that. So we got just a few of them coming out. We'll just file those because in case some people don't have an angle grinder. What a mess. Somebody don't clean their workbench. Okay, that's not as pretty as an angle grinder, but some people may not have one of those. And you can pick up a File pretty much anywhere. And yes, this is an old file. I would not do this to a bow file. So this is going to go on here like this. Okay. So I made my first mistake. It didn't take into account for that base plate. Might end up having to move screws now. Trying to build it so fast. I didn't think about my base plate. So we got to come an inch and a half down off of this. And Murphy's law dictates that's gonna hit right on the screws. I'm sure it will. Inch and a half. I mean. I mean dead center. Dead center. I mean you couldn't get any closer. It's just gonna right on the screws. That's beautiful. Nature is so beautiful. So we'll back those out. Phillips screws once they've been driven once. They do not like to be driven again. There. I made a classic mistake of putting them in line. So we'll back that over. Put another one in here to reinforce that. Okay. Yes. There's a. There's a screw through that one. So. Awesome. Go ahead and move that over. This is the conduit we're going to use for our pegs. This is pretty heavy wall conduit. I think this would be considered 1 inch conduit. But the ID is the 1 inch. The OD is a little bit bigger. So we're looking at about just under an inch and 3. 16. Or like Nick would say an inch and three little marks. Let's go find us a paddle bit that fits that. Some of these you can't trust. I always measure bits. That's a one and a quarter. And see, that's a little bit big. We may be stuck with that. Boy, that's going to be close. The hole saws have a set to the teeth. So sometimes they cut bigger and that's too big. So I think we're gonna be stuck with an inch and a quarter paddle bit. That's just gonna be too big. Man. We gotta find an inch and 3. 16. Wow. I think we're gonna have to go over to my dad's and get one. Honestly don't know if dad's gonna have. If he doesn't have one, what we're gonna do is we're gonna put an inch and a quarter in the mill and we're gonna take my angle grinder to it and we're just gonna make it work. See, like here's an inch and an eighth. That's close. We might take that. Negative. Nada. Jiminy Christmas. Well, we may have to modify one unless there's like sets of them back here somewhere. I know what is back here. You want one? I need to make me like a bit organizer, man. That's close. That's it, man. I wouldn't want to take any more off that. All right. So now normally I would do this with my mill or drill press, but most people aren't going to have that. Let's go ahead and quickly mark out our holes here, there, and then got 3 and 3 8, half of 3 and a half is 1 and 3 quarter. So we'll drop off of that a 16. So we'll go 1 11, 16. This isn't that critical that these are perfect. You can always double check yourself and that's correct. Let's do a trial with this bit on a screw scrap. That's a little bit big. I think I'm going to take this one down just a little bit more. Only a bowyer could make drilling a simple hole complicated. Oh, yeah, I like that. It'll go with a little persuasion from our good friend the hammer. I normally would do this with a drill press, but most people won't have a drill press or a mill. So we're just going to do this to freehand it. It's not super critical, but you want to have it pretty straight. So you just. You got to just keep looking at it as you're drilling that. You have it at a 90 there and then look over here and then just back and forth constantly to get that hole straight. So when you come through, you want to ease off on the pressure. A paddle bit is going to blow it out somewhat, but you can ease off on the pressure and come through and not blow the bottom out quite as much. That's a pretty nice hole right there. Yeah, that's going to work great. Let's do the other one. I'm going to mark six inches from that side. That's our six inch block. And then we're going to go to three and a half right here and mark those across. So that's how that's going to be. This is our block. It's going to go right here. That's actually perfectly square right there. So that's kind of the basic concept of our stringer. And if you were building this out of steel, you of course could knock that down lower. If you only shoot really short recurves or longbows, you could lower this way down here and drop the whole thing. But this is kind of just showing you, you know, if you do shoot 68 inch bows or you know, if you need that extra length. The last thing we're going to do before we fasten it all together is make our cross beam. So we have to have support coming down here to distribute that weight. So that's a 45 degree angle there. We went a 45. That kind of uses up our stomp. Plate. Plate. I'm thinking we'll just go like this. 37 and three quarter. Now on this one we got to have our blade on the other side. This is not a problem. So I said 37 and three quarter. We'll put that at one inch. Losing my mind. Here. I got my pen. Huh. Now when you're cutting with a circular saw, you noticed I was going like this. You can use this because this is square. Whenever you're cutting straight cuts. You cannot do that here. Well you can. It's a lot more difficult. You just have to be mindful of that because it's got to be a square cut here. This up. That looks good. Now we have to pre drill this. Cannot screw into the top of something like this without pre drilling it. So let me get a bit. So we kind of want to just drill in line with this. So there's a hard grain right there. But it doesn't really matter. That's just a countersink bit. You can pick those up at Home Depot. And then we'll do one of those on this side too. Just going to stay off of that rolled edge a little bit. Now I'll square this up just a hair. Now we'll drive some screws up through the bottom here. Alright. Let's set this guy up. We're just going to kind of let it be where it wants to be. And I'll stay off that rolled edge just like I did on the bottom. Now we're going to have to drill a couple holes here. We'll start with the smaller bit. We'll probably just put a couple in there. And then we'll move to a longer bit. Some length in there. It's in there a little bit. Not as much as I'd like. Really? That's really solid already. So now I'm just going to move this over till it's square. And that's perfectly square right there. Grab a hammer. See? No, I want that flush. That looks good. So we'll go ahead and pre drill here and back onto here. Really coming together now. My guy. That's looking great. Got your place for your foot and you've got this. A guy could drill this and Put like a lag bolt in there. I've got like three or four screws in that one and it's never going anywhere. We do have to fasten that to the bottom, though. That's actually what I need to do first. Let's cut our pegs. We want it to go all the way through there. I say we go three inches. Well, that's three. So overall, let's just go six inches. Everybody has a hacksaw. Not everybody has an angle grinder. So we're just going to go ahead and cut this with a hacksaw. We could. We'll just cut it with a hacksaw because they're cheap. Everybody can have one of those. Unless your mom said you can't have one. Mama says no. Everybody's in trouble. My favorite hacksaw right here, the Lenox. Just watch that cut as it progresses. Make sure you're going straight. Once you have it cut. I'm going to grab some 120 paper and we're just going to ease that edge. We don't want a sharp edge on there. Be careful doing this because you can get really cut up. So then I'm going to go in here. This is where it gets really dicey. You don't want to get cut. Okay, that's a nice edge. Do the same thing to this. That'll work. That is perfect. All right, let's do one more. Perfect. We'll put us a little block right up against there real quick. And you can make this so much nicer if you wanted to take time for it. We're just whipping it together here. Just to show you the basic concept of it. We do have professional ones that go in the tow hitch of your pickup for sale on our website, but they're kind of pricey, so we just wanted to show guys how to make their own. Go ahead and drill these. Most people that watch this could build a better stringer than this. Taking their time. So I'm going to start these and then I'm going to go ahead and put some tension on this. That's going to put a lot of pressure right up against there. Okay, almost ready. This is an old T shirt. What we're going to do. We want to wrap those pegs. Doesn't have to be that precise. In fact, if it hangs over a little bit, that's good. Mark along here about three inches or so. So the point of this is just to protect your bow. We're just going to wrap this around here. You can make this a lot more Professional. If you so choose. Alright, we'll do one for the bottom. Okay. You know, it's just a little wobbly. It works. But let's go ahead and put like a little cross beam across here. You wouldn't have to do that. It works without it. We'll just set this on here. Just kind of eyeball it in. When I just stand right there and I'll drive some screws in here. How's that? Oh yeah, that's real sturdy. Now let's give it a whirl. So this is a bow that I was working on this week. It's 85 pound longbow. And let's see what this straight does for me here. So I'm putting my foot up here. That works really nice. Kind of stabilizes it so it strings it effortlessly. 85 pounds right there. Let's try it on this recurve bow here. Oh yeah. Lovely. Okay. It works great, guys. And we were thinking, you know, there's endless possibilities with building something like this for your archery range or your archery club. You could take something like this. You could mount it right here. Even a bigger one. Put your arrows in there. You could build onto the side of it. You could have bow bow racks on it. Go sit it out. Put it out by your shooting range. Couple two by fours, a short section of two by six and you're good to go. You wouldn't even have to have the two by six. We just put it on there for a little bit extra weight distribution on the bottom and you could change it up any way you thought would work better than this. So there you have it. The 2x4 bow stringer from Great Plains. Thanks for watching, guys.
More from Pro







Choosing a Traditional Bow for Beginners | Custom or Amazon? | Which is Right for you?


Vintage Bow Restoration | Ben Pearson BP-H52 | Very Twisted Limb, Bad Finish, Holes in Riser

