Streamlining Digital Product Creation with Orchids by embodee | embodee | PI Apparel
Wilitza Vázquez and Ben Sosinski demo Orchids, a cloud platform for 3D fashion design that lets teams worldwide apply colors and materials to digital models without physical samples. A kids-wear brand pilot cut variant production from ten days to two and reduced physical samples by 400 in four months.
Chapters
First of all, thank you everybody for joining our session and our case study presentation today. As a quick introduction, my name is Wilitza Vázquez. I go by Will. I'm the Director of Business at Embodi, and there's my colleague, Ben Sosinski, the VP of Product. As a quick introduction, Embodi has been providing web-based solutions for the fashion industry since 2008. Originally, we were focused on customization solutions and found a niche in big team sports apparel brands. Yet in the last decade, we discovered that despite the big interest and the big need to move towards a digital product creation process, big companies, small companies, and every company was really struggling to get there. And that there were many challenges to be overcome when trying to do that. And that's why in 2018, '19, we designed the Orchids Web Platform. And what we aim to do is help brands, retailers, manufacturers, suppliers, everybody involved in the process to make a better use of their 3D investments and work better, faster, and more efficiently. Today, we're gonna be presenting one of our most successful stories and teaching you what's working and what's not working in the industry right now. If I were to have to summarize Orgids in one sentence, I would say it's an online platform that allows you to bring all of the stakeholders in the design process together to work around 3D assets regardless of their discipline. So it enhances collaboration and sharing. The platform excels in 4 areas mainly. We say one of them is DAM+. It's a digital asset management tool Plus, and we call it Plus because it's plus 3D. It allows the users to mix and match 2D and 3D assets, share and collaborate around those assets. Number 2, it's an easy and fast 3D variant creation tool. And what it means is that it allows different people from many different backgrounds to work on 3D assets and design them by placing colors, materials, prints, and graphics on those assets easily and quickly regardless of their discipline. Number 3, it's a sharing and publishing tool that will allow you to then take those assets to the outside world. That could mean e-commerce, marketing materials, and many others. And last but not least is a 3D file size optimization tool that would then allow you to share those assets to many digital outlets. As I said, marketing material, social media, and the metaverse. So with that, I'll leave you with Ben Sosinski. He will be showing the case study and our demo to basically show how all of this happens. Ben, take it away.
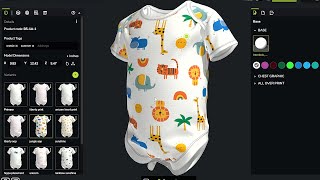
Thank you. Can everyone hear me? I guess so. Sounds pretty good. Let me get this going here. I'm about to jump in. All right. So I have a case study here to present to you guys today that I think will hopefully resonate with many of you. It has to do with a customer of ours named Norlanka. And Norlanka is a vertically integrated service bureau, and they have headquarters in Sri Lanka and also offices in London. So at the headquarters, they have a large factory. They have a large group of technical designers and fashion designers and visual designers as well working together for their customers. And then in London, they have a group there of designers as well that's facilitating their European customers. And so they're a split group. Norlanca services many brands around the world. And they started a 3D journey back in 2019. So they started this journey primarily for the reasons that many, many people start this journey for, primarily to reduce the physical samples, to— to manage construction issues at the beginning of the design process rather than further downstream, and to better communicate with their customers and to bring their customers into the design arena. And so once they got started, they got some people trained on the 3D authoring tools. They're using just the best of the breed. And they noticed very quickly that 3D wasn't scaling at their organization. So why was that? Why was that? So primarily, it was because of the limited number of people that actually knew the 3D authoring tools. 3D authoring tools are amazing. They just do amazing things, the drape and the pattern making and being able to design on top and create beautiful renderings. But they're very technical and they're hard to learn. And so in this case, only a few people knew it. And actually, in their case, only one person really dug deep and got to know the 3D authoring tools inside and out. So this guy is a really, really good technical designer, great pattern maker, and they really wanted him to focus on fashion and creating silhouettes. But really what his job ended up being is to take designer requests, because he's not really a designer, a visual designer himself, so he's not really interested in the colorways. He's interested in the shape. So the designers are hitting him over the head all day long. Asking him to create renderings for them. Can you take this print? Here's the print file. Can you take this print, put it on this garment, and make sure you line it up this way, and drawing arrows, and sending emails back and forth to make sure. And then he would do that for them. And then you'd get one design variant out of that. And then there would be another one, and another one. And all day long, he was just spending there being really a rendering monkey so they could actually create these renders so they could put them in presentations and send them to their customers for validation and approval. And it just didn't scale. So they found out pretty soon that what they were doing with customer presentations is having a mixed breed of 2D, their old process, and some 3D, but not really gaining any of the benefits that 3D was offering them. So they came to us and they said, hey guys, can you help us with this? And so the way that Orchids is helping them— and I'll show you a demo here to actually see this in action— is first capitalizing on 3D assets created by their technical designers. So the way that they do this— and this is This is a good example here, if you can look at the image. Well, first, they found a customer. They wanted to pilot orchids to begin with. They needed to find a customer that was willing for a process change. All right? Easier said than done, but they found one. OK? And this customer happened to be a kids' wear brand, and very open to working in a new way. They were just not happy with the old way of working. So they kicked it off. And this image here in this slide kind of shows you the old process versus the new process. So here we have basically 2D outlines of patterns that are used basically in Illustrator. And they're kind of templatized. They don't really reference exactly the pattern shape at all. And they can get out of date very easily to the actual garments being created. So what they would do is— put their graphic and prints on top of these 2D designs in Illustrator, and then create their presentations for the customer after that. And what would happen after this process was that they can make some decisions on what looks good and bad, but they really, really needed to have a physical— the customer needed to have a physical sample in their hands to be able to make true, true decisions with. So what the 3D allowed them to do, since they were outputting the 3D files directly from the authoring tool that were based on the actual patterns of the product, of the style, they could then, in Orchids, being a web-based platform, have designers come in and put their prints and graphics on top of the 3D model, which is actually using the real pattern pieces behind the scenes. So when the customer were looking at these in 3D, not only could they spin the product around and see it at all angles, and that's what people visualize, but they actually knew that the graphics placed on the patterns were done in true scale. And they actually— created the physical samples out of these and put them side by side. And they found out that, hey, you know what? I can actually make real decisions based on this imagery. So Orchids, being a web-based platform, allowed them, the designers from anywhere in the world, from London or Sri Lanka, to be able to design directly on top of the 3D models. So this really sped up the digital product creation workflow. And it reduced the dependency on physical samples. And the nature of web platforms has just your typical— I mean, this isn't rocket science. It's just being able to create, share models much more easily than they were before. So you can create a link very easily, send it in an email out to somebody. They can take a look at the design. They can give feedback. And they can collaborate easier using just standard commenting tools and commenting threads on the 3D models themselves via the web. So that's really, really how they really started to— to gain some speed and some scale within the process. So this next slide here just shows what a traditional product, a digital product creation workflow looks like. And everyone's different, and this doesn't represent everybody, of course. But really, it's here just to show the linearity— I think that's the word— of the process. You start with your designers and your technical designers. And they create the patterns, and you start to create the physical samples. And then in the meantime, you have some 2D, maybe some graphic or artwork designers working on some of the assets. And they're using Illustrator. And they're trying to combine them both. And if there's ever an issue or a problem or a suggestion, it kind of has to fall back downstream and kind of work its way all the way up the pipeline again. And then you start talking about marketing and having their say and has to work its way back and upstream again. And eventually, it takes a long time, but eventually things work out. And you get a model to put on some— some clothes and take pictures. And finally, you can get up to the retail and e-commerce spaces and actually take the product to market. But in the new world, maybe with something like Orchids, Orchids is the hub. And because it's web-based, anyone from around the world can actually log in and contribute. So you can have your technical artists, you can have your visual artists come together in the same place. Then merchandiser can come in before maybe the head designer or senior management comes in. But in the Norlanka use case, it was really the customer that made the difference. A difference. They could come in, they can log into the platform, they can see the design process as it was happening and catch problems along the way and be able to raise her hand, write some comments, and get the things changed very rapidly and quickly. So this kind of just illustrates how having a hub at the center of things and having it be web-based can really help move the process along. So the results are here. This is, again, this is after the very first pilot. So these are the results they found with their very first implementation. Of using Orchids in their pipeline. It was a 5-time increase in productivity. Where do we get that number? It's the next one, 250 variants created in 2 days. So those are separate visual variants using examples here of what they are, just prints and graphics. They were able to do that in 3D in 2 days versus 10 days, which was what the old process was doing. It takes less than a day for anyone within the platform to get trained within Orchids. It's simply— it's just— it's a simple solution. It's simpler than many of the other tools out there. So they were able to do that in about 5 hours. It takes to learn about 80% to 90% of the platform. And then the extra bit is a little bit more than that for the people that really need to get technical in the platform, but most people don't. So generally, it's about a 5-hour training time to get people. So it lowers the barrier and it gets people excited about using it. We all know process change is super, super hard, especially when you're working with customers and all, people from around the world. So that's been a target of ours since the inception. And then the last but not least is, in a 4-month period during the first implementation, 400 less physical samples. So from a sustainability perspective, this really, really succeeded in this pilot. And so since the pilot, they've really expanded this out to more and more customers, getting them on board. They've been able to show examples of it working, which gets people excited and more willing to do the process changes. They have moved forward. So with that, why don't I, I can kind of give you a little bit of a demo on how this all works using Orchids. So here it is, all right? So Norilanca has been kind enough to give us some assets of their own to use during this presentation. But here it is, it's again, I've said it for, I don't know, 10 times, a web-centric platform. There's no software to install. And let me actually do this and get full screen. Makes it look a little better. Here we go. So this is just a simple grid wall of products, right? And we have standard ways to organize the products and folders. I mean, tagging, search, sharing, things like that here at the product level. Over here in the top left is a product line. So this has been allowed someone like Norlanca to create different product lines and invite their customers to a particular product line, and then create other product lines for their different customers. So they can make sure that customer A is not getting into customer B's product line to see their designs. It's just a simple siloing type of methodology. Within the product lines, you have 3D models. You have a library over here on the left. And these consist of colors, materials, prints, and graphics. And then a group of users as well, like I just mentioned. All right. So behind each of these products, we'll take you— whoops, I don't want to go to that one. I want to go to another one. So I want to take you to another one. Clicked on the wrong one. Here we go. This one here. All right. So once we go into a product, we come to the Create tab. Now, I just want to hit everyone over the head with the fact that Orchids is not a 3D authoring tool. We do not— develop the 3D geometry. We are taking the geometry from the 3D authoring tool and primarily use— the use case that Norilanca is using it for is for carryovers. Why carryovers? Because carryovers don't take a lot of nip and tucks. They've been there for a long time. They've been sold to numerous brands for years, potentially. So they know that the geometries themselves, the actual shape isn't going to change. So they can use this to help scale and take the technical designer responsible for creating these geometries and have him focus on new stuff, rather than creating the designs and the 3D authoring tools. So they've been able to take these models and upload them to the platform. Now, we generally request— suggest that you start white. So you just start blank, essentially. And you can see that this product here has quite a bit of texture. To it. But the Create tool, the Create tab that we're in right here, actually gives you the ability to create variants and save the variants, right? So here we have several variants over here on the left of different print options that designers have uploaded and laid on top of these geometries. All right? So here, it gives the customer a chance to come in, zoom. You can see the level of detail. Actually see how that print is going to look on top of this fabric. We have different color options over here, for instance. These colors are coming from the color library that are stored over here on the left, so they can be reused from product to product, and they're accurate from product to product as well. And then we can do simple things like be able to visualize, potentially, let me pick a different print here. So let me come down to the prints, and let me create my own variant. So I'll come here to a simple heart shape. Let's see, isn't this cute? And then we'll come here and we can see, for instance, a different graphic on top of this design. And I can go over here and create my own, or I can actually lay my own graphic on this product. So here I can upload from my own device, or I can go to my library and I can pick a graphic from my library. So I'm going to— here I'm going to pick— Let's say this, I don't know, this one here. Stay Magical, who wouldn't want that? This one's coming upside down, so I can just quickly rotate it and get it right side up. And I can just simply drag it here. I can zoom in to make sure that it's in the correct location. And over here I can, I have my pattern piece, right? There we go. And I can actually see my pattern here, I can have guidelines to make sure it's measuring a certain distance from the top of the garment. And I can really get detailed on this and actually look at my scale here and know exactly the scale of these graphics. So further downstream to my factory, I can actually start sending this information if these variants are approved by the customer. All right, so I'm going to go here and apply this placement. And let's say this is the design that I like. It's hard to read against that print, but I think people get the idea. So blue with graphic. And I can just create this variant. And it takes a few seconds for it to generate the assets. And once it does, we get it down here at the bottom of the list. These can be reorganized. Here we go. Put it in order. We have commenting tools that we can use to write comments on the product, and so on and so on. I love this print. And these comments follow along with the model. And this is the way that people use the platform to communicate. We have rendering tools down here. We can create single snapshots up to 4K to use in presentations. We can download quick turntables of the product to use in presentations. And we also, as Wellitza mentioned, have a DAM portion of the product as well. So we can upload files to this product. So for instance, we can bring in tech packs. We can bring in PDFs, Excel spreadsheets, BOMs, things like that, and store this information along with the product. And last but not least, we can actually share this product very easily, again, web-based. So we can actually quickly share this. Once I click the Share tab up there, it actually publishes the model and all of its assets out into the cloud. And then you can just very rapidly generate links that then you can share. You can send an email, say, hey, check out this product. Check out the variants. Tell me what you think. They get a 3D model within their browser, and they can spin it around and play with it. There's no need for training because it's just— it's very simple. They've seen this type of interaction before. And it's very simple to find out. They don't even have to know what orchids is. So these are the kind of tools that Norilanca was using with their customer and internally to share design. So what are some other things that you can actually use with these variants? So we have an area over here called Spaces. And Spaces are a freeform infinite whiteboard. That's what we like to call it. If you've ever used a platform like Miro, it's very, very similar. Basically, this is infinitely scalable. So you can add as many— I made a big deal out of bringing my mouse up here, and then I forgot it, and this trackpad's kind of— crummy, so I apologize for that. But you can use these boards for just tons of different use cases. So in this case, I might have a board where I have inspirational imagery, and I start bringing in the variants from around the platform and laying them out here for my customer to see. Okay. So we have tools like being able to add files and product variants. Files can be really any file that you you can think of. So you can bring in ZIPs, you can bring in PDFs, you can bring in DXF files. You can all associate all these files along with your 3D models here in this board to keep things organized and keep things, you know, shareable and, and whatnot. So it's a very convenient way to be able to produce presentations. Adding and bringing in a product variant is simple as going here, going to the the one that I was using, which I believe was this one. And then this gives us a list of all of the different variants. Here's that one that I created. Maybe I want to do another one. Maybe I want to bring them in at a quarter view. So I'm bringing in two here. There we go. And then I can just scale them down and bring them in as part of the presentation. All right, it's easy as that. So what this does that's maybe a little different than Miro, though, is that it links— there's a link between the boards, the presentation boards, and the 3D models themselves. So if I wanted to maybe change this product, change this product variant, I can actually go to it here in the board. I can have the customer come here and say, you know what? This blue isn't really working for me. Maybe we can make it orange. They can simply go to the product, make a change themselves. We'll just simply make it, I don't know, maybe a— this different green here, and that variant's highlighted. I can just resave this variant and then head back to the board and see the update in real time. So this keeps anywhere that this variant is used with any of your boards, you see it down here, that update, that it will update within all your boards. So you're keeping your variants, you're keeping your designs in sync across all your different presentations. And so, So this is really truly how they scale their digital pipeline, primarily in regards to 3D. That's pretty much it. So I think it's time for questions if anybody has them. You're on the screen. Look up. There they are. There they are. There they are. Aha. Just a few. Good. Good. I'm glad. Here we go. Is there ability to build rules around— the answer there is yes. So ability to build rules around the colors that can be applied to which materials. So we have a rules section here, for instance. So what I didn't go into detail here were the different tabs over here along the left of the Create tab. These are what we call our setup tabs. One of our setup tabs that we have is componentization. This is the ability to take different meshes or different pattern pieces within a product and be able to combine them into different categories or groups. So you can then apply a color. Maybe you want, in this case, you want both sleeves to turn red when you update the sleeves within a product. So that's one. That's a very, very simple type of rule. But if you want to get down to the, the material type, we actually have a material library here. So if I wanted to add a different material to this product, I can simply click on this plus button, and we actually have integration with Swatchbook. If you're familiar with Swatchbook, if you have a Swatchbook account, you can log into Swatchbook and get access to all of your 3D materials there and just rapidly plop them on products. Now, you won't get a different drape. The drapes are handled in 3D authoring tool, but that that there can actually create a lot of visual guidance and information on how that material is going to use. If you need a different drape, yes, you have to go back to the 3D authoring tool, but it really can take you quite far here. And so we provide a material library that you can use from ours, or you can upload your own materials from your own 3D authoring tools or just libraries like SwatchBook. Now, the question was about rules. So we also have a Rules tab here, which can provide if-then statements for the product. So if you can say you give a rule title, rule number 1, this could be particular colors that could be associated with materials. So you can use these if-then statements, conditional statements, to be able to produce the rules you need to be able to handle that exact scenario.
Yep.
Long-winded answer, but got it for you. Can you upload robust material files like AXF. So today, so the answer here is yes. So we support out of the box U3M. That's a standard that we support. But at any point, you can actually upload your own material. You can start from blank, and then you can bring in your maps from that particular material. So any material in that case could be supported in that way. And we're planning on expanding out more and more there as well as time goes on. Um, does the system have— allow for PLM integration? So this is API-based. If there's a PLM that you need integration with, talk to us and we'll start to get that working with the particular PLM API base. So the idea around PLM integration is typically, hey, I have materials, I have colors, I have prints and graphics that are actually stored in the center of truth which is the PLM. So the APIs are designed to be able to sync assets between the PLM and Orchid so you can actually store those in one area and make sure that those assets are actually synced here. When a PLM is involved, we don't consider ourselves the center of truth. The PLM is always the center of truth. But we help facilitate the design work that can be done there. And so we want to be able to sync those libraries primarily. What systems encryption is in place for intellectual property? I mean, basically standard is just basic login and password protection. The encryption, I'm not exactly sure what is in place there. But we are very particular about making sure that people are— IP is important. We're making sure that people that people are not actually logging in to other people's product lines. So people are managed here in the People tab or the Users tab. We'll leave this design. Let me come here. And you can invite— you basically invite people to particular product lines to ensure that people aren't seeing other people's work. And then any other questions? I hope that answered that. Any other questions there? I thought I saw one more. Ah, what color files does the system accept? We accept ASE files. That's the main way to be able to get colors into the platform. But really, any color can be brought in. We have— I'll take you to the color library here. So this is the color library. You can bring in as many colors as you want and create palettes of the colors here within the color library. If you click the plus here, you can import an ASE file. This is just obviously from Illustrator or whatnot. Bring in all the colors there. Or you can actually create your own here and just type in a color name and add simple RGB values here to be able to create that color. Once that color is stored in the library, it can be added to any palette that you have. Here we just have a few set up. But yeah, they can be used on any product within that product line. And there we go. Is that it? Another one. Great.
Hi.
Hi. Hi. Hey, how are you? Quick question to this. Can you upload multiple ASEs to showcase a color under different illuminance? Knowing that a color might flare from illuminant to illuminant. That's a deep one right there. That's good. That's 3 ASCs associated with the retailer. Yeah, that was a show-off question. I'm sorry. So let me, let me show you this really quickly. So every— any ASC file you can bring in will create its own palette for that particular ASC file. So you can imagine keeping separate maybe lighting scenarios intact But what we also have at the product level, this starts to get deeper into what we call our Look Dev tools, look development tools, to make sure that the colors can actually pop in the correct way that they're supposed to, is we have the ability to actually edit files on a particular material for a particular product. So for instance, let me just change the color. Nope, sorry. I'm not really super familiar with this product, so let me get to it here. Where are my colors on this product? Oh no, where are they? This is colorizable. Here they are. So for instance, if I bring in a tan or whatnot, let me bring here— what's this changing the color of? Uh-oh. Next chatbot. Oh shoot, very last question. I'm getting stumped on the podium, my favorite. I don't know. Yeah, I'll do it. I don't know. If the answer is yes, I believe you. Yeah, I know. I just want to show it. Here we go. There we go. So here's the color so I can actually see them on the product. So let's take this sky blue. We actually have the ability to edit this color on the model using these values over here on the right. And what this is doing is it's just adjusting the color for that particular product, and that particular material, and that particular lighting. And it's not overriding that color at the library level. So you can make sure that your colors, if they're Pantone or whatever, are staying intact in your library. But sometimes when you bring in different colors for different products, materials, they just do not look correct until you start to do a little bit of adjusting. And it usually takes somebody with a really good eye in color to be able to get that adjustment. So we have those tools there to be able to do that for particular presentations. Yeah, absolutely. Yes, you can do it just right here. Yeah. Yep. Yep.
What do you mean by the color's not correct?
What do I mean by— so in the 3D world, color has a lot to do with the type of light that is being shown on that product. So it's not that the color itself is not correct. It's that visually, once you add in the material and the color of the light and the intensity of the light, the brightness of that light, that color can actually get a little bit off to what you would rather it be as you present it back to to a customer. So that's what I mean by colors being incorrect. Yeah. Mm-hmm.
Can you provide a sneak peek to the lighting settings?
The what?
Lighting settings.
Yeah. Yeah, I can do that. So yeah, we have a Scenes tab here as well. So we have different standard lighting here. We have 3-point. We have a list here that you can go through to get maybe an effect that you would like— dramatic, backlit, even fill, harsh front. And we can adjust that lighting here, just here within the browser to get something that might look correct to you for a particular scenario. We also have IBL. It's called IBL, image-based lighting. So in this case, you'll take a background image like this beach sunrise, for instance. I'll show the background. And it actually takes the lighting from the image and projects it onto the product. And in this case, in this scenario here, I'm taking that image that's producing this light. And you can see as I rotate my product, you can see how the light kind of changes around the product. Or if I do this and just rotate the product within the scene, you can see this isn't the best example. But that light will— it's coming from the sunset over here on the left-hand side of this image. And it will project on that. On that product the way it should. And you can see how the shadows change as I rotate the model within that lighting scene. But in this case, I'm using both an environment lighting and artificial lighting at the same time to be able to get a particular look that I'm looking for.