3 Easy Descript Tricks (for Faster Edits)
Ross Zeiger shows three ways to edit faster in Descript: use the AI assistant with a saved prompt template for rough cuts, turn styled scenes into reusable layout packs, and master keyboard shortcuts for timeline work. He includes a cheat sheet and emphasizes how reusable assets save time on future projects.
Chapters
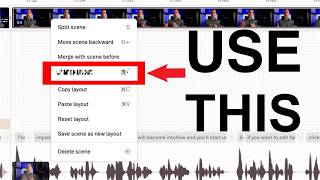
One of the reasons that Descript is the best video editing platform for beginners is how fast you can go from raw video to published. But there are a few tricks that if you don't know about them, you're unnecessarily wasting hours with every single project. So in this video, I'm going to show you 3 tricks that once you learn them and start using them will cut your editing time in half, if not more. The first tool I'm gonna show you is how to have AI do the rough cut of your video for you. To do that, come to this button in the bottom right corner that says Underlord. This is like the assistant, the AI assistant for your videos, and it pulls up a chat interface. So this is something that you can talk to just like ChatGPT if you've ever used that before. So you can type in here in plain English what you want it to do, but there's a very specific way to do this so that you don't break your videos. If you just let it run free, it might do unpredictable things to your video. So I actually maintain a Word document where I keep my prompts. And the way that I typically do this is I give it a role. So in this case, I say, you are a professional video editor doing a simple and quick first pass. And then I give it steps in bullet points. So I say, step number 1, apply studio sound and reduce intensity to 80%. And so on. And then at the very end, I give it an outcome, which is a video with cleaned up audio, silences and bad takes removed. And layout applied. So what I'm going to do is just copy this whole thing, select it all, copy. I'm going to come back to my Descript project, to my raw video, and I'm going to paste that all in to the chat interface here. And I'm going to hit send. And it says, thinking, starting plan. And by the way, if you have a preferred AI, if it's one of the big ones like Claude Sonic, Claude Opus, GPT, that's ChatGPT, or Gemini, you can choose those here in Descript and use the AI that you like best. And you can see it's working as I go, and it's just telling me its plan, and I can review it. And if there's things I don't like about it, I can tell it to make changes. And I can even click on this thing that says style direction, and I can choose a layout pack for how I want my video to look. And I'm actually gonna be talking about layout packs later in this video, but for now I'm gonna choose this one called Helsinki Blueberry. I'm going to hit apply changes and it said, got it, updated plan with the new layout pack. And I'm just going to say go and it's going to start working on it. And if I click on this little thing right here, it shows me what it's working on as it's doing it. And I can see in my video, it just cut off the 30 seconds or so of silence before I actually start speaking. And I can see it's starting to make cuts and you can even see on the transcript, the stuff that it struck out and it's done. It says all done. Here's a summary of what was applied. Studio Sound set to 80%. Let's just check its work. I'm gonna click on my video. Studio Sound is indeed applied and it is indeed at 80%. So it did that well. And by the way, I always recommend to do this, especially when you're first using AI, because there's things that it's good and it can handle, but it can't do everything. And by the way, with any command that I've given AI, I can always undo it by clicking this revert button next to that command. So I could undo up to this last one. Or I could come up to the previous one and revert, and it'll undo my changes up to that last step. And there's also times where it says it did something, but it didn't actually. So that's why I'm checking all this. It tells me the gain is normalized, and sure enough, the audio's at 100%. And so I would go through and just check everything that it said it did and verify. Now, right off the bat, I can see that it cut a lot of my intro, which is supposed to be in there. So what I'm going to do with that in mind, that it messed that up, is I'm going to go back to my prompt and I'm going to refine this. So for next time when I run this, it's going to be that much better. It's going to be that much more fine-tuned to what I want it to do. In the case of retakes, leave in the best take. If in doubt, choose the last take. So now that I've refined this a bit, I'm going to copy this, copy my new prompt. And I'm going to come back to Descript, but what I'm going to do now is come to this button right here, and that's going to clear out the entire chat history. And I'm going to click on Browse Templates, and then I'm going to click on New Template. And this is going to allow me to paste in my prompt that I just refined. And here's all of my instructions that I have for this rough cut task. I'm going to hit continue. It automatically gives it a name. AI called it Polished Podcast. Quick Edit template and a description of it. I can upload a thumbnail if I want, so when I'm later going to find this particular template, I could have a thumbnail for it. I can give it tags and I can choose if it's private, shared with Drive, or shared publicly, which I'm gonna go ahead and do. And I'm gonna share this exact prompt with you in the description of this video. And then I'm gonna hit publish. And now the next time I'm doing a rough cut on a video, I'll I'll click on Browse Popular Templates, and then I'll come to where it says All Templates, and I'll say Created by Me, and I'll find my particular one called Polished Podcast Quick Template. I'll say Use Template, and that just dropped in that entire prompt, and Underlord is now editing my video according to my instructions. Now that you know that, let me show you how you can make certain edits once and reuse them over and over across projects. For example, maybe you have a title card like this that always comes out in every video. I'm gonna show you how to make it one time so that you can apply it with the click of a button in every future video. The feature you're about to learn is called a layout, and it's something that you make one time and then you can save it and apply it to future videos, swapping out placeholder elements like changing the text or changing an image. And so I'm gonna first play a scene that I want to turn into a layout. So I'm gonna hit play. Going to evaluate these two in 5 categories to help you determine which one's better for your video. So what I want to capture with this is this right here. So this style of text with this font and this animation where the words are coming on one letter at a time, I don't want to create that again. I want to be able to apply this to future videos. So how do I do that? I come down. To the scene right here. This is scene number 4. I right-click on it and I can say save scene as new layout. Click on that. And then over here on the right side, you can give it a name. So I'm gonna call this coming up text because this is what I use to introduce what I'm gonna talk about in this video. Type, I'm gonna call this list. Save to, this is where you can select a layout pack or make a new one. So I'm gonna click on create new layout pack. I'm going to give it a name. I'm going to call this Descript Mastery Layouts, and you can make it private, meaning only you can see it, share it with a Drive, meaning if you have other editors in your Drive, they can also see it, or you can share it publicly, which I'm going to go ahead and do. And I'm going to leave the link to this layout pack in the description of this video. Then I'll hit continue. And you can see there's different layers here. So for every layer in this current scene, I have a couple options. If I click on this check mark next to it, I can say keep content, which means that the exact text that's in there is exactly what's gonna get applied to the video. Or I can say use placeholder, and that is going to make it so that this text gets replaced in the context of the video I apply it to. And then same thing with the script. I can put in exactly the video as it is, or I could leave it out and have no video at all. Or I could say use placeholder, meaning it's gonna get replaced by the video when I go to apply this. So I'm gonna click Create Pack and Save, and it's now been saved. It tells me there on the bottom right corner. Now I'm gonna go to a video I want to apply this to, which is the video you're watching right now. 3 tricks that once— So right where I wanna apply it, I put in a scene with a forward slash, and then I click on the scene rail up here. I say Change Layout, and over on the right side, the first thing that opens up is the one that I just created. Descript Mastery layouts, and there's my list. There should be a preview there, but it hasn't finished processing yet. So in a few minutes there'll be a preview of the layout that I just made. But for now I'm gonna click on it and there we go. There's the text layer that just dropped in and you can see the text changed. This text was generated by AI based on the video that I'm applying it to. And so that's exactly how you do it. I made this one time, I saved it, and now I can use it forever because I like this style. And I don't have to reinvent the wheel every single time. Now I know that was fast and layouts is one of the most complex things you can do in Descript. So if you want to go deeper on this, I have a layouts course on Udemy that you can sign up for for free for the first 100 people. 35 spots already taken at the time of recording, but I'll leave the link to get this for free in the description of this video. Now that you know that, I'm going to show you how to edit your videos in a fraction of the clicks. I'm talking about Keyboard shortcuts, also known as hotkeys. Let's say I want to get rid of this 5-second gap right here. I'm going to show you how I could do it using just the mouse and then how I can do it way faster with hotkeys. So the mouse way is to right-click. There's one click. And then I come up to Split. There's a second click. I come to the end of my silence. That's another click. I right-click again. I split clip, and then I click on the isolated piece, I right-click, and I say delete. That was a lot of clicks. I'm gonna hit undo until I'm back to where I started. What I could alternatively do is press R on my keyboard, and that puts me into the range tool. And now I highlight the range I want and I press delete. Two movements and it took maybe 4 seconds versus closer to 16 on the clicking only method. So I'm going to teach you just a couple hotkeys that are going to save you a ton of time. If you come to the timeline tools right here, these are your most important tools for using the timeline. The default is the A tool, and rather than coming in here every single time and choosing it, if you need to switch to it, you can press A. And every single feature that has a hotkey in Descript will have the hotkey right here. Next, you can press H for the hand tool, B for the blade tool, R for the range tool— that's the one I demonstrated— and Y for the slip tool. And if you don't know what those are, check out the video in the top right corner of your YouTube window where I go into each of those. Another super useful thing to know about is the play button. If you press the spacebar, it starts to play, and if you press it again, it pauses it. The other critical thing you need to know about is let's say I make a change and I didn't mean to make that edit. The most valuable tool in an editor's toolkit is the undo button, which you can come up here and click on it. And that undid my last action. Or with my hand already on the keyboard, I can press Command+Z on a Mac keyboard and that undid my last action. On Windows, it'll be Control+Z. I'm also gonna link to a document with a cheat sheet that I have with the most important hotkeys in Descript. So this is something that you can reference or print print out and post next to your computer, and it's gonna save you a ton of time in your edits. If you're feeling overwhelmed right now, you're not alone. The first time you see something, it's intimidating. So I encourage you, take a break, then come back and watch this video again. Then implement what you've learned and watch it a third time. These skills will become intuitive and you'll start using them without even thinking about it. So if you want to edit faster and better, Click right here to see my entire beginner's playlist to go from beginner to pro videos.








