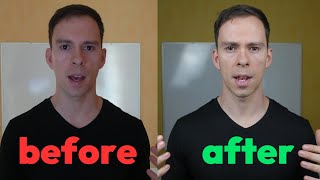
Lighting is the cheapest way to fix your video quality. The speaker shows four setups: natural light, a Lume Cube battery light, a ring light, and softboxes at 45 degrees. Position your light source in front of your face and you'll see the difference immediately.
Lighting can make a bad camera look great. I'm talking to you right now on my computer's built in Webcam. It's a 1080p webcam built into a MacBook Pro. And people always ask me, how do you look so good on zoom calls? And the answer is, I'm using probably the same camera you are. But I have lighting. So watch what happens when I turn these lights off. Suddenly I look very dark, very grainy, and it looks a lot worse, but it's the same camera. Here's lights on again. So I'm going to show you in this video some of the different options and how you can make your videos a lot better. The simplest solution and the solution that won't cost you a penny is natural lighting. This is me standing in front of a window with the natural light coming through. But watch what happens when I put it behind me. Suddenly I look very dark and shadowy and the light source is behind me. So it's important that your light source be in front of you for best results. And it's going to vary based on the time of day. Maybe you look great in the morning sun, but you don't look great in the afternoon. Or you can play with the curtains. The curtains will have a different type of a different level of diffusion of how it diffuses the light into the room. But the natural light source is a great source if you can use it. The next step up from natural lighting is something like this Lume cube here. You can get these pretty inexpensively on Amazon. And this one is just a battery powered little simple light. And you can change the warmth of it from blue to yellow, and you can change how bright it is. And the battery lasts several hours, does a great job. And it's got this little suction cup, this little thing right here that you could put onto the back of your computer. And then this could just go right above your webcam and light your face like this. So that's the simplest option and pretty inexpensive. Next would be something like a ring light. And this one I got on Costco and It was like 30 bucks, also not expensive. And it has a nice round diffused light, so it can light up your face like this. A lot of makeup influencers use this and a lot of just TikTok people in general use this. But this came with a tripod as well. So you can just mount this somewhere. You can change how high it is. And as with my Lume light, you can change the warmth of it so you can have kind of more of a yellow or a blue or a white color and change how intense the light is. So this is a great option for a home studio. So right now I have in front of me two softbox lights. So this is what it looks like on my face. And with two lighting, two lights, you want to have them offset at about 45 degrees to either side of you as well as up about 45 degrees. So this is what it looks like directly onto my face. And if I turn around, this is what they look like behind me. And these have tripods, and they look like this. They have kind of this soft material behind them and this screen in front of it that diffuses the light. And these for a pair of them, were about $50 on Amazon, including the tripod. So these aren't expensive and they can make you look great. Now that you have a basic understanding of the different types of lighting that are available to you, you're going to want to watch this video next to learn more about cameras.